tVerifyEmail
Verifies and formats email addresses against patterns and regular
expression.
tVerifyEmail
verifies if email addresses comply with specific rules and corrects addresses that do not
match the rules by using the content from specific columns.
Depending on the Talend solution you
are using, this component can be used in one, some or all of the following Job
frameworks:
-
Standard: see tVerifyEmail Standard properties.
The component in this framework is available when you have subscribed to one of
the Talend Platform products or Talend Data
Fabric. -
Spark Batch: see tVerifyEmail properties for Apache Spark Batch.
The component in this framework is available when you have subscribed to any Talend Platform product with Big Data or Talend Data
Fabric. -
Spark Streaming: see tVerifyEmail properties for Apache Spark Streaming.
The component in this framework is available only if you have subscribed to Talend Real-time Big Data Platform or Talend Data
Fabric.
tVerifyEmail Standard properties
These properties are used to configure tVerifyEmail running in the Standard Job framework.
The Standard
tVerifyEmail component belongs to the Data Quality family.
The component in this framework is available when you have subscribed to one of
the Talend Platform products or Talend Data
Fabric.
Basic settings
|
Schema |
A schema is a row description. It defines the number of fields (columns) to |
|
|
Built-In: You create and store the |
|
|
Repository: You have already created |
|
Edit Schema |
Click Edit schema to make changes to the The output schema of tVerifyEmail has different read-only
VerificationLevel: provides you with the verification –VALID: means that the email address comply with the defined –INVALID: means that the email address does not comply with the –CORRECTED: means that the input email does not comply with the –VERIFIED: means that the email address does exist at the domain. –REJECTED: means that the email address does not exist at the domain.
Suggested_Email: provides you with a suggested content |
|
Column to validate |
Select from the list the column you want to validate with tVerifyEmail. |
|
Check the entire email with regular expression |
Select this check box if you want to match the complete email address against a specific
Complete regular expression: enter the regular expression This match is done as a first step to optimize the matching process and exclude addresses |
|
LOCAL Part Options |
Fields in this section will vary according to what option you select. “LOCAL part” in an –Use regular expression: enter in the Pattern field the expression against which you want to check the –Use simplified pattern: enter in the Pattern field the simplified pattern against which you want to check –Use column content: use the fields in this view to –Enable case-sensitive pattern matching: select this |
|
DOMAIN Part Options |
Fields in this view will vary according to what option you select. –Check the Top-level Domains and the following ones: –Check domains with a black list: select this option to –Check domains with a white list: select this option to |
|
Check with mail server callback |
Select this check box to enable the verification of email addresses by With this technique, the mail server verifies the complete address It is not advisable to enable the SMTP verification when you have a The following is a list of cases when the SMTP verification will not – When the mail server requires authentication, – When the mail server has a security policy that may put your IP put – When the mail server is taking too long to reply (time out), – Any other unexpected exception generated by the mail server. In all these cases, the component results will only take into account |
Advanced settings
|
tStatCatcher Statistics |
Select this check box to gather the Job processing metadata at the Job level |
Global Variables
|
Global Variables |
ERROR_MESSAGE: the error message generated by the A Flow variable functions during the execution of a component while an After variable To fill up a field or expression with a variable, press Ctrl + For further information about variables, see |
Usage
|
Usage rule |
This component is usually used as an intermediate component, and it requires an |
Scenario: Verify email addresses against column content and domain names
This scenario applies only to a subscription-based Talend Platform solution or Talend Data Fabric.
This scenario describes a Job which uses:
-
the tFixedFlowInput component to generate the
email addresses to be analyzed, -
the tverifyEmail component to format the email
addresses through
Talend
email API, -
the tFileOutputExcel component to output the
formatted addresses in an .xls file.

Setting up the Job
-
Drop the following components from the Palette onto the design workspace: tFixedFlowInput, tVerifyEmail and
tFileOutputExcel. - Connect the three components together using the Main links.
Configuring the input component
-
Double-click tFixedFlowInput to open its
Basic settings view in the Component tab.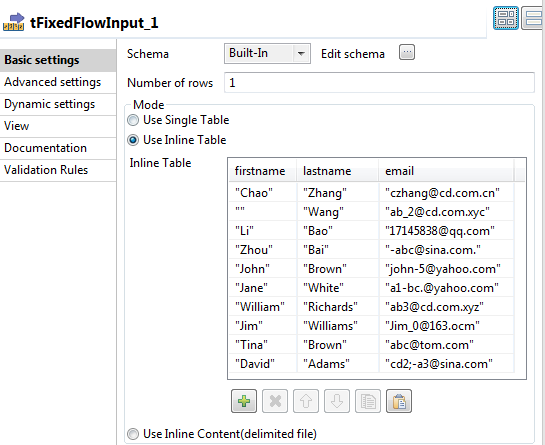
-
Create the schema through the Edit Schema
button.In the open dialog box, click the [+] button
and add the columns that will hold input address data. For this example, add
firstname, lastname and
email. - Click OK.
-
In the Number of rows field, enter
1. - In the Mode area, select the Use Inline Table option.
-
In the Inline table, use the [+] button to add lines to the table and then enter the
address data you want to analyze.
Verifying and formatting email addresses
-
Double-click tVerifyEmail to display the
Basic settings view and define the component
properties.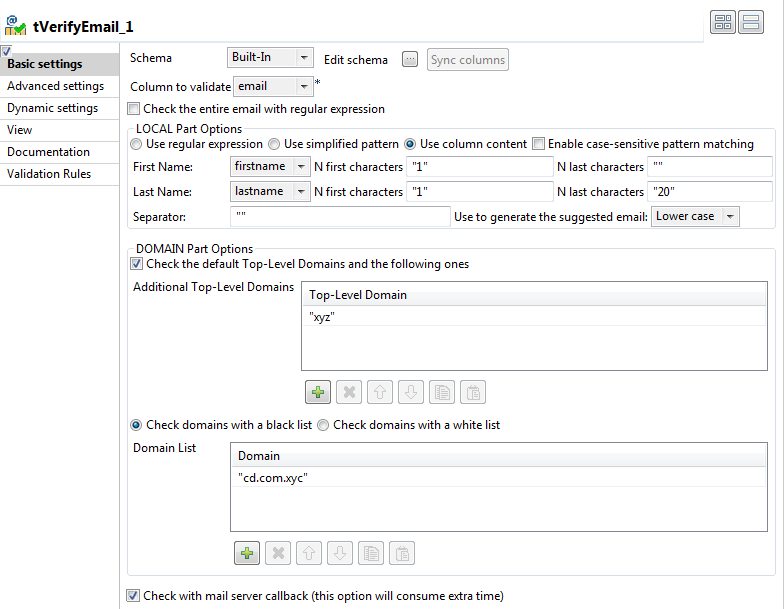
-
If required, click Sync columns to retrieve
the schema defined in the input component. -
Click the Edit schema button to open the
schema dialog box.tVerifyEmail proposes predefined read-only
address columns as shown in the below capture. The VerificationLevel column returns the
verification status of input email addresses. The SuggestedEmail column returns a suggested content for the email part
before the @ sign. This column is shown in the output schema only if you select
theUse column content option in the Local Part Options section. For further information about
output columns, see tVerifyEmail Standard properties. -
Move any of the input columns to the output schema if you want to show them in
the verification results, click OK and accept
to propagate the changes. -
From the Column to validate list, select the
email column. -
In the LOCAL Part Options section, select the
Use column content option.In this example, you want to check the email part before the @ sign to see if
it starts with the first letter of the first name followed by the family name,
all in lower case. If the local part does not match what you have defined,
tVerifyEmail will rewrite it by using the
parameters you define. -
In the DOMAIN Part Options, select:
-
the Check the default Top-level Domains and the
following ones check box and define in the table the
additional top-level domain against which you want to validate email
addresses. -
the Check domains with a black list
check box and define in the Domain list
table the domain to consider as black listed.
-
-
Select the Check with mail server callback
check box to enable the mail server to verify the complete address and accept or
reject the email.
Configuring the output component and executing the Job
-
Double-click the tFileOutputExcel component
to display the Basic settings view and define
the component properties.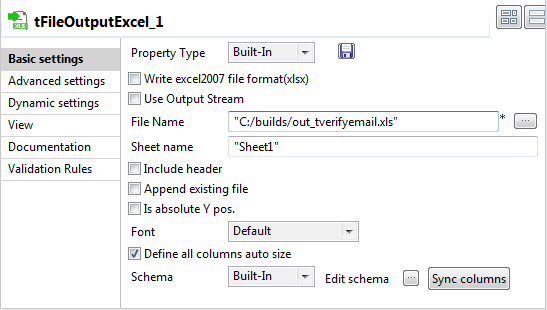
-
Set the destination file name as well as the sheet name and then select the
Define all columns auto size check box. -
Save your Job and press F6 to execute
it.The tVerifyEmail component analyzes email
addresses and corrects those that do not match what you have defined in the
local and domain part options. -
Right-click the output component and select Data
Viewer to display the formatted email addresses.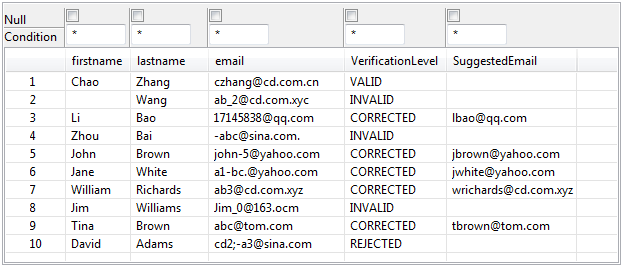 tVerifyEmail matches input addresses against
the rule you set in the LOCAL part options
section and the parameters you set for the domain names.The VerificationLevel output column returns
the status as VALID, INVALID,
CORRECTED and REJECTED according
to what you set/selected in tVerifyEmail basic
settings.All email addresses labeled as CORRECTED have a suggested
address in the SuggestedEmail output column.
tVerifyEmail properties for Apache Spark Batch
These properties are used to configure tVerifyEmail running in the Spark Batch Job framework.
The Spark Batch
tVerifyEmail component belongs to the Data Quality family.
The component in this framework is available when you have subscribed to any Talend Platform product with Big Data or Talend Data
Fabric.
Basic settings
|
Schema |
A schema is a row description. It defines the number of fields (columns) to |
|
|
Built-In: You create and store the |
|
|
Repository: You have already created |
|
Edit Schema |
Click Edit schema to make changes to the The output schema of tVerifyEmail has different read-only
VerificationLevel: provides you with the verification –VALID: means that the email address comply with the defined –INVALID: means that the email address does not comply with the –CORRECTED: means that the input email does not comply with the –VERIFIED: means that the email address does exist at the domain. –REJECTED: means that the email address does not exist at the domain.
Suggested_Email: provides you with a suggested content |
|
Column to validate |
Select from the list the column you want to validate with tVerifyEmail. |
|
Check the entire email with regular expression |
Select this check box if you want to match the complete email address against a specific
Complete regular expression: enter the regular expression This match is done as a first step to optimize the matching process and exclude addresses |
|
LOCAL Part Options |
Fields in this section will vary according to what option you select. “LOCAL part” in an –Use regular expression: enter in the Pattern field the expression against which you want to check the –Use simplified pattern: enter in the Pattern field the simplified pattern against which you want to check –Use column content: use the fields in this view to –Enable case-sensitive pattern matching: select this |
|
DOMAIN Part Options |
Fields in this view will vary according to what option you select. –Check the Top-level Domains and the following ones: –Check domains with a black list: select this option to –Check domains with a white list: select this option to |
Global Variables
|
Global Variables |
ERROR_MESSAGE: the error message generated by the A Flow variable functions during the execution of a component while an After variable To fill up a field or expression with a variable, press Ctrl + For further information about variables, see |
Usage
|
Usage rule |
This component is used as an intermediate step. This component, along with the Spark Batch component Palette it belongs to, appears only Note that in this documentation, unless otherwise |
|
Spark Connection |
You need to use the Spark Configuration tab in
the Run view to define the connection to a given Spark cluster for the whole Job. In addition, since the Job expects its dependent jar files for execution, you must specify the directory in the file system to which these jar files are transferred so that Spark can access these files:
This connection is effective on a per-Job basis. |
Related scenarios
No scenario is available for the Spark Batch version of this component
yet.
tVerifyEmail properties for Apache Spark Streaming
These properties are used to configure tVerifyEmail running in the Spark Streaming Job framework.
The Spark Streaming
tVerifyEmail component belongs to the Data Quality family.
The component in this framework is available only if you have subscribed to Talend Real-time Big Data Platform or Talend Data
Fabric.
Basic settings
|
Schema |
A schema is a row description. It defines the number of fields (columns) to |
|
|
Built-In: You create and store the |
|
|
Repository: You have already created |
|
Edit Schema |
Click Edit schema to make changes to the The output schema of tVerifyEmail has different read-only
VerificationLevel: provides you with the verification –VALID: means that the email address comply with the defined –VALID: means that the email address comply with the defined –INVALID: means that the email address does not comply with the –INVALID: means that the email address does not comply with the –CORRECTED: means that the input email does not comply with the –VERIFIED: means that the email address does exist at the domain. –REJECTED: means that the email address does not exist at the domain.
Suggested_Email: provides you with a suggested content |
|
Column to validate |
Select from the list the column you want to validate with tVerifyEmail. |
|
Check the entire email with regular expression |
Select this check box if you want to match the complete email address against a specific
Complete regular expression: enter the regular expression This match is done as a first step to optimize the matching process and exclude addresses |
|
LOCAL Part Options |
Fields in this section will vary according to what option you select. “LOCAL part” in an –Use regular expression: enter in the Pattern field the expression against which you want to check the –Use simplified pattern: enter in the Pattern field the simplified pattern against which you want to check –Use column content: use the fields in this view to –Enable case-sensitive pattern matching: select this |
|
DOMAIN Part Options |
Fields in this view will vary according to what option you select. –Check the Top-level Domains and the following ones: –Check domains with a black list: select this option to –Check domains with a white list: select this option to |
Global Variables
|
Global Variables |
ERROR_MESSAGE: the error message generated by the A Flow variable functions during the execution of a component while an After variable To fill up a field or expression with a variable, press Ctrl + For further information about variables, see |
Usage
|
Usage rule |
This component, along with the Spark Streaming component Palette it belongs to, appears This component is used as an intermediate step. You need to use the Spark Configuration tab in the This connection is effective on a per-Job basis. For further information about a Note that in this documentation, unless otherwise |
| Spark Connection |
You need to use the Spark Configuration tab in
the Run view to define the connection to a given Spark cluster for the whole Job. In addition, since the Job expects its dependent jar files for execution, you must specify the directory in the file system to which these jar files are transferred so that Spark can access these files:
This connection is effective on a per-Job basis. |
Related scenarios
No scenario is available for the Spark Streaming version of this component
yet.