tAggregateRow
Receives a flow and aggregates it based on one or more columns.
For each output line, are provided the aggregation key and the relevant
result of set operations (min, max, sum…).
tAggregateRow helps to provide a set of metrics based on values or
calculations.
Depending on the Talend
product you are using, this component can be used in one, some or all of the following
Job frameworks:
-
Standard: see tAggregateRow Standard properties.
The component in this framework is available in all Talend
products. -
MapReduce: see tAggregateRow MapReduce properties (deprecated).
The component in this framework is available in all subscription-based Talend products with Big Data
and Talend Data Fabric. -
Spark Batch:
see tAggregateRow properties for Apache Spark Batch.The component in this framework is available in all subscription-based Talend products with Big Data
and Talend Data Fabric. -
Spark Streaming:
see tAggregateRow properties for Apache Spark Streaming.This component is available in Talend Real Time Big Data Platform and Talend Data Fabric.
-
Storm: see tAggregateRow Storm properties (deprecated).
This component is available in Talend Real Time Big Data Platform and Talend Data Fabric.
tAggregateRow Standard properties
These properties are used to configure tAggregateRow running
in the Standard Job framework.
The Standard
tAggregateRow component belongs to the Processing
family.
The component in this framework is available in all Talend
products.
Basic settings
|
Schema and Edit Schema |
A schema is a row description. It defines the number of fields Click Edit
This This |
|
|
Built-In: You create and store the schema locally for this component |
|
|
Repository: You have already created the schema and stored it in the |
|
Group by |
Define the aggregation sets, the values of which will be |
|
|
Output Column: Select the column Ex: Select Country to calculate an average of values for |
|
|
Input Column: Match the input |
|
Operations |
Select the type of operation along with the value to use |
|
|
Output Column: Select the |
|
Function: Select the operator among:
|
|
|
|
Input column: Select the input |
|
|
Ignore null values: Select the |
Advanced settings
|
Delimiter(only for list |
Enter the delimiter you want to use to separate the |
|
Use financial precision, this is the max |
Select this check box to use a financial precision. This Warning:
We advise you to use the BigDecimal type for the |
|
Check type overflow (slower) |
Checks the type of data to ensure that the Job doesn’t |
|
Check ULP (Unit in the Last Place), ensure |
Select this check box to ensure the most precise results |
|
tStatCatcher Statistics |
Check this box to collect the log data at component level. Note that this |
Global Variables
|
Global Variables |
ERROR_MESSAGE: the error message generated by the A Flow variable functions during the execution of a component while an After variable To fill up a field or expression with a variable, press Ctrl + For further information about variables, see |
Usage
|
Usage rule |
This component handles flow of data therefore it requires |
Aggregating values and sorting data
students’ comprehensive scores and then sort the aggregated scores based on the student
names.
Creating a Job for aggregating and sorting data
Create a Job to aggregate the students’ comprehensive scores using the
tAggregateRow component, then sort the aggregated data
using the tSortRow component, finally display the
aggregated and sorted data on the console.

-
Create a new Job and add a tFixedFlowInput component, a tAggregateRow component, a tSortRow
component, and a tLogRow component by typing their
names in the design workspace or dropping them from the Palette. -
Link the tFixedFlowInput component to
the tAggregateRow component using a Row > Main
connection. -
Do the same to link the tAggregateRow
component to the tSortRow component, and the
tSortRow component to the tLogRow component.
Configuring the Job for aggregating and sorting data
using the tAggregateRow component and then sort
the aggregated data using the tSortRow
component.
-
Double-click the tFixedFlowInput
component to open its Basic settings view. -
Click the

button next to Edit schema to
open the schema dialog box and define the schema by adding two columns, name of String type and score of Double type. When done, click OK to save the changes and close the schema dialog box. -
In the Mode area, select Use Inline Content (delimited file) and in the Content field displayed, enter the following input
data:123456789101112131415Peter;92James;93Thomas;91Peter;94James;96Thomas;95Peter;96James;92Thomas;98Peter;95James;96Thomas;93Peter;98James;97Thomas;95 -
Double-click the tAggregateRow
component to open its Basic settings view.
-
Click the
button next to Edit schema to
open the schema dialog box and define the schema by adding five columns, name of String type, and sum, average, max, and min of
Double type.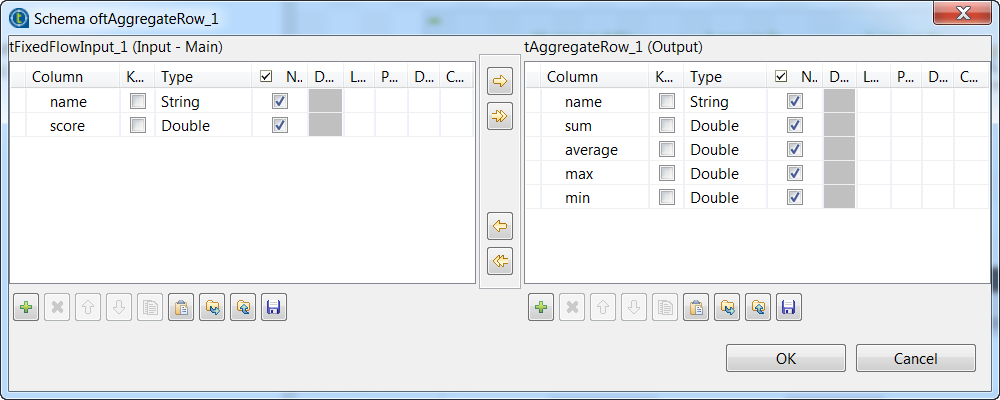 When done, click OK to save the changes and close
the schema dialog box. -
Add one row in the Group by table by
clicking the
button below it, and select name from both the Output column
and Input column position column fields to group
the input data by the name column. -
Add four rows in the Operations table
and define the operations to be carried out. In this example, the operations are
sum, average, max, and min. Then select score from all four Input column
position column fields to aggregate the input data based on
it. -
Double-click the tSortRow component to
open its Basic settings view.
-
Add one row in the Criteria table and
specify the column based on which the sort operation is performed. In this example,
it is the name column. Then select alpha from the sort num or
alpha? column field and asc from
the Order asc or desc? column field to sort the
aggregated data in ascending alphabetical order. -
Double-click the tLogRow component to
open its Basic settings view, and then select
Table (print values in cells of a table) in the
Mode area for better readability of the
result.
Executing the Job to aggregate and sort data
After setting up the Job and configuring the components used in the
Job for aggregating and sorting data, you can then execute the Job and verify the Job
execution result.
- Press Ctrl + S to save the Job.
-
Press F6 to execute the Job.

aggregated and then sorted in ascending alphabetical order based on the student
names.
Aggregating values based on dynamic schema
based on a dynamic schema column.
This scenario applies only to subscription-based Talend products.
Creating a Job for aggregating values based on dynamic schema
Create a Job to aggregate some task assignment data in a CSV file
based on a dynamic schema column using the tAggregateRow component, then display the aggregated data on the console and
write it into an output CSV file.

-
Create a new Job and add a tFileInputDelimited component, a tAggregateRow component, a tLogRow
component, and a tFileOutputDelimited component by
typing their names in the design workspace or dropping them from the Palette. -
Link the tFileInputDelimited component
to the tAggregateRow component using a Row > Main
connection. -
Do the same to link the tAggregateRow
component to the tLogRow component, and the
tLogRow component to the tFileOutputDelimited component.
Configuring the Job for aggregating values based on dynamic schema
Configure the Job to aggregate some task assignment data in a CSV
file based on a dynamic schema column using the tAggregateRow component.
Then this Job displays the aggregated data on the console
using the tLogRow component and writes it into an
output CSV file using the tFileOutputDelimited
component.
-
Double-click the tFileInputDelimited
component to open its Basic settings view. -
In the File name/Stream field, specify
the path to the CSV file that holds the following task assignment data, D:/tasks.csv in this example.1234567task;team;statustask1;team1;donetask2;team2;donetask3;team1;donetask4;team2;pendingtask5;team1;pendingtask6;team2;pending -
In the Header field, enter the number
of rows to be skipped in the beginning of the file, 1 in this example.Note that the dynamic schema feature is only supported in the Built-In mode and requires the input file to have a
header row. -
Click the
button next to Edit schema to
open the schema dialog box and define the schema by adding two columns, task of String type and other of Dynamic type. When done, click OK to save the changes and close the schema dialog box.Note that the dynamic column must be defined in the last row of the schema. For
more information about dynamic schema, see
Talend Studio User
Guide. -
Double-click the tAggregateRow
component, and on its Basic settings view, click
the Sync columns button to retrieve the schema from
the preceding component.
-
Add one row in the Group by table by
clicking thebutton below it, and select other from both the Output column
and Input column position column fields to group
the input data by the other dynamic
column.Note that the dynamic column aggregation can be carried out only for the grouping
operation. -
Add one row in the Operations table
and define the operation to be carried out. In this example, the operation function
is list. Then select task from both the Output column
and Input column position column fields to list the
entries in the task column in the grouping result. -
Double-click the tLogRow component to
open its Basic settings view, and then select
Table (print values in cells of a table) in the
Mode area for better readability of the
result. -
Double-click the tFileOutputDelimited
component to open its Basic settings view, and in
the File Name field, specify the path to the CSV
file into which the aggregated data will be written, D:/tasks_aggregated.csv in this example. -
Select the Include Header check box to
include the header of each column in the CSV file.
Executing the Job to aggregate values based on dynamic schema
After setting up the Job and configuring the components used in the
Job for aggregating the task assignment data based on a dynamic schema column, you can then
execute the Job and verify the Job execution result.
- Press Ctrl + S to save the Job.
-
Press F6 to execute the Job.

the other dynamic column, and the aggregated data
is displayed on the console and written into the output CSV file.
tAggregateRow MapReduce properties (deprecated)
These properties are used to configure tAggregateRow running in the MapReduce Job framework.
The MapReduce
tAggregateRow component belongs to the Processing family.
The component in this framework is available in all subscription-based Talend products with Big Data
and Talend Data Fabric.
The MapReduce framework is deprecated from Talend 7.3 onwards. Use Talend Jobs for Apache Spark to accomplish your integration tasks.
Basic settings
|
Schema and Edit |
A schema is a row description. It defines the number of fields Click Edit
|
|
|
Built-In: You create and store the schema locally for this component |
|
|
Repository: You have already created the schema and stored it in the |
|
Group by |
Define the aggregation sets, the values of which will be used for |
|
|
Output Column: Select the column Ex: Select Country to calculate an average of values for each |
|
|
Input Column: Match the input |
|
Operations |
Select the type of operation along with the value to use for the |
|
|
Output Column: Select the |
|
Function: Select the operator among:
Some functions that are available in a traditional ETL Job, such as first or last, are not available in MapReduce Jobs because these functions does not make sense in a distributed environment. |
|
|
|
Input column: Select the input |
|
|
Ignore null values: Select the |
Advanced settings
|
Delimiter(only for list operation) |
Enter the delimiter you want to use to separate the different |
|
Use financial precision, this is the max precision for |
Select this check box to use a financial precision. This is a max Warning:
We advise you to use the BigDecimal type for the |
|
Check type overflow (slower) |
Checks the type of data to ensure that the Job doesn’t |
|
Check ULP (Unit in the Last Place), ensure that a value |
Select this check box to ensure the most precise results possible |
Global Variables
|
Global Variables |
ERROR_MESSAGE: the error message generated by the A Flow variable functions during the execution of a component while an After variable To fill up a field or expression with a variable, press Ctrl + For further information about variables, see |
Usage
|
Usage rule |
In a For further information about a Note that in this documentation, unless otherwise |
Related scenarios
No scenario is available for the Map/Reduce version of this component yet.
tAggregateRow properties for Apache Spark Batch
These properties are used to configure tAggregateRow running in the Spark Batch Job framework.
The Spark Batch
tAggregateRow component belongs to the Processing family.
The component in this framework is available in all subscription-based Talend products with Big Data
and Talend Data Fabric.
Basic settings
|
Schema and Edit |
A schema is a row description. It defines the number of fields Click Edit
|
|
|
Built-In: You create and store the schema locally for this component |
|
|
Repository: You have already created the schema and stored it in the |
|
Group by |
Define the aggregation sets, the values of which will be used for |
|
|
Output Column: Select the column Ex: Select Country to calculate an average of values for each country |
|
|
Input Column: Match the input column |
|
Operations |
Select the type of operation along with the value to use for the |
|
|
Output Column: Select the destination |
|
Function: Select the operator among:
Some functions that are available in a traditional ETL Job, such as first or last, are not available in Spark Jobs because these functions does not make sense in a distributed environment. |
|
|
|
Input column: Select the input column |
|
|
Ignore null values: Select the check |
Advanced settings
|
Use financial precision, this is the max precision for “sum” |
Select this check box to use a financial precision. This is a max Warning:
We advise you to use the BigDecimal type for the output in |
|
Check type overflow (slower) |
Checks the type of data to ensure that the Job doesn’t crash. |
|
Check ULP (Unit in the Last Place), ensure that a value will |
Select this check box to ensure the most precise results possible for |
Usage
|
Usage rule |
This component is used as an intermediate step. This component, along with the Spark Batch component Palette it belongs to, Note that in this documentation, unless otherwise explicitly stated, a |
|
Spark Connection |
In the Spark
Configuration tab in the Run view, define the connection to a given Spark cluster for the whole Job. In addition, since the Job expects its dependent jar files for execution, you must specify the directory in the file system to which these jar files are transferred so that Spark can access these files:
This connection is effective on a per-Job basis. |
Related scenarios
For a related scenario, see Performing download analysis using a Spark Batch Job.
tAggregateRow properties for Apache Spark Streaming
These properties are used to configure tAggregateRow running in the Spark Streaming Job framework.
The Spark Streaming
tAggregateRow component belongs to the Processing family.
This component is available in Talend Real Time Big Data Platform and Talend Data Fabric.
Basic settings
|
Schema and Edit |
A schema is a row description. It defines the number of fields Click Edit
|
|
|
Built-In: You create and store the schema locally for this component |
|
|
Repository: You have already created the schema and stored it in the |
|
Group by |
Define the aggregation sets, the values of which will be used for |
|
|
Output Column: Select the column Ex: Select Country to calculate an average of values for each country |
|
|
Input Column: Match the input column |
|
Operations |
Select the type of operation along with the value to use for the |
|
|
Output Column: Select the destination |
|
Function: Select the operator among:
Some functions that are available in a traditional ETL Job, such as first or last, are not available in Spark Jobs because these functions does not make sense in a distributed environment. |
|
|
|
Input column: Select the input column |
|
|
Ignore null values: Select the check |
Advanced settings
|
Use financial precision, this is the max precision for “sum” |
Select this check box to use a financial precision. This is a max Warning:
We advise you to use the BigDecimal type for the output in |
|
Check type overflow (slower) |
Checks the type of data to ensure that the Job doesn’t crash. |
|
Check ULP (Unit in the Last Place), ensure that a value will |
Select this check box to ensure the most precise results possible for |
Usage
|
Usage rule |
This component is used as an intermediate step. This component, along with the Spark Streaming component Palette it belongs to, appears Note that in this documentation, unless otherwise explicitly stated, a scenario presents |
|
Spark Connection |
In the Spark
Configuration tab in the Run view, define the connection to a given Spark cluster for the whole Job. In addition, since the Job expects its dependent jar files for execution, you must specify the directory in the file system to which these jar files are transferred so that Spark can access these files:
This connection is effective on a per-Job basis. |
Related scenarios
For a related scenario, see Analyzing a Twitter flow in near real-time.
tAggregateRow Storm properties (deprecated)
These properties are used to configure tAggregateRow running in the Storm Job framework.
The Storm
tAggregateRow component belongs to the Processing family.
This component is available in Talend Real Time Big Data Platform and Talend Data Fabric.
The Storm framework is deprecated from Talend 7.1 onwards. Use Talend Jobs for Apache Spark Streaming to accomplish your Streaming related tasks.
Basic settings
|
Schema and Edit |
A schema is a row description. It defines the number of fields Click Edit
|
|
|
Built-In: You create and store the schema locally for this component |
|
|
Repository: You have already created the schema and stored it in the |
|
Group by |
Define the aggregation sets, the values of which will be used for |
|
|
Output Column: Select the column Ex: Select Country to calculate an average of values for each |
|
|
Input Column: Match the input |
|
Operations |
Select the type of operation along with the value to use for the |
|
|
Output Column: Select the |
|
|
Function: Select the operator |
|
|
Input column: Select the input |
|
|
Ignore null values: Select the |
Advanced settings
|
Delimiter(only for list operation) |
Enter the delimiter you want to use to separate the different |
|
Use financial precision, this is the max precision for |
Select this check box to use a financial precision. This is a max Warning:
We advise you to use the BigDecimal type for the |
|
Check type overflow (slower) |
Checks the type of data to ensure that the Job doesn’t |
|
Check ULP (Unit in the Last Place), ensure that a value |
Select this check box to ensure the most precise results possible |
Usage
|
Usage rule |
If you have subscribed to one of the The Storm version does not support the use of the global variables. You need to use the Storm Configuration tab in the This connection is effective on a per-Job basis. For further information about a Note that in this documentation, unless otherwise explicitly stated, a scenario presents |
Related scenarios
No scenario is available for the Storm version of this component
yet.