tAmazonAuroraInput
Reads an Amazon Aurora database and extracts fields based on a query.
tAmazonAuroraInput executes a database query with a strictly defined
order which must correspond to the schema definition. Then it passes on the field list
to the next component via a Row >Main
link.
tAmazonAuroraInput Standard properties
These properties are used to configure tAmazonAuroraInput
running in the Standard Job framework.
The Standard
tAmazonAuroraInput component belongs to the Cloud and the Databases families.
The component in this framework is available in all Talend
products.
connector. The properties related to database settings vary depending on your database
type selection. For more information about dynamic database connectors, see Dynamic database components.
Basic settings
| Database |
Select a type of database from the list and click |
|
Property Type |
Either Built-In or |
|
|
Built-In: No property data stored |
|
|
Repository: Select the repository file |
|
Use an existing connection |
Select this check box and in the Component List click the relevant connection component to Note: When a Job contains the parent Job and the child Job, if you
need to share an existing connection between the two levels, for example, to share the connection created by the parent Job with the child Job, you have to:
For an example about how to share a database connection |
|
Host |
Type in the IP address or hostname of the Amazon Aurora |
|
Port |
Type in the listening port number of the Amazon Aurora |
|
Database |
Type in the name of the database you want to use. |
|
Username and Password |
Type in the database user authentication data. To enter the password, click the […] button next to the |
|
Schema and Edit schema |
A schema is a row description. It defines the number of fields This This |
|
|
Built-In: You create and store the schema locally for this component |
|
|
Repository: You have already created the schema and stored it in the |
|
|
Click Edit
|
|
Table Name |
Type in the name of the table to be read. |
|
Query Type and Query |
Enter the database query paying particularly attention to the
If using the dynamic schema feature, the SELECT query must |
|
Guess Query |
Click the button to generate the query which corresponds to the |
|
Guess schema |
Click the button to retrieve the schema from the table. |
|
Specify a data source alias |
Select this check box and specify the alias of a data source created on the This check box disappears when the Use an existing connection check box is selected. |
|
Data source alias |
Type in the alias of the data source created on the This field appears only when the Specify a data source alias check box is selected. |
Advanced settings
|
Additional JDBC parameters |
Specify additional connection properties for the database This field disappears when the Use |
|
Enable stream |
Select this check box to enable streaming over buffering which |
|
Trim all the String/Char columns |
Select this check box to remove leading and trailing whitespace |
|
Trim column |
Select the check box(es) in the Trim column to remove leading and trailing whitespace from the This option disappears when the Trim |
|
tStatCatcher Statistics |
Select this check box to gather the Job processing metadata at |
Global Variables
|
Global Variables |
NB_LINE: the number of rows read by an input component or
QUERY: the query statement being processed. This is a Flow
ERROR_MESSAGE: the error message generated by the A Flow variable functions during the execution of a component while an After variable To fill up a field or expression with a variable, press Ctrl + For further information about variables, see |
Usage
|
Usage rule |
This component is usually used as a start component of a Job or |
|
Dynamic settings |
Click the [+] button to add a row in the table The Dynamic settings table is For examples on using dynamic parameters, see Reading data from databases through context-based dynamic connections and Reading data from different MySQL databases using dynamically loaded connection parameters. For more information on Dynamic |
Handling data with Amazon Aurora
This scenario describes a Job that writes the user information into Amazon Aurora, and then
reads the information in Amazon Aurora and displays it on the console.

-
tAmazonAuroraConnection: opens a connection
to Amazon Aurora. -
tFixedFlowInput: defines the user information
data structure, and sends the data to the next component. -
tAmazonAuroraOutput: writes the data it
receives from the preceding component into Amazon Aurora. -
tAmazonAuroraCommit: commits in one go the
data processed to Amazon Aurora. -
tAmazonAuroraInput: reads the data from
Amazon Aurora. -
tLogRow: displays the data it receives from
the preceding component on the console. -
tAmazonAuroraClose: closes the connection to
Amazon Aurora.
Adding and linking the components
-
Create a new Job and add seven components listed previously by typing their names in the
design workspace or dropping them from the Palette. -
Connect tFixedFlowInput to tAmazonAuroraOutput using a Row
> Main connection. -
Do the same to connect tAmazonAuroraInput to
tLogRow. -
Connect tAmazonAuroraConnection to tFixedFlowInput using a Trigger
> OnSubjobOk connection. - Do the same to connect tFixedFlowInput to tAmazonAuroraCommit, tAmazonAuroraCommit to tAmazonAuroraInput, and tAmazonAuroraInput to tAmazonAuroraClose.
Configuring the components
Opening a connection to Amazon Aurora
-
Double-click tAmazonAuroraConnection to open its
Basic settings view.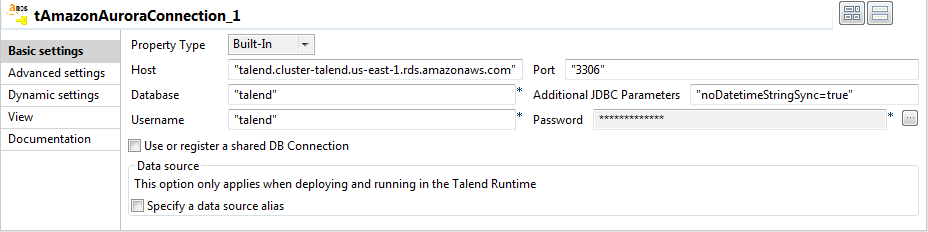
-
In the Host, Port,
Database, Username and Password fields,
enter the information required for the connection to Amazon Aurora.
Writing the data into Amazon Aurora
-
Double-click tFixedFlowInput to open its
Basic settings view.
-
Click the […] button next to Edit
schema and in the pop-up window define the schema by adding three
columns: id of Integer type, and name and city of
String type. Click OK to validate the changes and accept
the propagation prompted by the pop-up dialog box. -
In the Mode area, select Use Inline Content (delimited file) and enter the
following user information in the Content
field.123456789101;George;Bismarck2;Abraham;Boise3;Taylor;Nashville4;William;Jefferson City5;Alexander;Jackson6;James;Boise7;Gerald;Little Rock8;Tony;Richmond9;Thomas;Springfield10;Andre;Nashville -
Double-click tAmazonAuroraOutput to open its
Basic settings view.
-
Select the Use an existing connection check
box and in the Component List that appears,
select the connection component you have configured. -
In the Table field, enter or browse to the
table into which you want to write the data. In this example, it is TalendUser. -
Select Drop table if exists and create from
the Action on table drop-down list, and select
Insert from the Action on data drop-down list. -
Double-click tAmazonAuroraCommit to open its
Basic settings view.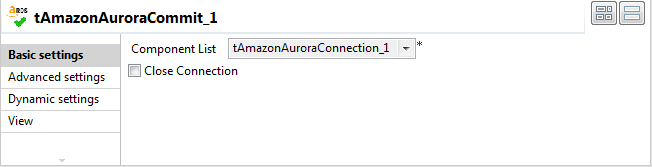
-
Clear the Close Connection check box if it is
selected.
Retrieving the data from Amazon Aurora
-
Double-click tAmazonAuroraInput to open its
Basic settings view.
-
Select the Use an existing connection check
box and in the Component List that appears,
select the connection component you have configured. -
Click the […] button next to Edit schema and in the pop-up window define the
schema by adding three columns: id of Integer
type, and name and city of String type. The data structure is same as the structure
you have defined for tFixedFlowInput. -
In the Table Name field, enter or browse to
the table into which you write the data. In this example, it is TalendUser. -
Click the Guess Query button to generate the
query. The Query field will be filled with the
automatically generated query. -
Double-click tLogRow to open its Basic settings view.

-
In the Mode area, select Table (print values in cells of a table) for better
readability of the result.
Closing the connection to Amazon Aurora
-
Double-click tAmazonAuroraClose to open its Basic settings view.

-
In the Component List, select the connection
component you have configured.
Saving and executing the Job
- Press Ctrl + S to save the Job.
-
Press F6 or click Run on the Run tab to run the
Job. As shown above, the user information is written into Amazon Aurora, and then the data is
retrieved from Amazon Aurora and displayed on the console.