tAzureStorageGet
the specified filters applied on the virtual hierarchy of the blobs and then write
selected blobs in a local folder.
tAzureStorageGet Standard properties
These properties are used to configure tAzureStorageGet
running in the Standard Job framework.
The Standard
tAzureStorageGet component belongs to the Cloud family.
The component in this framework is available in all Talend
products.
Basic settings
|
Property Type |
Select the way the connection details
This property is not available when other connection component is selected |
| Connection Component |
Select the component whose connection details will be |
|
Account Name |
Enter the name of the storage account you need to access. A storage account |
|
Account Key |
Enter the key associated with the storage account you need to access. Two |
|
Protocol |
Select the protocol for this connection to be created. |
|
Use Azure Shared Access Signature |
Select this check box to use a shared access signature (SAS) to access the In the Azure Shared Access Signature field displayed, Note that the SAS has valid period, you can set the start time at which the |
|
Container |
Enter the name of the container you need to retrieve |
|
Local folder |
Enter the path, or browse to the folder in which you need |
|
Blobs |
Complete this table to select the blobs to be retrieved.
|
|
Die on error |
Select the check box to stop the execution of the Job when an error Clear the check box to skip any rows on error and complete the process for |
Advanced settings
|
tStatCatcher Statistics |
Select this check box to gather the Job processing metadata at the Job level |
Global Variables
| CONTAINER |
The name of the blob container. This is an After variable and it |
| LOCAL_FOLDER |
The local directory used in this component. This is an After variable |
| ERROR_MESSAGE |
The error message generated by the component when an error occurs. This |
Usage
|
Usage rule |
This component can be used as a standalone component of a Job or |
|
Prerequisites |
Knowledge about Microsoft Azure Storage is required. |
Retrieving files from a Azure Storage container
In this scenario, a five-component Job uses Azure Storage components to write
files in a given Azure Storage system and then retrieve selected files (blobs in terms of
Azure Storage) from that system.

Before replicating this scenario, you must have appropriate rights and
permissions to read and write files in the Azure storage account to be used. For further
information, see Microsoft’s documentation for Azure Storage: http://azure.microsoft.com/en-us/documentation/services/storage/.
The talendcontainer container used in this scenario
was created using tAzureStorageContainerCreate in the
scenario Creating a container in Azure Storage.
Linking the components
-
In the
Integration
perspective of the Studio, create an empty Job, named
azureTalend for example, from the Job Designs node in the Repository tree view. -
Drop tAzureStoragePut, tAzureStorageList, tJava and tAzureStorageGet
onto the workspace. - Connect the Azure Storage components using the Trigger > OnSubjobOk link while connect tAzureStorageList to tJava using the Row > Iterate link.
Connecting to an Azure storage account
-
Double-click tAzureStorageConnection to open its Component view.

-
In the Account name
field, enter the name of the storage account to be connected to. In this
example, it is
talendstorage,
an account that has been created for demonstration purposes. -
In the Account key field, paste the
primary or the secondary key associated with the storage account to be used.
These keys can be found in the Manage Access Key dashboard in the Azure
Storage system to be connected to. -
From the Protocol list,
select the protocol for the endpoint of the storage account to be used. In this
example, it is
HTTPS.
Writing files in Azure Storage
-
Double-click tAzureStoragePut to open its Component view.

-
Select
the component whose connection details will be used to set up the Azure storage
connection. In this example, it is
tAzureStorageConnection_1. -
In the Container name
field, enter the name of the container you need to write files in. In this
example, it is
talendcontainer,
a container created in the scenario Creating a container in Azure Storage. -
In the Local folder
field, enter the path, or browse, to the directory where the files to be used
are stored. In this scenario, they are some pictures showing technical process
and stored locally in
E:/photos.
Therefore, put
E:/photos;
this allows tAzureStoragePut to upload
all the files of this folder and its sub-folders into the
talendcontainer
container.For demonstration purposes, the example photos are organized as follows in
the E:/photos folder.-
Directly beneath the
E:/photos
level:components-use_case_triakinput_1.png
components-use_case_triakinput_2.png
components-use_case_triakinput_3.png
components-use_case_triakinput_4.png
-
In the
E:/photos/mongodb/step1
directory:components-use_case_tmongodbbulkload_1.png
components-use_case_tmongodbbulkload_2.png
components-use_case_tmongodbbulkload_3.png
components-use_case_tmongodbbulkload_4.png
-
In the
E:/photos/mongodb/step2
directory:components-use_case_tmongodbbulkload_5.png
components-use_case_tmongodbbulkload_6.png
components-use_case_tmongodbbulkload_7.png
components-use_case_tmongodbbulkload_8.png
-
-
In the Azure Storage
folder field, enter the directory where you want to write files.
This directory will be created in the container to be used if it does not exist.
In this example, enter
photos.
Verifying the file transfer
Configuring tAzureStorageList
-
Double-click tAzureStorageList to open its Component view.

-
Select
the component whose connection details will be used to set up the Azure storage
connection. In this example, it is
tAzureStorageConnection_1. -
In the Container name
field, enter the name of the container in which you need to check whether the
given files exist. In this scenario, it is
talendcontainer. -
Under the Blob filter table, click the
[+] button to add one row in the
table. -
In the Prefix column,
enter the common prefix of the names of the files (blobs) to be checked. This
prefix represents a virtual directory level you designate as the starting point
down from which files (blobs) are checked. In this example, it is
photos/.For further information about blob names, see http://msdn.microsoft.com/en-us/library/dd135715.aspx.
-
In the Include sub-directories column,
select the check box in the newly added row. This allows tAzureStorageList to check all the files at any
hierarchical level beneath the designated starting point.
Configuring tJava
-
Double-click tJava to
open its Component view.
-
In the Code field, enter
System.out.println();
-
In the Outline panel,
which, by default, is found to the left side of the Component view, expand the tAzureStorageList node.
-
From the Outline panel, drop the
CONTAINER_BLOB global variable into the
parentheses in the code in the Component
view so as to make the code read:
System.out.println(((Boolean)globalMap.get("tAzureStorageList_1_CURRENT_BLOB")));
Retrieving selected files
-
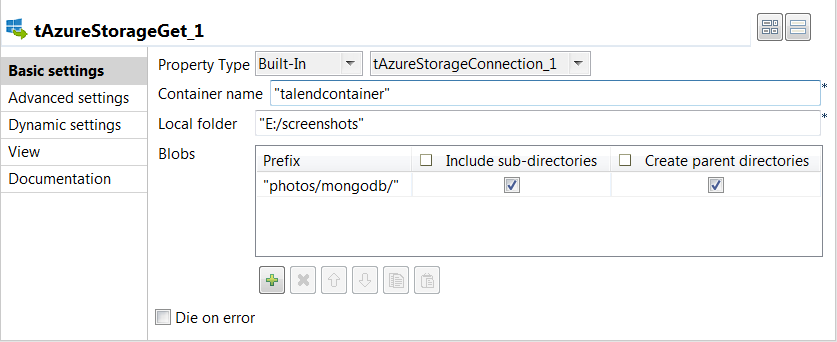
Double-click tAzureStorageGet to open its Component view.

-
Select
the component whose connection details will be used to set up the Azure storage
connection. In this example, it is
tAzureStorageConnection_1. -
In the Container name
field, enter the name of the container from which you need to retrieve files. In
this scenario, it is
talendcontainer. -
In the Local folder
field, enter the path, or browse, to the directory where you want to put the
retrieved files. In this example, it is
E:/screenshots. - Under the Blob table, click the [+] button to add one row in the table.
-
In the Prefix column,
enter the common name prefix of the files (blobs) to be retrieved. In this
example, it is
photos/mongodb/. -
In the Include
sub-directories column, select the check box in the newly added
row. This allows tAzureStorageGet to
retrieve all the files (blobs) beneath the
photos/mongodb/
level. -
In the Create parent
directories column, select the check box in the newly added row
to create the same directory in the specified local folder as the retrieved
blobs have in the container.Note that having this same directory is necessary for successfully retrieving
blobs. If you leave this check box clear, then you need to create the same
directory yourself in the target local folder.
Executing the Job
-
Press F6 to run this
Job. -
Check the execution result on the Run console.

You can read that the Job returns the list of the blobs with
the photos prefix in the container. -
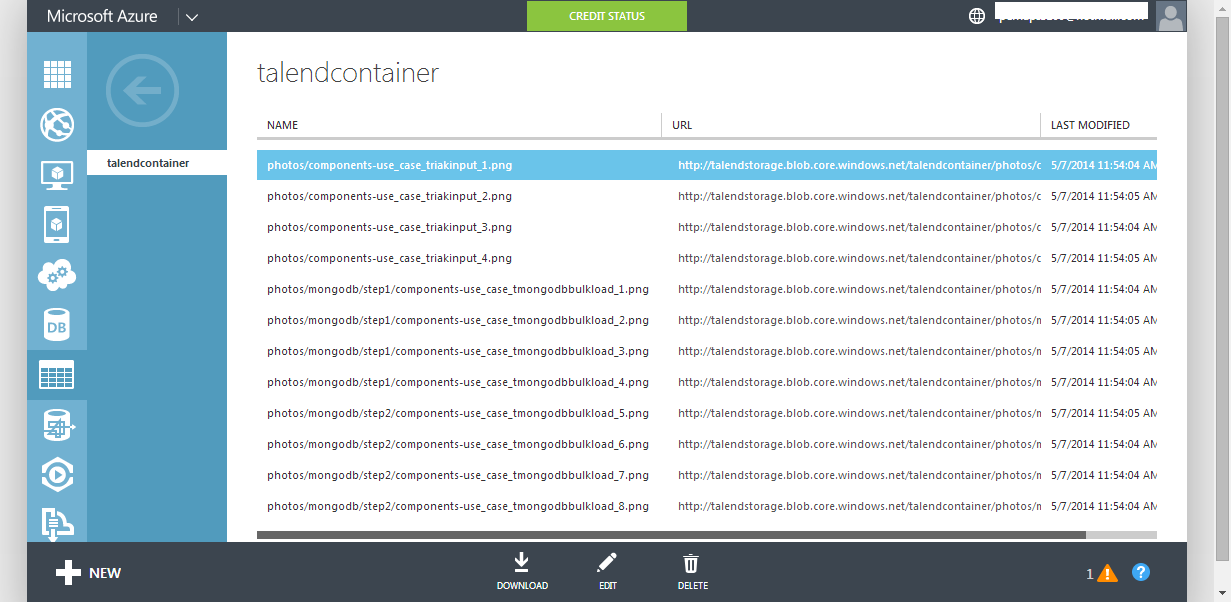
Double-check the resut in the web console of the Azure storage account.

-
Check the retrieved files in the specified local folder.

You can see the blobs with the photos/mongodb/ prefix
have been retrieved and their prefix transformed to directories.