tAzureStorageInputTable
storage table.
tAzureStorageInputTable Standard properties
These properties are used to configure tAzureStorageInputTable
running in the Standard Job framework.
The Standard
tAzureStorageInputTable component belongs to the Cloud family.
The component in this framework is available in all Talend products with Big Data
and in Talend Data Fabric.
Basic settings
|
Property Type |
Select the way the connection details
This property is not available when other connection component is selected |
| Connection Component |
Select the component whose connection details will be |
| Account Name |
Enter the name of the storage account you need to access. A storage account |
| Account Key |
Enter the key associated with the storage account you need to access. Two |
| Protocol |
Select the protocol for this connection to be created. |
|
Use Azure Shared Access Signature |
Select this check box to use a shared access signature (SAS) to access the In the Azure Shared Access Signature field displayed, Note that the SAS has valid period, you can set the start time at which the |
| Table name |
Specify the name of the table from which the entities will be retrieved. |
| Schema and Edit schema |
A schema is a row description. It defines the number of fields
The schema of this component is predefined with the following columns that describe
For more information about these system properties, see Understanding the Table Service Data Click Edit
|
| Use filter expression |
Select this check box and complete the Filter expressions
The generated filter expression will be displayed in the read-only For more information about the filter expressions, see Querying Tables and Entities. |
| Die on error |
Select the check box to stop the execution of the Job when an error |
Advanced settings
| Name mappings |
Complete this table to map the column name of the
For example, if there are three schema columns |
| tStatCatcher Statistics |
Select this check box to gather the Job processing metadata at the Job level |
Global variables
| NB_LINE |
The number of rows processed. This is an After variable and it returns an |
| ERROR_MESSAGE |
The error message generated by the component when an error occurs. This |
Usage
|
Usage rule |
This component is usually used as a start component of a Job or |
Handling data with Microsoft Azure Table storage
Microsoft Azure storage account that gives you access to Azure storage table service, write
some employee data into an Azure storage table, and then retrieve the employee data from the
table and display it on the console.
The employee data used in this example is as follows:
|
1 2 3 4 5 6 7 8 9 10 11 |
#Id;Name;Site;Job;Date;Salary 12000;Gerald Roosevelt;Beijing;Software Developer;2008-01-01;15000.01 12001;Benjamin Harrison;Paris;Software Developer;2008-11-22;13000.11 12002;Bob Clinton;Beijing;Software Tester;2008-05-12;12000.22 12003;James Quincy;Paris;Technical Writer;2009-03-10;12000.33 12004;Gerald Harrison;Beijing;Software Tester;2009-06-20;12500.44 12005;Harry Madison;Paris;Software Developer;2009-10-15;14000.55 12006;Helen Roosevelt;Beijing;Software Tester;2009-03-25;13500.66 12007;Mary Clinton;Beijing;Software Developer;2010-02-20;16000.77 12008;Cathey Quincy;Paris;Software Developer;2010-07-15;14000.88 12009;John Smith;Beijing;Technical Writer;2011-02-10;12500.99 |
Creating a Job for handling data with Azure Table storage
Create a Job to connect to an Azure storage account, write some employee data
into an Azure storage table, and then retrieve that information from the table and
display it on the console.

-
Create a new Job and add a tAzureStorageConnection
component, a tFixedFlowInput component, a
tAzureStorageOutputTable component, a
tAzureStorageInputTable component, and a
tLogRow component by typing their names in the design
workspace or dropping them from the Palette. -
Link the tFixedFlowInput component to the
tAzureStorageOutputTable component using a
Row > Main
connection. -
Do the same to link the tAzureStorageInputTable
component to the tLogRow component. -
Link the tAzureStorageConnection component to the
tFixedFlowInput component using a
Trigger > OnSubjobOk
connection. -
Do the same to link the tFixedFlowInput component to the
tAzureStorageInputTable component.
Connecting to an Azure Storage account
the connection to an Azure Storage account.
The Azure Storage account, which allows you to access the Azure Table storage service
and store the provided employee data, has already been created. For more information
about how to create an Azure Storage account, see About Azure storage accounts.
-
Double-click the tAzureStorageConnection component to
open its Basic settings view on the
Component tab.
-
In the Account Name field, specify the name of the
storage account you need to access. -
In the Account Key field, specify the key associated
with the storage account you need to access.
Writing data into an Azure Storage table
tAzureStorageOutputTable component to write the employee data
into an Azure Storage table.
-
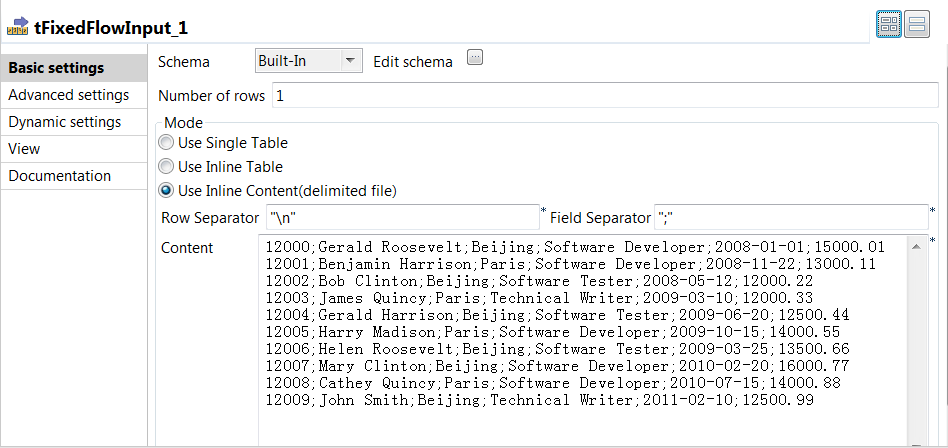
Double-click the tFixedFlowInput component to open its
Basic settings view on the
Component tab.
-
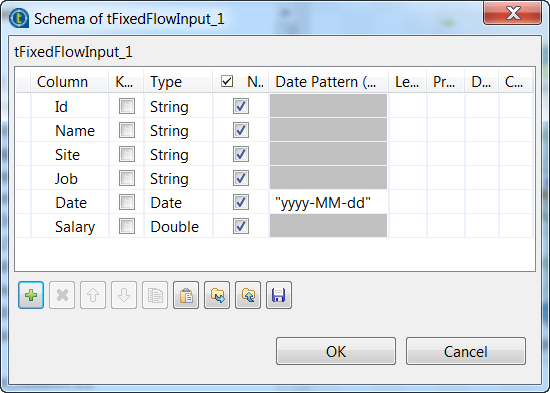
Click
 next to Edit schema to open the
schema dialog box and define the schema by adding six columns:
Id, Name,
Site, and Job of String type,
Date of Date type, and Salary
of Double type. Then click OK to save the changes and
accept the propagation prompted by the pop-up dialog box.
Note that in this example, the Site and
Id columns are used to feed the values of the
PartitionKey and RowKey
system properties of each entity and they should be of String type, and the
Name column is used to feed the value of the
EmployeeName property of each entity. -
In the Mode area, select Use Inline
Content(delimited file) and in the
Content field displayed, enter the employee data that
will be written into the Azure Storage table. -
Double-click the tAzureStorageOutputTable component to
open its Basic settings view on the
Component tab
-
From the connection component drop-down list, select the component whose
connection details will be used to set up the connection to the Azure Storage
service, tAzureStorageConnection_1 in this example. -
In the Table name field, enter the name of the table
into which the employee data will be written, employee in
this example. -
From the Action on table drop-down list, select the
operation to be performed on the specified table, Drop table if exist
and create in this example. -
Click Advanced settings to open its view.

-
Click
 under the
Name mappings table to add three rows and map the
schema column name with the property name of each entity in the Azure table. In
this example,- the Site column is used to feed the value of the
PartitionKey system property, in the first
row you need to set the Schema column name cell
with the value "Site" and the Entity
property name cell with the value
"PartitionKey". - the Id column is used to feed the value of the
RowKey system property, in the second row you
need to set the Schema column name cell with the
value "Id" and the Entity property
name cell with the value
"RowKey". - the Name column is used to feed the value of the
EmployeeName property, in the third row you
need to set the Schema column name cell with the
value "Name" and the Entity property
name cell with the value
"EmployeeName".
- the Site column is used to feed the value of the
Retrieving data from the Azure Storage table
tLogRow component to retrieve the employee data from the
Azure Storage table.
-
Double-click the tAzureStorageInputTable component to
open its Basic settings view.
-
From the connection component drop-down list, select the component whose
connection details will be used to set up the connection to the Azure Storage
service, tAzureStorageConnection_1 in this example. -
In the Table name field, enter the name of the table
from which the employee data will be retrieved, employee
in this example. -
Click
 next to Edit schema to open
the schema dialog box.
Note that the schema has already been predefined with two read-only columns
RowKey and PartitionKey of
String type, and another column Timestamp of Date
type. The RowKey and
PartitionKey columns correspond to the
Id and Site columns of the
tAzureStorageOutputTable schema. -
Define the schema by adding another four columns that hold other employee data,
Name and Job of String type,
Date of Date type, and Salary
of Double type. Then click OK to save the changes and
accept the propagation prompted by the pop-up dialog box. -
Click Advanced settings to open its view.

-
Click
 under the
Name mappings table to add one row and set the
Schema column name cell with the value
"Name" and the Entity property
name cell with the value "EmployeeName"
to map the schema column name with the property name of each entity in the Azure
table.Note that for the tAzureStorageInputTable component,
the PartitionKey and RowKey
columns have already been added automatically to the schema and you do not
need to specify the mapping relationship for them. -
Double-click the tLogRow component to open its
Basic settings view and in the
Mode area, select Table (print values in
cells of a table) for a better display of the result.
Executing the Job to handle data with Azure Table storage
handling data with Azure Table storage, you can then execute the Job and verify the Job
execution result.
- Press Ctrl + S to save the Job.
-
Press F6 to execute the Job.

As shown above, the Job is executed successfully and the employee data is
displayed on the console, with the timestamp value that indicates when each
entity was inserted. -
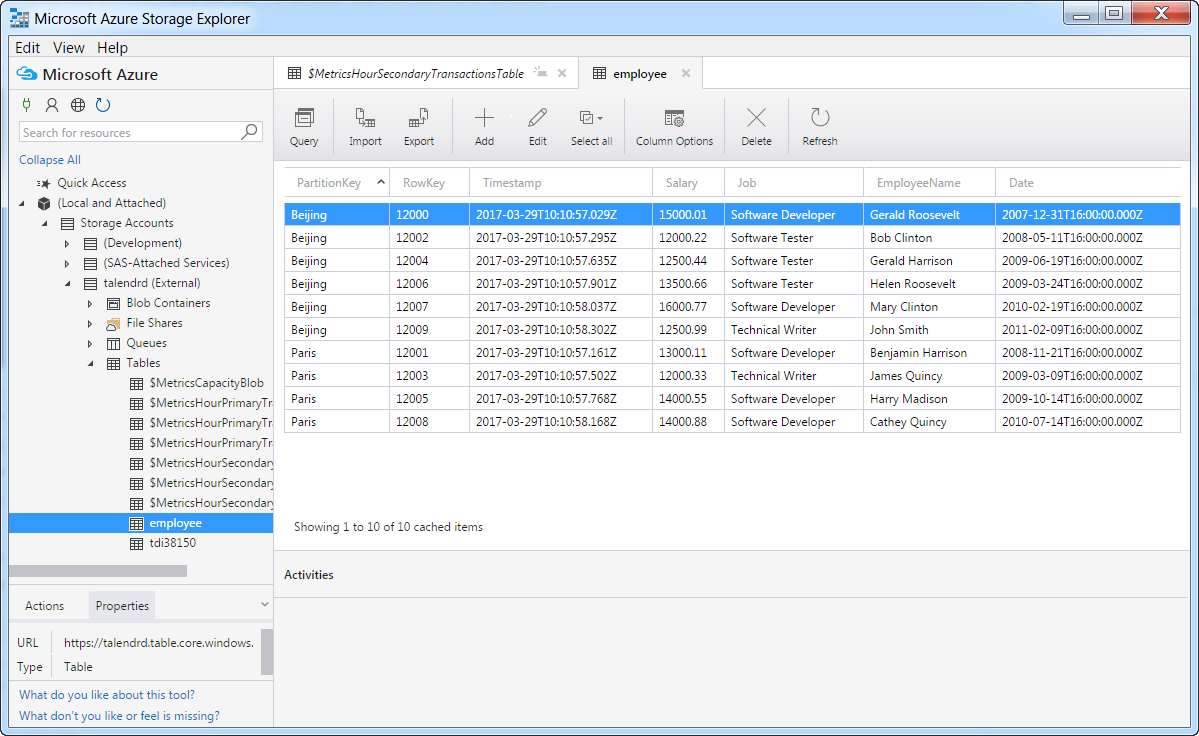
Double-check the employee data that has been written into the Azure Storage
table employee using Microsoft Azure Storage Explorer if
you want.