tBufferOutput
Collects data in a buffer in order to access it later via webservice for
example.
tBufferOutput has been designed to be exported as Webservice in order to
access data on the web application server directly. For more information, see Talend Studio User Guide.
tBufferOutput Standard properties
These properties are used to configure tBufferOutput running in the Standard Job framework.
The Standard
tBufferOutput component belongs to the Misc family.
The component in this framework is available in all Talend
products.
Basic settings
|
Schema and |
A schema is a row description, it defines Click Edit
In the case of the tBufferOutput, the column position is |
|
|
Built-in: |
|
|
Repository: |
Global
Variables
|
Global |
ERROR_MESSAGE: the error message generated by the A Flow variable functions during the execution of a component while an After variable To fill up a field or expression with a variable, press Ctrl + For further information about variables, see |
Usage
|
Usage rule |
This component is not startable (green |
Buffering data
This scenario describes an intentionally basic Job that bufferizes data in a
child job while a parent Job simply displays the bufferized data onto the
standard output console. For an example of how to use tBufferOutput to access output data directly on the Web
application server, see Buffering output data on the webapp server.

-
Create two Jobs: a first Job
(BufferFatherJob) runs the
second Job and displays its content onto the Run console. The second Job
(BufferChildJob) stores the
defined data into a buffer memory. -
On the first Job, drop the following components: tRunJob and tLogRow from the Palette to the design
workspace. -
On the second Job, drop the following components: tFileInputDelimited and
tBufferOutput the
same way.
Let’s set the parameters of the second Job first:
-
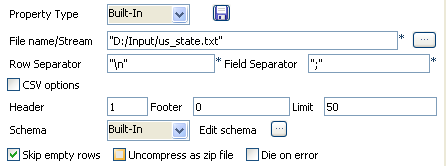
Select the tFileInputDelimited and on the Basic Settings tab of the
Component view, set
the access parameters to the input file.

-
In File Name, browse to the
delimited file whose data are to be bufferized. -
Define the Row and Field separators, as well as
the Header.

-
Describe the Schema of the
data to be passed on to the tBufferOutput component. -
Select the tBufferOutput
component and set the parameters on the Basic Settings tab of the
Component view.

-
Generally the schema is propagated from the input component
and automatically fed into the tBufferOutput schema. But you could also
set part of the schema to be bufferized if you want
to. -
Now on the other Job (BufferFatherJob)
Design, define the parameters of the tRunJob component.

-
Edit the Schema if relevant and select the column to be
displayed. The schema can be identical to the bufferized
schema or different. -
You could also define context parameters to be used for this
particular execution. To keep it simple, the default context
with no particular setting is used for this use case.
Press F6 to execute the parent Job. The
tRunJob looks after executing the
child Job and returns the data onto the standard console:

Buffering data to be used as a source system
An MDM process will invoke this Job to retrieve data by looking up the defined elements
(agent region values) from the buffered data. The process can then display the retrieved data
in the Talend MDM Web User Interface without really saving them in the MDM hub.
Creating a data buffer Job
- Create a Job named DetermineRegion.
-
Drop the following components from the Palette onto the design workspace: tJava, tFixedFlowInput, and
tBufferOutput. -
Connect tJava to
tFixedFlowInput using a Trigger > On Component
Ok link. -
Connect tFixedFlowInput to
tBufferOutput using a Row > Main link.
Configuring the Job to buffer data
-
In the Contexts view, add a new context variable with
the Name of xmlInput and the
Type of String.In this example, the context variable xmlInput of
the Job will be specified in the MDM process which wants to invoke this
Job.You can search for further information about MDM
processess on Talend Help Center (https://help.talend.com).If you cannot find the Contexts view, go to Window > Show view > Talend, and select Contexts.
For more information about how to define context variables, see Talend Studio
User Guide.You can search for further information about how to
define context variables on Talend Help Center (https://help.talend.com). -
Double-click the tJava component to open
its Component view, and in the
Code area, enter the code according to your
needs.In this example, enter
System.out.println("#############################"+context.xmlInput);. -
Double-click the tFixedFlowInput component to open its
Component view. -
Click the […] button next
to Edit schema to open the dialog box and
define the schema for the data to be used by the source system.In this example, add one new column col0 of the type
String. -
After the schema is defined, click Yes in the
Propagate dialog box to propagate the schema changes
to the following component tBufferOutput. -
In the Number of rows field, enter
1. -
In the Mode area, select Use Single
Table and enter "Paris" in the
Value column that corresponds to the column
col0 you have defined.In this example, the value of the col0 provides the
agent region information to be retrieved by MDM. -
Double-click the tBufferOutput component to open its
Component view, and then make sure its schema is
synchronized with the previous component
tFixedFlowInput. - Run the Job and make sure the execution succeeds.
Buffering output data on the webapp server
This scenario describes a Job that is called as a Webservice and stores the
output data in a buffer directly on the server of the Web application. This scenario creates
first a Webservice oriented Job with context variables, and next exports the Job as a
Webservice.
Creating a Job
-
Drop the following components from the Palette onto the design
workspace: tFixedFlowInput and tBufferOutput. -
Connect tFixedFlowInput to tBufferOutput using a
Row Main
link.
Creating a context variable
For this scenario, you will define two context variables:
nb_lines and
lastname. The first variable will set
the number of lines the tFixedFlowInput
component will generate, and the second one will set the
last name to display in the output list. For more information about
how to create and use context variables, see
Talend Studio User Guide.
To define the two context variables:
-
Select the Contexts
tab view of your Job, and click the [+] button at the bottom of
the view to add two variables, respectively
nb_lines of
type Integer and
lastname of
type String. -
In the Value field
for the variables, set the last name to be displayed
and the number of lines to be generated,
respectively Ford
and 3 in this
example.
Configuring the input data
- In the design workspace, select tFixedFlowInput.
-
Click the Component
tab to define the basic settings for tFixedFlowInput. -
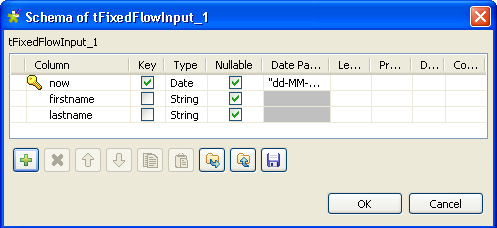
Click the three-dot […] button next to Edit Schema to describe the
data structure you want to create from internal
variables. In this scenario, the schema is made of
three columns, now of type
Date,
firstname of type String, and
lastname of type String.
-
Click OK to close the
dialog box and accept propagating the changes when
prompted by the system. The three defined columns
display in the Values panel of the Basic settings view of
tFixedFlowInput.
-
Click in the Value
cell of each of the first two defined columns and
press Ctrl+Space to
access the global variable list. -
From the global variable list, select
Talend Date.getCurrentDate()
and
talendDatagenerator.getFirstName,
for the now and
firstname columns
respectively. -
Click in the Value
cell of lastname column and
press Ctrl+Space to
access the global variable list. -
From the global variable list, select
context.lastname, the context
variable you created for the last name column.
Building your Job as a Webservice
Before building your Job as a Web service, see
Talend Studio User Guide for more
information.
-
In the Repository
tree view, right-click on the above created Job and
select Build Job.
The Build Job
dialog box appears.
-
Click the Browse…
button to select a directory to archive your Job
in. -
In the Build type
panel, select the build type you want to use in the
Tomcat webapp directory (WAR in this example) and
click Finish. The
Build Job
dialog box disappears. -
Copy the War folder and paste it in a Tomcat webapp
directory.
Calling a Job with context variables from a browser
This scenario describes how to call the Job you created in Buffering output data on the webapp server from your browser with/without modifying the
values of the context variables.
Type the following URL into your browser: http://localhost:8080//export_job/services/export_job3?method=runJob
where “export_job” is the name of the webapp directory deployed in Tomcat
and “export_job3” is the name of the Job.

Click Enter to execute your Job from your
browser.

The Job uses the default values of the context variables:
nb_lines and lastname,
that is it generates three lines with the current date, first name and Ford
as a last name.
You can modify the values of the context variables directly from your browser.
To call the Job from your browser and modify the values of the two context
variables, type the following URL:
http://localhost:8080//export_job/services/export_job3?method=runJob&arg1=–context_param%20lastname=MASSY&arg2=–context_param%20nb_lines=2.
%20 stands for a blank space in the URL language. In the first argument
“arg1”, you set the value of the context variable to display “MASSY” as last
name. In the second argument “arg2”, you set the value of the context
variable to “2” to generate only two lines.
Click Enter to execute your Job from your
browser.

The Job generates two lines with MASSY as last name.
Calling a Job exported as Webservice in another Job
This scenario describes a Job that calls another Job exported as a
Webservice using the tWebServiceInput.
This scenario will call the Job created in Buffering output data on the webapp server.
-
Drop the following components from the Palette onto the design
workspace: tWebServiceInput and tLogRow. -
Connect tWebserviceInput to tLogRow using a
Row Main
link.

-
In the design workspace, select tWebServiceInput.
-
Click the Component tab to define the basic
settings for tWebServiceInput.

-
Set the Schema
Type to Built-In and click the three-dot
[…] button
next to Edit Schema
to describe the data structure you want to call
from the exported Job. In this scenario, the schema is made
of three columns, now, firstname, and lastname.

-
Click the plus button to add the three parameter
lines and define your variables. Click OK to close the dialog
box. -
In the WSDL field of the Basic settings view of
tWebServiceInput, enter the URL http://localhost:8080/export_job/services/export_job3?WSDL
where “export_job” is the name od the webapp directory where
the Job to call is stored and “export_job3” is the name of
the Job itself.

-
In the Method name
field, enter runJob. -
In the Parameters panel, Click the plus button
to add two parameter lines to define your context
variables. -
Click in the first Value cell to enter the parameter to
set the number of generated lines using the following
syntax: –context_param nb_line=3. -
Click in the second Value cell to enter the parameter to
set the last name to display using the following syntax: –context_param lastname=Ford. -
Select tLogRow and click the Component tab to display
the component view. -
Set the Basic settings
for the tLogRow
component to display the output data in a
tabular mode. For more information, see tLogRow. -
Save your Job and press F6 to execute it.

The system generates three columns with the current date, first
name, and last name and displays them onto the log console in a tabular
mode.