tDataprepRun
Applies a preparation made using Talend Data Preparation in a standard Data Integration
Job.
tDataprepRun fetches a preparation made
using Talend Data Preparation and applies it to
a set of data.
Depending on the Talend
product you are using, this component can be used in one, some or all of the following
Job frameworks:
-
Standard: see tDataprepRun Standard properties.
The component in this framework is available in Talend Data Management Platform, Talend Big Data Platform, Talend Real Time Big Data Platform, Talend Data Services Platform, Talend MDM Platform and in Talend Data Fabric.
-
Spark Batch: see tDataprepRun properties for Apache Spark Batch.
The component in this framework is available in all subscription-based Talend products with Big Data
and Talend Data Fabric. -
Spark Streaming: see tDataprepRun properties for Apache Spark Streaming.
This component is available in Talend Real Time Big Data Platform and Talend Data Fabric.
tDataprepRun Standard properties
These properties are used to configure tDataprepRun running in the Standard Job
framework.
The Standard
tDataprepRun component belongs to the Talend Data Preparation family.
The component in this framework is available in all subscription-based Talend products.
Basic settings
|
URL |
Type the URL to the Talend Data Preparation web application, between double quotes. If you are working with Talend Cloud Data Preparation,
|
|
Username |
Type the email address that you use to log in the Talend Data Preparation web application, between double |
|
Password |
Click the […] button and type your user password for the Talend Data Preparation web application, between double If you are working with Talend Cloud Data Preparation and if:
|
When using the default preparation selection properties:
|
Preparation |
To complete the Preparation field, do one of the following:
|
|
|
Click this button to edit the preparation in Talend Data Preparation that corresponds to the ID defined |
|
Version |
If you have created several versions of your |
|
Schema and Edit Schema |
A schema is a row description. It defines the number of fields Click Edit
Click Sync |
|
Fetch Schema |
Click this button to retrieve the schema from the preparation |

When using the Dynamic preparation selection:
|
Dynamic preparation |
Select this checkbox to define a preparation path and version |
|
Preparation path |
Use a context variable to define a preparation path. Paths |
|
Preparation version |
Use a context variable to define the version of the |
|
Schema and Edit Schema |
A schema is a row description. It defines the number of fields Click Edit
Click Sync |
|
Fetch Schema |
Click this button to dynamically retrieve the schema from the |
Advanced settings
|
Limit Preview |
Specify the number of rows to which you want to limit the |
|
tStatCatcher Statistics |
Select this check box to gather the Job processing metadata at |
Global Variables
|
Global Variables |
ERROR_MESSAGE: the error message generated by the A Flow variable functions during the execution of a component while an After variable To fill up a field or expression with a variable, press Ctrl + For further information about variables, see |
Usage
|
Usage rule |
This component is an intermediary step. It requires an input |
|
Limitations |
|
Preparing data from a
database in a Talend Job
This scenario applies only to subscription-based Talend products.
The tDataprepRun component allows you to reuse an existing
preparation made in Talend Data Preparation or Talend Cloud Data Preparation, directly in a data integration Job. In
other words, you can operationalize the process of applying a preparation to input data with
the same model.
The following scenario creates a simple Job
that :
- retrieves a table from a MySQL database, that holds some employee-related
data, - applies an existing preparation on this data,
- outputs the prepared data into an Excel file.

This assumes that a preparation has been created beforehand, on a dataset
with the same schema as your input data for the Job. In this case, the existing preparation is
called datapreprun_scenario. This simple preparation puts the employees
last names into upper case and isolate the employees with a salary greater than 1500$.

Adding and linking the components
-
In the Integration perspective of the Studio, create an empty
Standard Job from the Job Designs node in
the Repository tree view. -
Drop the following components from the Palette onto the design workspace: tMysqlInput, tDataprepRun and
tFileOutputExcel. - Connect the three components using Row > Main links.
Configuring the components
Retrieving the data from the database
-
In the design workspace, select tMysqlInput
and click the Component tab to define its
basic settings.
-
In the Property Type list, select Built-in to set the database connection details
manually. -
In the DB Version list, select the version of
MySQL you are using, MySQL 5 in this
example. -
In the Host, Port, Database, Username and Password
fields, enter the MySQL connection details and the user authentication data for
the database, between double quotes. -
In the Table Name field, type the name of the
table to be read, between double quotes. -
In the Query field,
enter your database query between double quotes. In this example, the query is
select * from employeesto retrieve all of the
information from the tableemployees, in the
testdatabase. -
Click Guess schema to automatically retrieve
the schema from the database table or enter the schema manually by clicking the
[…] button next to Edit
schema.Make sure that the schema of the tMysqlInput component matches the schema expected by the
tDataprepRun component. In other
words, the input schema must be the same as the dataset upon which the
preparation was made in the first place.
Accessing the preparation from Talend Data Preparation
-
In the design workspace, select tDataprepRun
and click the Component tab to define its
basic settings.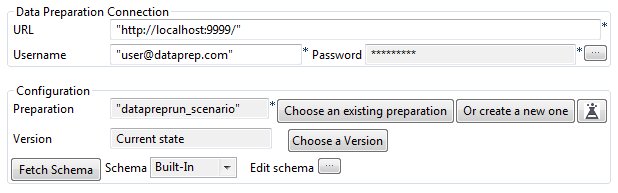
-
In the URL field, type
the URL of the Talend Data Preparation or
Talend Cloud Data Preparation web application,
between double quotes. Port9999is the default
port for Talend Data Preparation. -
In the Username and
Password fields, enter your Talend Data Preparation or Talend Cloud Data Preparation connection information,
between double quotes.If you are working with Talend Cloud Data Preparation and if:- SSO is enabled, enter an access
token in the field. - SSO is not enabled, enter either
an access token or your password in the field.
- SSO is enabled, enter an access
-
Click Choose an existing
preparation to display a list of the preparations available in
Talend Data Preparation or Talend Cloud Data Preparation, and select datapreprun_scenario.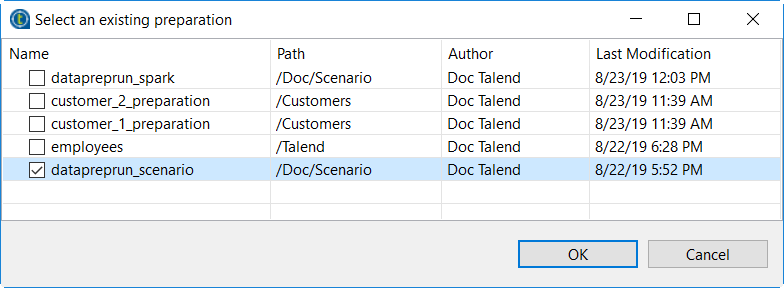
This scenario assumes that a preparation with a compatible schema has been
created beforehand. -
Click Fetch Schema to
retrieve the schema of the preparation,
datapreprun_preparation in this case.The output schema of the tDataprepRun component now
reflects the changes made with each preparation step. The schema takes into
account columns that were added or removed for example. By defaut, the output
schema will use theStringtype for all the columns, in order
not to overwrite any formatting operations performed on dates or numeric values
during the preparation.
Outputting the preparation into an Excel file
-
In the design workspace, select tFileOutputExcel and click the Component tab to define its basic settings.
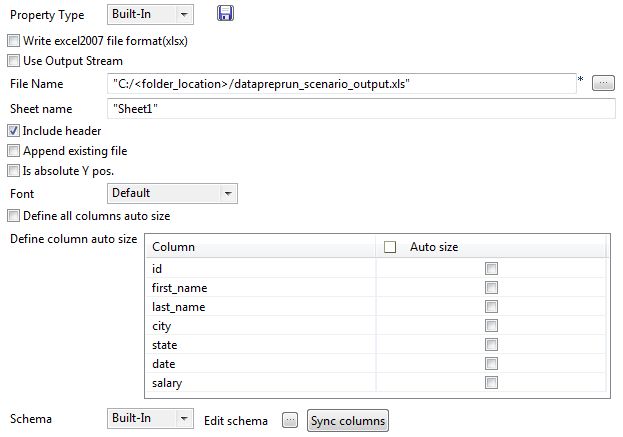
-
In the File Name field, enter the location
where you want to save the result of the preparation. -
Click Sync columns to
retrieve the new output schema, inherited from the tDataprepRun
component.
Saving and executing the Job
- Save your Job and press F6 to execute it.
-
You can now open the Excel file containing the result of the preparation
applied on your data from the MySQL database.
Dynamically selecting a
preparation at runtime according to the input
This scenario applies only to subscription-based Talend products.
The tDataprepRun component allows you to reuse an existing preparation
made in Talend Data Preparation, directly in a data
integration, Spark Batch or Spark Streaming Job. In other words, you can operationalize the
process of applying a preparation to input data with the same model.
By default, the tDataprepRun component retrieves
preparations using their technical id. However, the dynamic preparation selection feature
allows you to call a preparation via its path in Talend Data Preparation. Through the use of the Dynamic
preparation selection check box and some variables, it is then possible to
dynamically select a preparation at runtime, according to runtime data or metadata.
In case you wanted to operationalize preparations in a Talend Job using the regular preparation selection
properties, you would actually need several Jobs: one for each preparation to apply on a
specific dataset. By retrieving the correct preparation according to the input file name, you
will be able to dynamically run more than one preparation on your source data, in a single
Job.
The following scenario creates a Job that:
- Scans the content of a folder containing several datasets
- Creates a dynamic path to your CSV files
- Dynamically retrieves the preparations according to the input file name and
applies them on the data - Outputs the prepared data into a Redshift database

In this example, .csv datasets with data from two of your
clients are locally stored in a folder called customers_files. Each of
your clients datasets have their specific naming convention and are stored in dedicated sub
folders. All the datasets in the customers_files folder have identical
schemas, or data model.

A customers folder has also been created in Talend Data Preparation, containing two preparations. These two
distinct preparation are each aimed at cleaning data from your two different customers.

The purpose of customer_1_preparation for example is to isolate a
certain type of email addresses, while customer_2_preparation aims at
cleansing invalid values and formatting the data. In this example, the preparations names are
based on the two sub folders names customer_1 and
customer_2, with _preparation as suffix.

Just like the input schema that all four dataset have in common, all of your output data must
also share the same model. For this reason, you cannot have one preparation that modifies the
schema by adding a column for example, while the other does not.
By following this scenario, a single Job will allow you to use the appropriate preparation,
depending on whether the dataset extracted from the local customers_files
folder belongs to customer 1 or customer 2.
Designing the Job
-
In the Integration perspective of the Studio, create an
empty Standard, Spark Batch or Spark Streaming Job from the Job
Designs node in the Repository tree
view. -
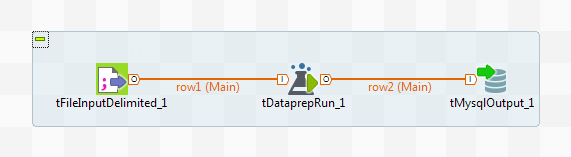
Drop the following components from the palette onto the
design workspace: two tFileList, a
tFileInputDelimited, a tDataprepRun and a
tRedshiftOutput. -
Connect the two tFileList and the
tFileInputDelimited components using Row > Iterate links. -
Connect the tFileInputDelimited,
tDataprepRun and tRedshiftOutput
components using Row > Main links.
Configuring the components
Reading the input files from your local folder
-
In the design workspace, select
tFileList_1 and click the
Component tab to define its basic settings.This first tFileList will read the
customers_files folder, and retrieve the path of the
two sub folders so that they can be reused later.
-
In the Directory field, enter the path to the
customers_files folder, containing the customers datasets,
in their respective sub folders. -
Click the + button in the
Filemask table to add a new line and rename it
*, between double quotes. -
In the design workspace, select tFileList_2 and click
the Component tab to define its basic settings.This second tFileList will read the four
.csv datasets contained in the two sub folders and
retrieve their file paths.
-
To fill the Directory field with the expression that
will dynamically retrieve the input files paths, drag it from the
tFileList_1 list of expressions in the
Outline panel.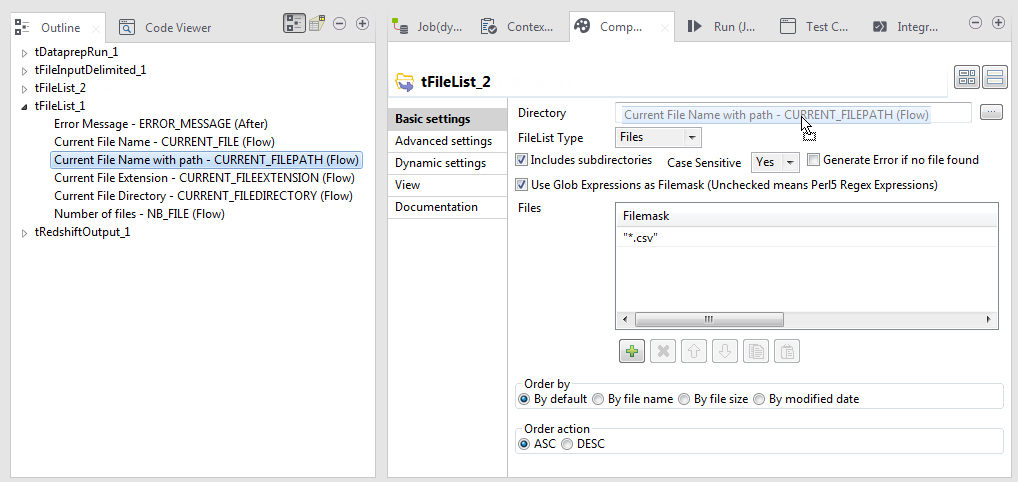
- Check the Includes subdirectories check box.
-
Click the + button in the
Filemask table to add a new line and rename it
*.csv, between double quotes. -
In the design workspace, select the tFileInputDelimited and
click the Component tab to define its basic
settings.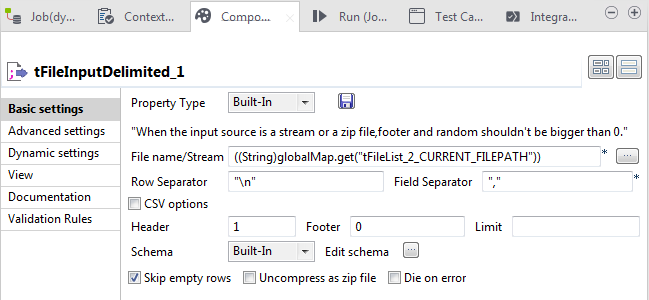
-
To fill the File name/Stream field with the expression
that will dynamically retrieve the input files paths, drag it from the
tFileList_2 list of expressions in the
Outline panel.
-
Enter the Row Separator and Field
Separator that correspond to your datasets, between double
quotes. -
Click the Edit schema button to define the columns of
the source datasets and their data type.The schema is the same for all the datasets from the
customers_files folder. Make sure that this schema
matches the schema expected by the tDataprepRun
component. In other words, the input schema must be the same as the datasets
upon which the preparations were made in the first place.
Dynamically selecting the preparation from Talend Data Preparation
-
In the design workspace, select tDataprepRun and click the
Component tab to define its basic settings.
-
In the URL field, type the URL of the Talend Data Preparation web application, between
double quotes. Port9999is the default port for Talend Data Preparation. -
In the Username and Password
fields, enter your Talend Data Preparation connection information, between
double quotes.If you are using Talend Data Preparation Cloud, you need to use your Talend Data Preparation Cloud login instead of
your Talend Data Preparation email.If you are working with Talend Cloud Data Preparation and if:
- SSO is enabled, enter an access
token in the field. - SSO is not enabled, enter either
an access token or your password in the field.
- SSO is enabled, enter an access
-
Select the Dynamic preparation selection check box to
dynamically define the preparations with their paths in Talend Data Preparation rather than their technical
ids. -
In the Preparation path field, enter
"customers/"+((String)globalMap.get("tFileList_2_CURRENT_FILE"))+"_preparation".This expression is made of three distinct parts. In the path,
customersis the folder in Talend Data Preparation where the preparations are
kept. As for the preparations names, because they are partly reused from the
local sub folders names, you will use this expression to retrieve those sub
folders name from the tFileList_1, and attach the
_preparation suffix. -
In the Preparation version field, type
Current state between double quotes, in order to use the
current version of the preparation. -
Click Fetch Schema to
retrieve the schema of the preparation.The output schema of the tDataprepRun component now
reflects the changes made with each preparation step. The schema takes into
account columns that were added or removed for example. By defaut, the output
schema will use theStringtype for all the columns, in order
not to overwrite any formatting operations performed on dates or numeric values
during the preparation.
Outputting the result of the preparation into a database
-
In the design workspace, select tRedshiftOutput and click the
Component tab to define its basic settings.
-
In the Property Type list, select
Built-in to set the database connection details
manually. -
In the Host, Port,
Database, Schema,
Username and Password fields, enter the
Redshift connection details and the user authentication data for the database,
between double quotes -
To fill the Table field, with the expression that will
dynamically reuse the input file name and give it to the table, drag it from the
tFileList_2 list of expressions in the
Outline panel.
-
From the Action on table drop-down list, select
Create table if does not exist. -
From the Action on data drop-down list, select
Insert. -
Click Sync columns to retrieve the new output schema,
inherited from the tDataprepRun component.
Saving and executing the Job
- Save your Job.
- Press F6 to execute it.
The four datasets have been dynamically prepared with a single Job, using the
preparation dedicated to each of your customers and the output of those four
preparations has been sent to a Redshift database, in four new tables.
Promoting a Job
leveraging a preparation across environments
This scenario applies only to subscription-based Talend products.
The tDataprepRun component allows you to reuse an existing preparation made in Talend Data Preparation, directly in a data integration, Spark Batch
or Spark Streaming Job. In other words, you can operationalize the process of applying a
preparation to input data with the same model.
A good practice when using Talend Data Preparation is to set up at least two environments to
work with: a development one, and a production one for example. When a preparation is ready on
the development environment, you can use the Import/Export
Preparation feature to promote it to the production environment, that has a
different URL. For more information, see the section about promoting a preparation across
environments.

Following this logic, you will likely find yourself with a preparation that has the same name
on different environments. The thing is that preparations are not actually identified by their
name, but rather by a technical id, such as
prepid=faf4fe3e-3cec-4550-ae0b-f1ce108f83d5. As a consequence, what you
really have is two dinstinct preparations, each with its specific id.
In case you wanted to operationalize this recipe in a Talend Job using the regular preparation selection
properties, you would actually need two Jobs: one for the preparation on the development
environment, with a specific url and id, and a second one for the production environment, with
different parameters.
Through the use the Dynamic preparation selection checkbox and some
context variables, you will be able to use a single Job to run your preparation, regardless of
the environment. Indeed, the dynamic preparation selection relies on the preparation path in
Talend Data Preparation, and not on the preparation id.
You will be able to use a single Job definition to later deploy on your development or
production environment
The following scenario creates a simple Job that:
- Receives data from a local CSV file containing customers data
- Dynamically retrieves an existing preparation based on its path and
environment - Applies the preparation on the input data
- Outputs the prepared data into a MySQL database.
In this example, the customers_leads preparation has
been created beforehand in Talend Data Preparation. This
simple preparation was created on a dataset that has the same schema as the CSV file used as
input for this Job, and its purpose is to remove invalid values from your customers data.

Designing the Job
-
In the Integration perspective of Talend Studio, create an empty Standard Job
from the Job Designs node in the
Repository tree view. - Drop the following components from the Palette onto the design workspace: tFileInputDelimited, tDataprepRun and tMysqlOutput.
- Connect the three components using Row > Main links.
Creating contexts for your different environments
For your Job to be usable in differents situations, you will create two distincts
contexts.
Talend Studio allows you to create a set of
variables that you can regroup in a context. In this example, you will create a context
called Development and another one called
Production. Each of these contexts will contain the variables to
be used for the tDataprepRun configuration, according to the
target environment.
-
Click the Contexts tab of your
Job.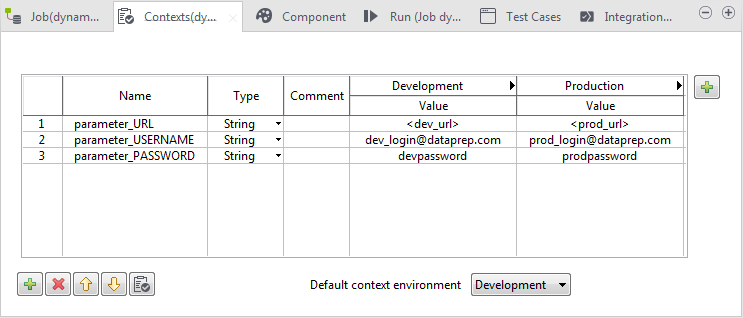
-
Click the + button on the top right of the variables
table to create a new context. -
Select the Default context and click
Edit… to rename it
Development. -
Click New… to create a new context called
Production. -
Click the + button on the bottom left of the variables
table to create a new variable called
parameter_URL.The
parameter_prefix is mandatory, in order for the
variable to be retrievable in Talend Cloud Management Console, if you use the Cloud
version of Talend Data Preparation. -
On the newly created URL line, enter the URLs of your
development and production instances of Talend Data Preparation in the corresponding
columns. -
Repeat the last two steps in order to create the
parameter_USERNAME and
parameter_PASSWORD variables, that will store your
Talend Data Preparation credentials depending
on the environment.If Multi Factor Authentication is activated, use your authentication token
instead of your password when creating the
parameter_PASSWORD variable.
These two different contexts will be available at execution time, when deploying your
Job.
Configuring the components
Retrieving the data from a CSV file
wich the preparation to operationalize was created.
-
In the design workspace, select the
tFileInputDelimited component, and click the
Component tab to define its basic settings.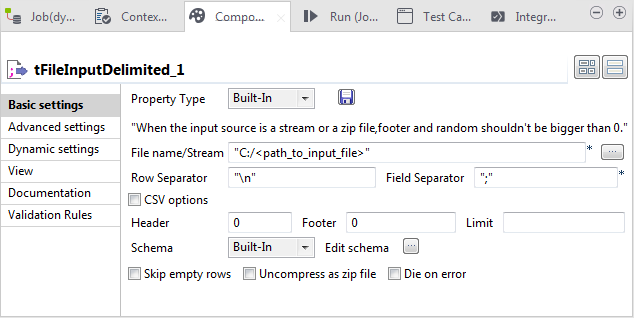
Fields marked with a * are mandatory.
-
In the Property Type list, select
Built-in. -
In the File name/Stream field, enter the path to the
file containing the input data on which you want to apply the preparation. -
Define the characters to be used as Row Separator and
Field Separator. -
Cick the Edit schema button to define the columns of the
source dataset and their data type.Make sure that the schema of the tFileInputDelimited
component matches the schema expected by the
tDataprepRun component. In other words, the input
schema must be the same as the dataset upon which the preparation was made
in the first place.
Dynamically selecting the preparation from Talend Data Preparation
-
In the design workspace, select tDataprepRun
and click the Component tab to define its
basic settings.
-
In the URL field, enter
context.parameter_URL to reuse one of the values
previously set for theURLcontext variable. -
In the Username and
Password fields, respectively enter
context.parameter_USERNAME and
context.parameter_PASSWORD to reuse one of the values
previously set for theUSERNAMEandPASSWORD
context variables. -
Select the Dynamic preparation selection checkbox to
define a preparation with its path in Talend Data Preparation rather than its technical
id. -
In the Preparation path field, enter the path to the
customers_leads preparation you want to apply on the
.csv file.Your preparation must have the same path on your Talend Data Preparation development environment
and production environment. -
In the Preparation version field, type
Current state between double quotes, in order to use the
current version of the preparation. -
Click Fetch Schema to
retrieve the schema of the preparation.The output schema of the tDataprepRun component now
reflects the changes made with each preparation step. The schema takes into
account columns that were added or removed for example. By defaut, the output
schema will use theStringtype for all the columns, in order
not to overwrite any formatting operations performed on dates or numeric values
during the preparation.
Outputting the result of the preparation into a database
The result of the preparation will be exported to a MySQL database.
-
In the design workspace, select tDataprepRun and click the
Component tab to define its basic
settings.
-
In the Property Type list, select Built-in to set the
database connection details manually. -
In the DB Version list, select the version of MySQL you are
using, MySQL 5 in this example. -
In the Host, Port,
Database, Username and
Password fields, enter the MySQL connection details and the
user authentication data for the database, between double quotes. -
In the Table Name field, type the name of the table to be
write in, between double quotes. -
From the Action on table drop-down list, select
Create table if does not exist. -
From the Action on data drop-down list, select
Insert. -
Click Sync columns to retrieve the new output schema,
inherited from the tDataprepRun component.
Deploying the Job to production
operationalize your preparation on real data.
- Save your Job.
- To promote your Job to production, export it to Talend Administration Center.
-
Create an execution task with the production context variables and configure
your preferred schedule.For more information on how to create an execution
task with the appropriate context variables, see the Working with Job
execution tasks section of the Talend Administration Center User Guide on https://help.talend.com.
tDataprepRun properties for Apache Spark Batch
These properties are used to configure tDataprepRun running in
the Spark Batch Job framework.
The Spark Batch
tDataprepRun component belongs to the
Talend Data Preparation family.
The component in this framework is available in all subscription-based Talend products with Big Data
and Talend Data Fabric.
Basic settings
|
URL |
Type the URL to the Talend Data Preparation web application, between double quotes. If you are working with Talend Cloud Data Preparation,
|
|
|
Type the email address that you use to log in the Talend Data Preparation web application, between double |
|
Password |
Click the […] button and type your user password for the Talend Data Preparation web application, between double If you are working with Talend Cloud Data Preparation and if:
|
When using the default preparation selection properties:
|
Preparation |
To complete the Preparation field, click Choose |
|
|
Click this button to edit the preparation in Talend Data Preparation that corresponds to the ID defined |
|
Version |
If you have created several versions of your |
|
Schema and Edit Schema |
A schema is a row description. It defines the number of fields Click Edit
Click Sync |
|
Fetch Schema |
Click this button to retrieve the schema from the preparation |
When using the Dynamic preparation selection:
|
Dynamic preparation selection |
Select this checkbox to define a preparation path and version |
|
Preparation path |
Use a context variable to define a preparation path. Paths |
|
Preparation version |
Use a context variable to define the version of the |
|
Schema and Edit Schema |
A schema is a row description. It defines the number of fields Click Edit
Click Sync |
|
Fetch Schema |
Click this button to dynamically retrieve the schema from the |
Advanced settings
|
Encoding |
Select an encoding mode from this list. You can select |
Global Variables
|
Global Variables |
ERROR_MESSAGE: the error message generated by the A Flow variable functions during the execution of a component while an After variable To fill up a field or expression with a variable, press Ctrl + For further information about variables, see |
Usage
|
Usage rule |
This component is an intermediary step. It requires an input |
|
Limitations |
|
|
Yarn cluster mode |
When the Yarn cluster mode is selected, the Job driver |
Applying a preparation
to a data sample in an Apache Spark Batch Job
This scenario applies only to subscription-based Talend products with Big
Data.
The tDataprepRun component allows you to reuse an existing
preparation made in Talend Data Preparation or Talend Cloud Data Preparation, directly in a Big Data Job. In other
words, you can operationalize the process of applying a preparation to input data with the
same model.
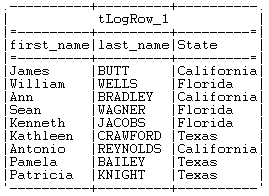
The following scenario creates a simple Job that :
- Reads a small sample of customer data,
- applies an existing preparation on this data,
- shows the result of the execution in the console.
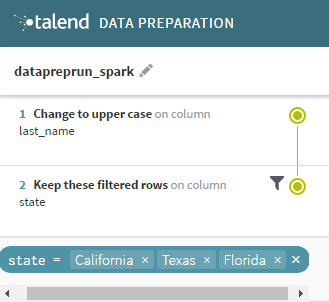
This assumes that a preparation has been created beforehand, on a dataset
with the same schema as your input data for the Job. In this case, the existing preparation
is called datapreprun_spark. This simple preparation puts the customer
last names into upper case and applies a filter to isolate the customers from California,
Texas and Florida.
Note that if a preparation contains actions that only affect a single row, or cells, they
will be skipped by the tDataprepRun component during the job. The Make as
header or Delete Row functions for example, do not work
in a Big Data context.
follows:
|
1 2 3 4 5 6 7 8 9 10 11 12 13 14 15 16 |
James;Butt;California Daniel;Fox;Connecticut Donna;Coleman;Alabama Thomas;Webb;Illinois William;Wells;Florida Ann;Bradley;California Sean;Wagner;Florida Elizabeth;Hall;Minnesota Kenneth;Jacobs;Florida Kathleen;Crawford;Texas Antonio;Reynolds;California Pamela;Bailey;Texas Patricia;Knight;Texas Todd;Lane;New Jersey Dorothy;Patterson;Virginia |
tHDFSConfiguration is used in this scenario by Spark to connect
to the HDFS system where the jar files dependent on the Job are transferred.
Configuration tab in the Run
view, define the connection to a given Spark cluster for the whole Job. In
addition, since the Job expects its dependent jar files for execution, you must
specify the directory in the file system to which these jar files are
transferred so that Spark can access these files:
-
Yarn mode (Yarn client or Yarn cluster):
-
When using Google Dataproc, specify a bucket in the
Google Storage staging bucket
field in the Spark configuration
tab. -
When using HDInsight, specify the blob to be used for Job
deployment in the Windows Azure Storage
configuration area in the Spark
configuration tab. - When using Altus, specify the S3 bucket or the Azure
Data Lake Storage for Job deployment in the Spark
configuration tab. - When using Qubole, add a
tS3Configuration to your Job to write
your actual business data in the S3 system with Qubole. Without
tS3Configuration, this business data is
written in the Qubole HDFS system and destroyed once you shut
down your cluster. -
When using on-premise
distributions, use the configuration component corresponding
to the file system your cluster is using. Typically, this
system is HDFS and so use tHDFSConfiguration.
-
-
Standalone mode: use the
configuration component corresponding to the file system your cluster is
using, such as tHDFSConfiguration or
tS3Configuration.If you are using Databricks without any configuration component present
in your Job, your business data is written directly in DBFS (Databricks
Filesystem).
Prerequisite: ensure that the Spark
cluster has been properly installed and is running.
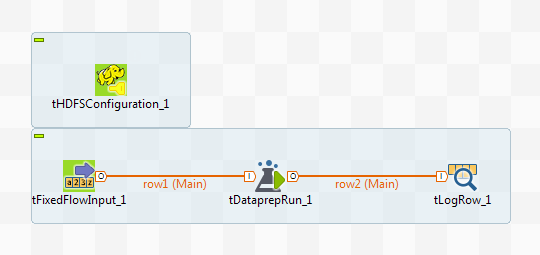
Adding and linking the components
-
In the Integration perspective of Talend Studio, create an empty Spark Batch
Job from the Job Designs node in the
Repository tree view.For further information about how to create a Spark Batch Job, see
Talend Big Data Getting Started Guide. -
Drop the following components from the Palette onto the design workspace:
tHDFSConfiguration, tFixedFlowInput, tDataprepRun and tLogRow. - Connect the last three components using Row > Main links.
Selecting the Spark mode
Depending on the Spark cluster to be used, select a Spark mode for your Job.
The Spark documentation provides an exhaustive list of Spark properties and
their default values at Spark Configuration. A Spark Job designed in the Studio uses
this default configuration except for the properties you explicitly defined in the
Spark Configuration tab or the components
used in your Job.
-
Click Run to open its view and then click the
Spark Configuration tab to display its view
for configuring the Spark connection. -
Select the Use local mode check box to test your Job locally.
In the local mode, the Studio builds the Spark environment in itself on the fly in order to
run the Job in. Each processor of the local machine is used as a Spark
worker to perform the computations.In this mode, your local file system is used; therefore, deactivate the
configuration components such as tS3Configuration or
tHDFSConfiguration that provides connection
information to a remote file system, if you have placed these components
in your Job.You can launch
your Job without any further configuration. -
Clear the Use local mode check box to display the
list of the available Hadoop distributions and from this list, select
the distribution corresponding to your Spark cluster to be used.This distribution could be:-
For this distribution, Talend supports:
-
Yarn client
-
Yarn cluster
-
-
For this distribution, Talend supports:
-
Standalone
-
Yarn client
-
Yarn cluster
-
-
For this distribution, Talend supports:
-
Yarn client
-
-
For this distribution, Talend supports:
-
Yarn client
-
Yarn cluster
-
-
For this distribution, Talend supports:
-
Standalone
-
Yarn client
-
Yarn cluster
-
-
For this distribution, Talend supports:
-
Yarn cluster
-
-
Cloudera Altus
For this distribution, Talend supports:-
Yarn cluster
Your Altus cluster should run on the following Cloud
providers:-
Azure
The support for Altus on Azure is a technical
preview feature. -
AWS
-
-
As a Job relies on Avro to move data among its components, it is recommended to set your
cluster to use Kryo to handle the Avro types. This not only helps avoid
this Avro known issue but also
brings inherent preformance gains. The Spark property to be set in your
cluster is:
1spark.serializer org.apache.spark.serializer.KryoSerializerIf you cannot find the distribution corresponding to yours from this
drop-down list, this means the distribution you want to connect to is not officially
supported by
Talend
. In this situation, you can select Custom, then select the Spark
version of the cluster to be connected and click the
[+] button to display the dialog box in which you can
alternatively:-
Select Import from existing
version to import an officially supported distribution as base
and then add other required jar files which the base distribution does not
provide. -
Select Import from zip to
import the configuration zip for the custom distribution to be used. This zip
file should contain the libraries of the different Hadoop/Spark elements and the
index file of these libraries.In
Talend
Exchange, members of
Talend
community have shared some ready-for-use configuration zip files
which you can download from this Hadoop configuration
list and directly use them in your connection accordingly. However, because of
the ongoing evolution of the different Hadoop-related projects, you might not be
able to find the configuration zip corresponding to your distribution from this
list; then it is recommended to use the Import from
existing version option to take an existing distribution as base
to add the jars required by your distribution.Note that custom versions are not officially supported by
Talend
.
Talend
and its community provide you with the opportunity to connect to
custom versions from the Studio but cannot guarantee that the configuration of
whichever version you choose will be easy. As such, you should only attempt to
set up such a connection if you have sufficient Hadoop and Spark experience to
handle any issues on your own.
For a step-by-step example about how to connect to a custom
distribution and share this connection, see Hortonworks.
Configuring the connection to the file system to be used by Spark
Skip this section if you are using Google Dataproc or HDInsight, as for these two
distributions, this connection is configured in the Spark
configuration tab.
-
Double-click tHDFSConfiguration to open its Component view.
Spark uses this component to connect to the HDFS system to which the jar
files dependent on the Job are transferred. -
If you have defined the HDFS connection metadata under the Hadoop
cluster node in Repository, select
Repository from the Property
type drop-down list and then click the
[…] button to select the HDFS connection you have
defined from the Repository content wizard.For further information about setting up a reusable
HDFS connection, search for centralizing HDFS metadata on Talend Help Center
(https://help.talend.com).If you complete this step, you can skip the following steps about configuring
tHDFSConfiguration because all the required fields
should have been filled automatically. -
In the Version area, select
the Hadoop distribution you need to connect to and its version. -
In the NameNode URI field,
enter the location of the machine hosting the NameNode service of the cluster.
If you are using WebHDFS, the location should be
webhdfs://masternode:portnumber; WebHDFS with SSL is not
supported yet. -
In the Username field, enter
the authentication information used to connect to the HDFS system to be used.
Note that the user name must be the same as you have put in the Spark configuration tab.
Configuring the input data and the preparation
Loading the sample data
-
In the design workspace, select the
tFixedFlowInput component and click the Component tab to define its basic settings.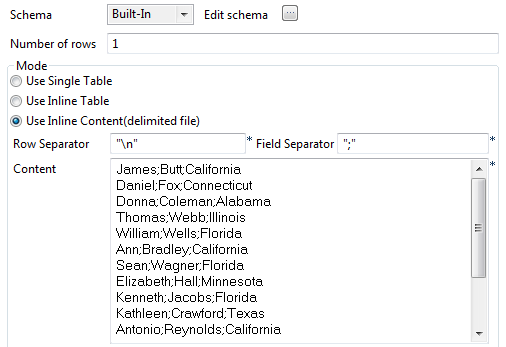
- Click the […] button next to Edit schema to open the schema editor.
-
Click the [+] button to add the schema
columns as shown in this image.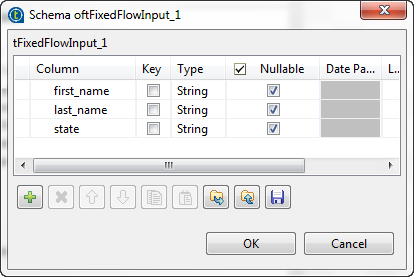
This schema is the same as the dataset originally used to create the
datapreprun_spark preparation in
Talend Data Preparation or Talend Cloud Data Preparation. -
Click OK to validate these changes and accept
the propagation prompted by the pop-up dialog box. -
In the Mode area, select the Use Inline Content radio button and paste the
above-mentioned sample data about customers into the Content field that is displayed. -
In the Field separator
field, enter a semicolon (;).
Accessing the preparation from Talend Data Preparation
-
In the design workspace, select tDataprepRun
and click the Component tab to define its
basic settings.
-
In the URL field, type
the URL of the Talend Data Preparation or
Talend Cloud Data Preparation web application,
between double quotes. Port9999is the default
port for Talend Data Preparation. -
In the Username and
Password fields, enter your Talend Data Preparation or Talend Cloud Data Preparation connection information,
between double quotes.If you are working with Talend Cloud Data Preparation and if:- SSO is enabled, enter an access
token in the field. - SSO is not enabled, enter either
an access token or your password in the field.
- SSO is enabled, enter an access
-
Click Choose an existing
preparation to display a list of the prepations available in
Talend Data Preparation or Talend Cloud Data Preparation, and select datapreprun_spark.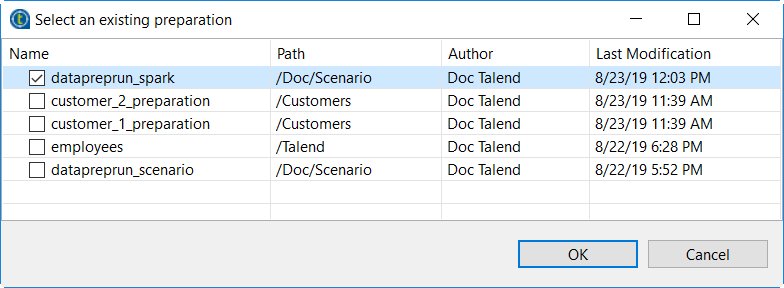
This scenario assumes that a preparation with a compatible schema has been
created beforehand.A warning is displayed next to preparations containing incompatible actions,
that only affect a single row or cell. -
Click Fetch Schema to retrieve the schema of
the preparation.The output schema of the tDataprepRun component now
reflects the changes made with each preparation step. The schema takes into
account columns that were added or removed for example. By defaut, the output
schema will use theStringtype for all the columns, in order
not to overwrite any formatting operations performed on dates or numeric values
during the preparation.
Executing the Job
The tLogRow component is used to present the
execution result of the Job.
-
In the design workspace, select the tLogRow
component and click the Component tab to define
its basic settings. -
Select the Table radio button to present the
result in a table. - Save your Job and press F6 to execute it.
-
You can now check the execution result in the console of the Run view.
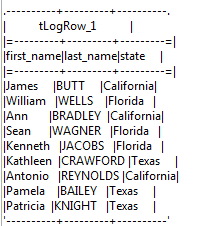
The preparation made in Talend Data Preparation or Talend Cloud Data Preparation has been applied to the sample
data and only the customer from California, Florida and Texas remain.
For the sake of this example, we used a small data sample, but the Spark
Batch version of the tDataprepRun component can be used with high
volume of data.
tDataprepRun properties for Apache Spark Streaming
These properties are used to configure tDataprepRun running in
the Spark Streaming Job framework.
The Spark Streaming
tDataprepRun component belongs to
the Talend Data Preparation family.
This component is available in Talend Real Time Big Data Platform and Talend Data Fabric.
Basic settings
|
URL |
Type the URL to the Talend Data Preparation web application, between double quotes. If you are working with Talend Cloud Data Preparation,
|
|
|
Type the email address that you use to log in the Talend Data Preparation web application, between double |
|
Password |
Click the […] button and type your user password for the Talend Data Preparation web application, between double If you are working with Talend Cloud Data Preparation and if:
|
When using the default preparation selection properties:
|
Preparation |
To complete the Preparation field, click Choose |
|
|
Click this button to edit the preparation in Talend Data Preparation that corresponds to the ID defined |
|
Version |
If you have created several versions of your |
|
Schema and Edit Schema |
A schema is a row description. It defines the number of fields Click Edit
Click Sync |
|
Fetch Schema |
Click this button to retrieve the schema from the preparation |
When using the Dynamic preparation selection:
|
Dynamic preparation selection |
Select this checkbox to define a preparation path and version |
|
Preparation path |
Use a context variable to define a preparation path. Paths |
|
Preparation version |
Use a context variable to define the version of the |
|
Schema and Edit Schema |
A schema is a row description. It defines the number of fields Click Edit
Click Sync |
|
Fetch Schema |
Click this button to dynamically retrieve the schema from the |
Advanced settings
|
Encoding |
Select an encoding mode from this list. You can select |
Global Variables
|
Global |
ERROR_MESSAGE: the error message generated by the A Flow variable functions during the execution of a component while an After variable To fill up a field or expression with a variable, press Ctrl + For further information about variables, see |
Usage
|
Usage rule |
This component is an intermediary step. It requires an input |
|
Limitations |
|
|
Yarn cluster mode |
When the Yarn cluster mode is selected, the Job driver |
Applying a preparation to a data
sample in an Apache Spark Streaming Job
This scenario applies only to Talend Real Time Big Data Platform and Talend Data Fabric.
The tDataprepRun component allows you to reuse an existing preparation
made in Talend Data Preparation or Talend Cloud Data Preparation, directly in a Big Data Job. In other
words, you can operationalize the process of applying a preparation to input data with the
same model.
The following scenario creates a simple Job that :
- Reads a small sample of customer data,
- applies an existing preparation on this data,
- shows the result of the execution in the console.
This assumes that a preparation has been created beforehand, on a dataset with the same
schema as your input data for the Job. In this case, the existing preparation is called
datapreprun_spark. This simple preparation puts the customer last
names into upper case and applies a filter to isolate the customers from California, Texas
and Florida.
Note that if a preparation contains actions that only affect a single row, or cells, they
will be skipped by the tDataprepRun component during the job. The
Make as header or Delete Row functions for
example, do not work in a Big Data context.
follows:
|
1 2 3 4 5 6 7 8 9 10 11 12 13 14 15 16 |
James;Butt;California Daniel;Fox;Connecticut Donna;Coleman;Alabama Thomas;Webb;Illinois William;Wells;Florida Ann;Bradley;California Sean;Wagner;Florida Elizabeth;Hall;Minnesota Kenneth;Jacobs;Florida Kathleen;Crawford;Texas Antonio;Reynolds;California Pamela;Bailey;Texas Patricia;Knight;Texas Todd;Lane;New Jersey Dorothy;Patterson;Virginia |
tHDFSConfiguration is used in this scenario by Spark to connect
to the HDFS system where the jar files dependent on the Job are transferred.
Configuration tab in the Run
view, define the connection to a given Spark cluster for the whole Job. In
addition, since the Job expects its dependent jar files for execution, you must
specify the directory in the file system to which these jar files are
transferred so that Spark can access these files:
-
Yarn mode (Yarn client or Yarn cluster):
-
When using Google Dataproc, specify a bucket in the
Google Storage staging bucket
field in the Spark configuration
tab. -
When using HDInsight, specify the blob to be used for Job
deployment in the Windows Azure Storage
configuration area in the Spark
configuration tab. - When using Altus, specify the S3 bucket or the Azure
Data Lake Storage for Job deployment in the Spark
configuration tab. - When using Qubole, add a
tS3Configuration to your Job to write
your actual business data in the S3 system with Qubole. Without
tS3Configuration, this business data is
written in the Qubole HDFS system and destroyed once you shut
down your cluster. -
When using on-premise
distributions, use the configuration component corresponding
to the file system your cluster is using. Typically, this
system is HDFS and so use tHDFSConfiguration.
-
-
Standalone mode: use the
configuration component corresponding to the file system your cluster is
using, such as tHDFSConfiguration or
tS3Configuration.If you are using Databricks without any configuration component present
in your Job, your business data is written directly in DBFS (Databricks
Filesystem).
Prerequisite: ensure that the Spark cluster has been properly
installed and is running.
Adding and linking the components
-
In the Integration perspective of Talend Studio, create an empty Spark
Streaming Job from the Job Designs node in the
Repository tree view.For further information about how to create a Spark Streaming Job, see
Talend Real-Time Big Data Getting Started Guide. -
Drop the following components from the Palette onto the
design workspace: tHDFSConfiguration,
tFixedFlowInput, tDataprepRun and tLogRow. - Connect the last three components using Row > Main links.
Selecting the Spark mode
Depending on the Spark cluster to be used, select a Spark mode for your Job.
The Spark documentation provides an exhaustive list of Spark properties and
their default values at Spark Configuration. A Spark Job designed in the Studio uses
this default configuration except for the properties you explicitly defined in the
Spark Configuration tab or the components
used in your Job.
-
Click Run to open its view and then click the
Spark Configuration tab to display its view
for configuring the Spark connection. -
Select the Use local mode check box to test your Job locally.
In the local mode, the Studio builds the Spark environment in itself on the fly in order to
run the Job in. Each processor of the local machine is used as a Spark
worker to perform the computations.In this mode, your local file system is used; therefore, deactivate the
configuration components such as tS3Configuration or
tHDFSConfiguration that provides connection
information to a remote file system, if you have placed these components
in your Job.You can launch
your Job without any further configuration. -
Clear the Use local mode check box to display the
list of the available Hadoop distributions and from this list, select
the distribution corresponding to your Spark cluster to be used.This distribution could be:-
For this distribution, Talend supports:
-
Yarn client
-
Yarn cluster
-
-
For this distribution, Talend supports:
-
Standalone
-
Yarn client
-
Yarn cluster
-
-
For this distribution, Talend supports:
-
Yarn client
-
-
For this distribution, Talend supports:
-
Yarn client
-
Yarn cluster
-
-
For this distribution, Talend supports:
-
Standalone
-
Yarn client
-
Yarn cluster
-
-
For this distribution, Talend supports:
-
Yarn cluster
-
-
Cloudera Altus
For this distribution, Talend supports:-
Yarn cluster
Your Altus cluster should run on the following Cloud
providers:-
Azure
The support for Altus on Azure is a technical
preview feature. -
AWS
-
-
As a Job relies on Avro to move data among its components, it is recommended to set your
cluster to use Kryo to handle the Avro types. This not only helps avoid
this Avro known issue but also
brings inherent preformance gains. The Spark property to be set in your
cluster is:
1spark.serializer org.apache.spark.serializer.KryoSerializerIf you cannot find the distribution corresponding to yours from this
drop-down list, this means the distribution you want to connect to is not officially
supported by
Talend
. In this situation, you can select Custom, then select the Spark
version of the cluster to be connected and click the
[+] button to display the dialog box in which you can
alternatively:-
Select Import from existing
version to import an officially supported distribution as base
and then add other required jar files which the base distribution does not
provide. -
Select Import from zip to
import the configuration zip for the custom distribution to be used. This zip
file should contain the libraries of the different Hadoop/Spark elements and the
index file of these libraries.In
Talend
Exchange, members of
Talend
community have shared some ready-for-use configuration zip files
which you can download from this Hadoop configuration
list and directly use them in your connection accordingly. However, because of
the ongoing evolution of the different Hadoop-related projects, you might not be
able to find the configuration zip corresponding to your distribution from this
list; then it is recommended to use the Import from
existing version option to take an existing distribution as base
to add the jars required by your distribution.Note that custom versions are not officially supported by
Talend
.
Talend
and its community provide you with the opportunity to connect to
custom versions from the Studio but cannot guarantee that the configuration of
whichever version you choose will be easy. As such, you should only attempt to
set up such a connection if you have sufficient Hadoop and Spark experience to
handle any issues on your own.
For a step-by-step example about how to connect to a custom
distribution and share this connection, see Hortonworks.
Configuring a Spark stream for your Apache Spark streaming Job
-
In the Batch size
field, enter the time interval at the end of which the Job reviews the source
data to identify changes and processes the new micro batches. -
If needs be, select the Define a streaming
timeout check box and in the field that is displayed, enter the
time frame at the end of which the streaming Job automatically stops
running.
Configuring the connection to the file system to be used by Spark
Skip this section if you are using Google Dataproc or HDInsight, as for these two
distributions, this connection is configured in the Spark
configuration tab.
-
Double-click tHDFSConfiguration to open its Component view.
Spark uses this component to connect to the HDFS system to which the jar
files dependent on the Job are transferred. -
If you have defined the HDFS connection metadata under the Hadoop
cluster node in Repository, select
Repository from the Property
type drop-down list and then click the
[…] button to select the HDFS connection you have
defined from the Repository content wizard.For further information about setting up a reusable
HDFS connection, search for centralizing HDFS metadata on Talend Help Center
(https://help.talend.com).If you complete this step, you can skip the following steps about configuring
tHDFSConfiguration because all the required fields
should have been filled automatically. -
In the Version area, select
the Hadoop distribution you need to connect to and its version. -
In the NameNode URI field,
enter the location of the machine hosting the NameNode service of the cluster.
If you are using WebHDFS, the location should be
webhdfs://masternode:portnumber; WebHDFS with SSL is not
supported yet. -
In the Username field, enter
the authentication information used to connect to the HDFS system to be used.
Note that the user name must be the same as you have put in the Spark configuration tab.
Configuring the input data and the preparation
Loading the sample data
-
In the design workspace, select the tFixedFlowInput
component and click the Component tab to define its basic
settings.
- Click the […] button next to Edit schema to open the schema editor.
-
Click the [+] button to add the schema
columns as shown in this image.
This schema is the same as the dataset originally used to create the
datapreprun_spark preparation in Talend Data Preparation or Talend Cloud Data Preparation. -
Click OK to validate these changes and accept
the propagation prompted by the pop-up dialog box. -
In the Streaming area, enter your preferred value for
the Input repetition interval (ms) field. In this
example, the default value, 5000 is used. -
In the Mode area, select the Use Inline Content radio button and paste the
above-mentioned sample data about customers into the Content field that is displayed. -
In the Field separator
field, enter a semicolon (;).
Accessing the preparation from Talend Data Preparation
-
In the design workspace, select tDataprepRun and click
the Component tab to define its basic settings.
-
In the URL field, type the URL of the Talend Data Preparation or Talend Cloud Data Preparation web application, between
double quotes. Port9999is the default port for Talend Data Preparation. -
In the Username and
Password fields, enter your Talend Data Preparation or Talend Cloud Data Preparation connection information,
between double quotes.If you are working with Talend Cloud Data Preparation and if:- SSO is enabled, enter an access
token in the field. - SSO is not enabled, enter either
an access token or your password in the field.
- SSO is enabled, enter an access
-
Click Choose an existing
preparation to display a list of the prepations available in
Talend Data Preparation, and select
datapreprun_spark.
This scenario assumes that a preparation with a compatible schema has been
created beforehand.A warning is displayed next to preparations containing incompatible actions,
that only affect a single row or cell. -
Click Fetch Schema to retrieve the schema of
the preparation.The output schema of the tDataprepRun component now
reflects the changes made with each preparation step. The schema takes into
account columns that were added or removed for example. By defaut, the output
schema will use theStringtype for all the columns, in order
not to overwrite any formatting operations performed on dates or numeric values
during the preparation.
Executing the Job
The tLogRow component is used to present the execution result of the
Job.
-
In the design workspace, select the tLogRow
component and click the Component tab to define
its basic settings. -
Select the Table radio button to present the
result in a table. -
Save your Job and press F6 to
execute it. -
You can now check the execution result in the console of the Run view.
The preparation made in Talend Data Preparation or
Talend Cloud Data Preparation has been applied to the
sample data and only the customer from California, Florida and Texas remain.
For the sake of this example, we used a small data sample, but the Spark
Batch version of the tDataprepRun component can be used with high
volume of data.