tELTOracleOutput
Performs the action (insert, update, delete, or merge) on data in the specified
Oracle table through the SQL statement generated by the tELTOracleMap
component.
The three ELT Oracle components are closely related, in
terms of their operating conditions. These components should be used to handle Oracle
database table schemas to generate SQL statements, including clauses, which are to be
executed in the database output table defined.
tELTOracleOutput Standard properties
These properties are used to configure tELTOracleOutput running in the Standard Job framework.
The Standard
tELTOracleOutput component belongs to the ELT family.
The component in this framework is available in all Talend
products.
Basic Settings
|
Action on data |
On the data of the table defined, you can perform the following
Insert: Add new entries to the table. If Update: Updates entries in the table.
Delete: Deletes the entries which
MERGE: Updates and/or adds data to the Note:
Following global variables are available:
|
|
Schema and Edit schema |
A schema is a row description, it defines the number of fields Click Edit
|
|
|
Built-in: The schema is created and |
|
|
Repository: The schema already exists |
|
Where clauses for (for UPDATE and DELETE |
Enter a clause to filter the data to be updated or deleted |
|
Use Merge Update (for MERGE) |
Select this check box to update the data in the output
Column : Lists the columns in the entry
Update : Select the check box which
Use Merge Update Where Clause : Select
Use Merge Update Delete Clause: Select |
|
Use Merge Insert (for MERGE) |
Select this check box to insert the data in the table.
Column: Lists the entry flow
Check All: Select the check box
Use Merge Update Where Clause: Select |
|
Default Table Name |
Enter a default name for the table, between double quotation |
|
Default Schema Name |
Enter a name for the default Oracle schema, between double |
|
Table name from connection name is |
Select this check box when the name of the connection to this |
|
Use different table name |
Select this check box to define a different output table name, |
|
Mapping |
Specify the metadata mapping file |
Advanced settings
|
Use Hint Options |
Select this check box to activate the hint configuration area when you – HINT: specify the hint you need, – POSITION: specify where you put the – SQL STMT: select the SQL statement |
|
tStatCatcher Statistics |
Select this check box to gather the Job processing metadata at a Job |
Global Variables
|
Global Variables |
NB_LINE: the number of rows read by an input component or
NB_LINE_INSERTED: the number of rows inserted. This is an
ERROR_MESSAGE: the error message generated by the A Flow variable functions during the execution of a component while an After variable To fill up a field or expression with a variable, press Ctrl + For further information about variables, see |
Usage
|
Usage rule |
tELTOracleOutput is to be used along Note:
Note that the ELT components do not handle actual data flow but |
Managing data using the Oracle MERGE function
The sample Job described in this scenario allows you to add
new customer information and update existing customer information in a database table using
the Oracle MERGE command.
Linking the components
-
Add the following components from the Palette to the design workspace:
tELTOracleInput, tELTOracleMap, and tELTOracleOutput. -
Label tELTOracleInput as new_customer, tELTOracleMap as ELT Mapper,
and tELTOracleOutput as
merge_data. - Link tELTOracleInput to tELTOracleMap using a Row > New Output (table) connection.
-
When prompted, enter NEW_CUSTOMER as the table name, which should be the actual database
table name. - Link tELTOracleMap to tELTOracleOutput using a Row > New Output (table) connection.
-
When prompted, enter customers_merge as the name of the database table, which holds the
merge results.
Configuring the components
-
Double-click the tELTOracleInput component to display its Basic settings view.
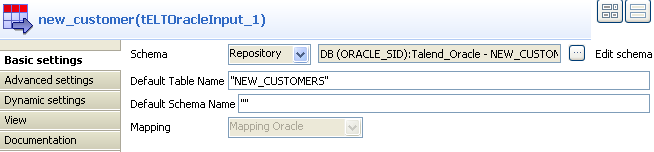
- Select Repository from the Schema list and click the […] button preceding Edit schema.
-
Select your database connection and the desired schema from the
Repository Content dialog
box.
The selected schema name appears in the
Default Table Name field
automatically.- In this use case, the database connection is Talend_Oracle and the schema is
new_customers. - In this use case, the input schema is stored in the Metadata node of the Repository tree view for easy
retrieval. For further information concerning metadata, see
Talend Studio
User Guide. - You can also select the input component by dropping the
relevant schema from the Metadata area onto the design workspace and double-clicking
tELTOracleInput from
the Components dialog box.
Doing so allows you to skip the steps of labeling the input component and
defining its schema manually.
- In this use case, the database connection is Talend_Oracle and the schema is
-
Click the tELTOracleMap component to display its Basic settings view.

-
Select Repository from the Property Type list, and select the same database connection that you
use for the input components.Remember: All the database details are automatically
retrieved. Leave the other settings as they are. -
Double-click the tELTOracleMap component to launch the ELT Map editor
for setingup the data transformation flow.Display the input table by clicking the green plus
button at the upper left corner of the ELT Map editor and selecting the relevant
table name in the Add a new
alias dialog box.In this use case, the only input table is
new_customers.
-
Select all the columns in the input table and drop
them to the output table.
-
Click the Generated SQL Select query tab to display the query
statement to be executed. Click OK to validate the ELT Map settings and close the ELT Map
editor. -
Double-click the tELTOracleOutput component to display its Basic settings view.
-
From the Action on
data list, select MERGE. -
Click the Sync
columns button to retrieve the schema from the preceding
component. -
Select the Use
Merge Update check box to update the data using Oracle’s MERGE
function.
-
From the Action on
-
In the table that appears, select the check boxes
for the columns you want to update.In this use case, youupdate all the data
according to the customer ID. Therefore, select all the check boxes except the one
for the ID column. Warning: The columns defined as the
primary key cannot and must not be made subject to updates. -
Select the Use Merge Insert check box to insert new data while
updating the existing data by leveraging the OracleMERGE function. -
In the table that appears, select the check boxes for the columns
into which you want to insert new data.In this use case, insert all the new customer
data. Therefore, select all the check boxes by clicking the Check All check box. -
Fill the Default Table Name field with the name of the target
table already existing in your database. In this example, fill in customers_merge. -
Leave the other parameters as they are.

Executing the Job
-
Save
the Job. -
Click
Run to
execute
the Job.The data is updated and inserted in the database. The query used
is displayed on the console.