tFileOutputLDIF
Writes or modifies an LDIF file with data separated in respective entries based on
the schema defined, or else deletes content from an LDIF file.
tFileOutputLDIF outputs data to an
LDIF type of file which can then be loaded into an LDAP directory.
tFileOutputLDIF Standard properties
These properties are used to configure tFileOutputLDIF running in the Standard Job framework.
The Standard
tFileOutputLDIF component belongs to the File family.
The component in this framework is available in all Talend
products.
Basic settings
|
File Name |
Specify the path to the LDIF output file. Warning: Use absolute path (instead of relative path) for
this field to avoid possible errors. |
|
Wrap |
Specify the number of characters at which the line will be |
|
Change type |
Select a changetype that defines the operation you want to perform
on the entries in the output LDIF file.
|
|
Multi-Values / Modify Detail |
Specify the attributes for multi-value fields when Add or Default is selected from the Change type list or provide the detailed
This table is available only when Add, Modify, or |
|
Schema and Edit |
A schema is a row description. It defines the number of fields Click Edit
|
|
|
Built-In: You create and store the schema locally for this component |
|
|
Repository: You have already created the schema and stored it in the |
|
Sync columns |
Click to synchronize the output file schema with the input file |
|
Append |
Select this check box to add the new rows at the end of the |
Advanced settings
|
Enforce safe base 64 conversion |
Select this check box to enable the safe base-64 encoding. For |
|
Create directory if not exists |
This check box is selected by default. It creates the directory |
|
Custom the flush buffer size |
Select this check box to specify the number of lines to write |
|
Row number |
Type in the number of lines to write before emptying the This field is available only when the Custom |
|
Encoding |
Select the encoding from the list or select Custom and define it manually. This field is |
|
Don’t generate empty file |
Select this check box if you do not want to generate empty |
|
tStatCatcher Statistics |
Select this check box to gather the Job processing metadata at a |
Global Variables
|
Global Variables |
NB_LINE: the number of rows read by an input component or
ERROR_MESSAGE: the error message generated by the A Flow variable functions during the execution of a component while an After variable To fill up a field or expression with a variable, press Ctrl + For further information about variables, see |
Usage
|
Usage rule |
This component is used to write an LDIF file with data passed on |
|
Limitation |
Due to license incompatibility, one or more JARs required to use |
Writing data from a database table into an LDIF file
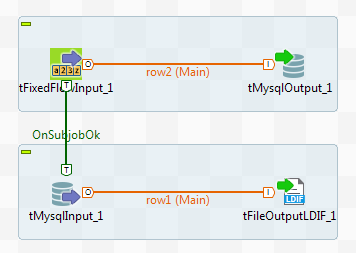
This scenario describes a Job that loads data into a database table, and then
extracts the data from the table and writing the data into a new LDIF file.
Adding and linking components
-
Create a new Job and add the following components by typing their names in
the design workspace or dropping them from the Palette: a tFixedFlowInput
component, a tMysqlOutput component, a
tMysqlInput component, and a tFileOutputLDIF component. -
Link tFixedFlowInput to tMysqlOutput using a Row > Main
connection. -
Link tMysqlInput to tFileOutputLDIF using a Row
> Main connection. -
Link tFixedFlowInput to tMysqlInput using a Trigger > On Subjob Ok
connection.
Configuring the components
Loading data into a database table
-
Double-click tFixedFlowInput to open its
Basic settings view.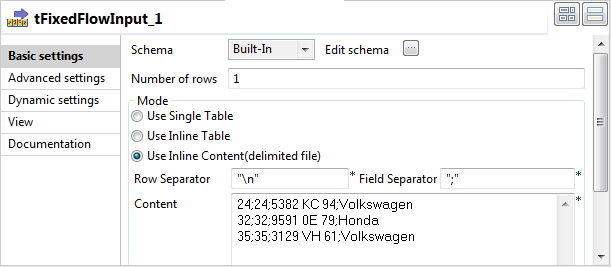
-
Click the […] button next to Edit schema and in the pop-up window define the
schema by adding four columns: dn,
id_owners, registration, and make,
all of String type.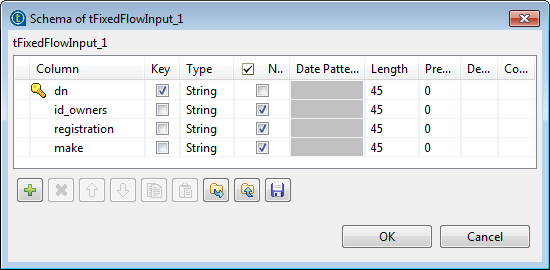
-
Click OK to close the schema editor and
accept the propagation prompted by the pop-up dialog box. -
In the Mode area, select Use Inline Content(delimited file), and then in
the Content field displayed, enter the
following input
data:24;24;5382 KC 94;Volkswagen
32;32;9591 0E 79;Honda
35;35;3129 VH 61;Volkswagen
-
Double-click tMysqlOutput to open its
Basic settings view.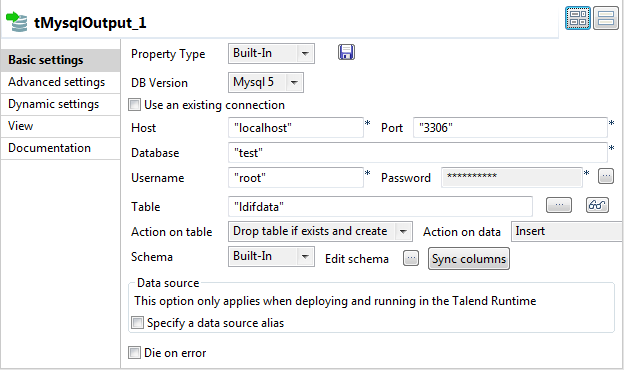
-
Fill in the Host, Port, Database, Username, and Password fields with your MySQL database connection
details. -
In the Table field, enter the name of the
table into which the data will be written. In this example, it is ldifdata. -
Select Drop table if exists and create
from the Action on table drop-down
list.
Extracting data from the database table and writing it into an LDIF
file
-
Double-click tMysqlInput to open its
Basic settings view.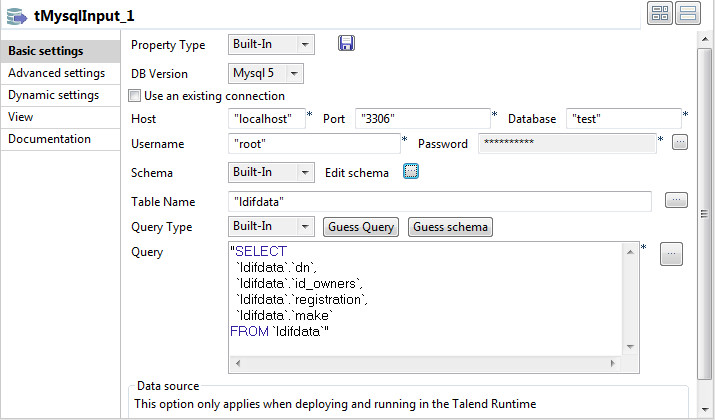
-
Fill in the Host, Port, Database, Username, and Password fields with your MySQL database connection
details. -
Click the […] button next to Edit schema and in the pop-up window define the
schema by adding four columns: dn,
id_owners, registration, and make,
all of String type. -
In the Table Name field, enter the name
of the table from which the data will be read. In this example, it is
ldifdata. -
Click the Guess Query button to fill in
the Query field with the auto-generated
query. -
Double-click tFileOutputLDIF to open its
Basic settings view.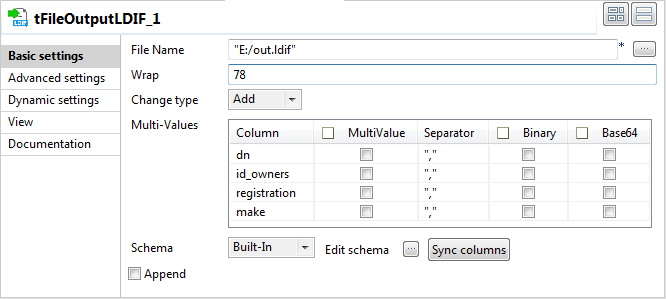
-
In the File Name field, browse to or
enter the path to the LDIF file to be generated. In this example, it is
E:/out.ldif. -
Select the operation Add from the
Change type list. -
Click the Sync columns button to retrieve
the schema from the preceding component.
Saving and executing the Job
- Press Ctrl+S to save your Job.
-
Press F6 or click Run on the Run tab to
execute the Job. The LDIF file created contains the data from the database table and the
change type for the entries is set to add.