tHDFSGet
Copies files from Hadoop distributed file system(HDFS), pastes them in a
user-defined directory and if needs be, renames them.
tHDFSGet connects to Hadoop distributed file system, helping to obtain
large-scale files with optimized performance.
tHDFSGet Standard properties
These properties are used to configure tHDFSGet running in the Standard Job framework.
The Standard
tHDFSGet component belongs to the Big Data and the File families.
The component in this framework is available in all Talend products with Big Data
and in Talend Data Fabric.
Basic settings
|
Property type |
Either Built-in or Repository Built-in: No property data stored centrally.
Repository: Select the repository file in which the |
|
Use an existing connection |
Select this check box and in the Component List click the HDFS connection component from which Note that when a Job contains the parent Job and the child Job, |
|
Distribution |
Select the cluster you are using from the drop-down list. The options in the
list vary depending on the component you are using. Among these options, the following ones requires specific configuration:
|
|
Version |
Select the version of the Hadoop distribution you are using. The available |
| Scheme | Select the URI scheme of the file system to be used from the Scheme drop-down list. This scheme could be
The schemes present on this list vary depending on the distribution you Once a scheme is If you have selected
ADLS, the connection parameters to be defined become:
For a |
|
NameNode URI |
Type in the URI of the Hadoop NameNode, the master node of a |
|
Use kerberos authentication |
If you are accessing the Hadoop cluster running
with Kerberos security, select this check box, then, enter the Kerberos principal name for the NameNode in the field displayed. This enables you to use your user name to authenticate against the credentials stored in Kerberos.
This check box is available depending on the Hadoop distribution you are |
| Use a keytab to authenticate |
Select the Use a keytab to authenticate Note that the user that executes a keytab-enabled Job is not necessarily |
|
User name |
The User name field is available when you are not using |
|
Group |
Enter the membership including the authentication user under which the HDFS instances were |
|
HDFS directory |
Browse to, or enter the path pointing to the data to be used in the file system. |
|
Local directory |
Browse to, or enter the local directory to store the files obtained from |
|
Overwrite file |
Options to overwrite or not the existing file with the new one. |
|
Append |
Select this check box to add the new rows at the end of the records. |
|
Include subdirectories |
Select this check box if the selected input source type includes |
|
Files |
In the Files area, the fields to be completed are: – File mask: type in the file name to be selected from – New name: give a new name to the obtained file. |
|
Die on error |
This check box is selected by default. Clear the check box to skip the row on |
Advanced settings
|
tStatCatcher Statistics |
Select this check box to collect log data at the component |
|
Hadoop properties |
Talend Studio uses a default configuration for its engine to perform operations in a Hadoop distribution. If you need to use a custom configuration in a specific situation, complete this table with the property or properties to be customized. Then at runtime, the customized property or properties will override those default ones.
For further information about the properties required by Hadoop and its related systems such
as HDFS and Hive, see the documentation of the Hadoop distribution you are using or see Apache’s Hadoop documentation on http://hadoop.apache.org/docs and then select the version of the documentation you want. For demonstration purposes, the links to some properties are listed below:
|
Global Variables
|
Global Variables |
NB_FILE: the number of files processed. This is an After
CURRENT_STATUS: the execution result of the component.
TRANSFER_MESSAGES: file transferred information. This is
ERROR_MESSAGE: the error message generated by the A Flow variable functions during the execution of a component while an After variable To fill up a field or expression with a variable, press Ctrl + For further information about variables, see |
Usage
|
Usage rule |
This component combines HDFS connection and data extraction, thus Different from the tHDFSInput and the It is often connected to the Job using OnSubjobOk or OnComponentOk link, depending on the context. |
|
Dynamic settings |
Click the [+] button to add a row in the The Dynamic settings table is For examples on using dynamic parameters, see Reading data from databases through context-based dynamic connections and Reading data from different MySQL databases using dynamically loaded connection parameters. For more information on Dynamic |
|
Prerequisites |
The Hadoop distribution must be properly installed, so as to guarantee the interaction
For further information about how to install a Hadoop distribution, see the manuals |
|
Limitations |
JRE 1.6+ is required. |
Computing data with Hadoop distributed file system
This scenario applies only to Talend products with Big Data.
The following scenario describes a simple Job that creates a file in a defined
directory, get it into and out of HDFS, subsequently store it to another local directory, and
read it at the end of the Job.
Setting up the Job
-
Drop the following components from the Palette onto the design workspace: tFixedFlowInput, tFileOutputDelimited, tHDFSPut, tHDFSGet,
tFileInputDelimited and tLogRow. -
Connect tFixedFlowInput to tFileOutputDelimited using a Row > Main
connection. -
Connect tFileInputDelimited to tLogRow using a Row > Main
connection. - Connect tFixedFlowInput to tHDFSPut using an OnSubjobOk connection.
- Connect tHDFSPut to tHDFSGet using an OnSubjobOk connection.
-
Connect tHDFSGet to tFileInputDelimitedusing an OnSubjobOk connection.

Configuring the input component
-
Double-click tFixedFlowInput to define
the component in its Basic settings
view. -
Set the Schema to Built-In and click the three-dot […] button next to Edit
Schema to describe the data structure you want to create from
internal variables. In this scenario, the schema contains one column:
content.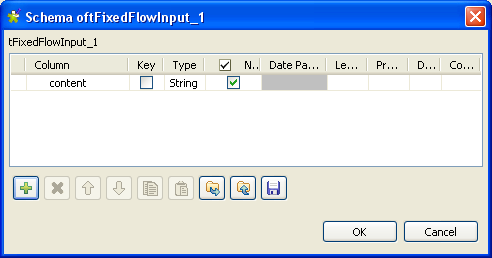
- Click the plus button to add the parameter line.
-
Click OK to close the dialog box and
accept to propagate the changes when prompted by the studio. -
In Basic settings, define the
corresponding value in the Mode area using
the Use Single Table option. In this
scenario, the value is “Hello world!”.
Configuring the tFileOutputDelimited component
-
Double-click tFileOutputDelimited to
define the component in its Basic settings
view.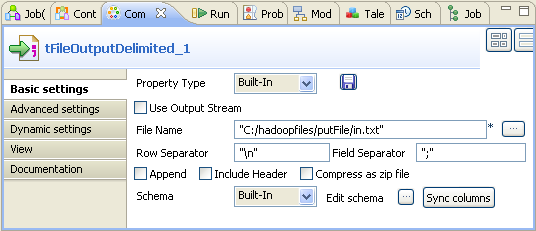
-
Click the […] button next to the
File Name field and browse to the
output file you want to write data in, in.txt in this
example.
Loading the data from the local file
-
Double-click tHDFSPut to define the
component in its Basic settings
view.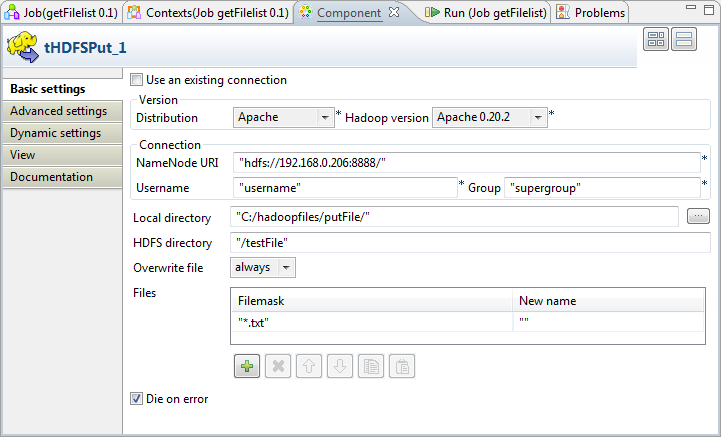
-
Select, for example, Apache 0.20.2 from the Hadoop
version list. -
In the NameNode URI, the
Username and the Group fields, enter the connection parameters to
the HDFS. If you are using WebHDFS, the location should be
webhdfs://masternode:portnumber; WebHDFS with SSL is not
supported yet. -
Next to the Local directory field, click
the three-dot […] button to browse to the
folder with the file to be loaded into the HDFS. In this scenario, the
directory has been specified while configuring tFileOutputDelimited:
C:/hadoopfiles/putFile/. -
In the HDFS directory field, type in the
intended location in HDFS to store the file to be loaded. In this example,
it is /testFile. -
Click the Overwrite file field to stretch
the drop-down. - From the menu, select always.
-
In the Files area, click the plus button
to add a row in which you define the file to be loaded. -
In the File mask column, enter
*.txt to replace newLine
between quotation marks and leave the New
name column as it is. This allows you to extract all the
.txt files in the specified directory without
changing their names. In this example, the file is
in.txt.
Getting the data from the HDFS
-
Double-click tHDFSGet to define the
component in its Basic settings
view.
-
Select, for example, Apache 0.20.2 from the Hadoop
version list. -
In the NameNode URI, the
Username, the Group fields, enter the connection parameters to
the HDFS. If you are using WebHDFS, the location should be
webhdfs://masternode:portnumber; WebHDFS with SSL is not
supported yet. -
In the HDFS directory field, type in
location storing the loaded file in HDFS. In this example, it is
/testFile. -
Next to the Local directory field, click
the three-dot […] button to browse to the
folder intended to store the files that are extracted out of the HDFS. In
this scenario, the directory is:
C:/hadoopfiles/getFile/. -
Click the Overwrite file field to stretch
the drop-down. - From the menu, select always.
-
In the Files area, click the plus button
to add a row in which you define the file to be extracted. -
In the File mask column, enter
*.txt to replace newLine
between quotation marks and leave the New
name column as it is. This allows you to extract all the
.txt files from the specified directory in the HDFS
without changing their names. In this example, the file is
in.txt.
Reading data from the HDFS and saving the data locally
-
Double-click tFileInputDelimited to
define the component in its Basic settings
view.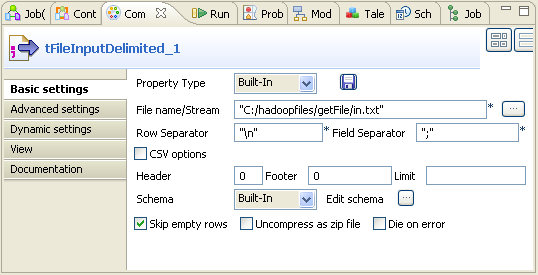
- Set property type to Built-In.
-
Next to the File Name/Stream field, click
the three-dot button to browse to the file you have obtained from the HDFS.
In this scenario, the directory is
C:/hadoopfiles/getFile/in.txt. -
Set Schema to Built-In and click Edit
schema to define the data to pass on to the tLogRow component.
- Click the plus button to add a new column.
-
Click OK to close the dialog box and
accept to propagate the changes when prompted by the studio.
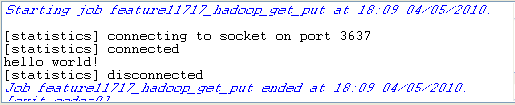
Executing the Job
Save the Job and press F6 to execute it.
The in.txt file is created and loaded into the HDFS.

The file is also extracted from the HDFS by tHDFSGet and is read by tFileInputDelimited.