tJavaFlex
Provides a Java code editor that lets you enter personalized code in order to
integrate it in Talend
program.
tJavaFlex enables you to add Java
code to the Start/Main/End code sections of this component itself. With
tJavaFlex, you can enter the three java-code parts (start, main and end)
that constitute a kind of component dedicated to do a desired operation.
tJavaFlex Standard properties
These properties are used to configure tJavaFlex running in the Standard Job framework.
The Standard
tJavaFlex component belongs to the Custom Code family.
The component in this framework is available in all Talend
products.
Basic settings
|
Schema and Edit |
A schema is a row description. It defines the number of fields Click Sync columns to retrieve This This |
|
|
Built-In: You create and store the schema locally for this component |
|
|
Repository: You have already created the schema and stored it in the When the schema to be reused has default values that are You can find more details about how to |
|
Click Edit
|
|
|
Data Auto Propagate |
Select this check box to automatically propagate the data to the |
|
Start code |
Enter the Java code that will be called during the initialization |
|
Main code |
Enter the Java code to be applied for each line in the data |
|
End code |
Enter the Java code that will be called during the closing |
Advanced settings
|
Import |
Enter the Java code that helps to import, if necessary, external |
|
tStatCatcher Statistics |
Select this check box to gather the Job processing metadata at a |
Global Variables
|
Global Variables |
ERROR_MESSAGE: the error message generated by the A Flow variable functions during the execution of a component while an After variable To fill up a field or expression with a variable, press Ctrl + For further information about variables, see |
Usage
|
Usage rule |
You can use this component as a start, intermediate or output |
|
Limitation |
You should know the Java language. |
Generating data flow
This scenario describes a two-components Job that generates a three-line data flow
describing different personal titles (Miss, Mrs, and Mr) and displaying them on the
console.

Setting up the Job
-
Drop tJavaFlex and tLogRow from the Palette
onto the design workspace. - Connect the components together using a Row > Main link.
Configuring the tJavaFlex component
-
Double-click tJavaFlex to display its
Basic settings view and define its
properties.
-
Click
the three-dot button next to Edit schema to
open the corresponding dialog box where you can define the data structure to
pass to the component that follows.
-
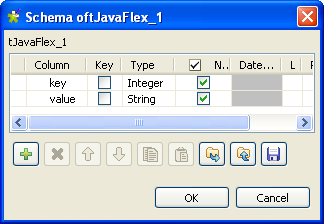
Click the [+] button to add two columns:
key and value and then set
their types to Integer and String respectively. -
Click OK to validate your changes and
close the dialog box. -
In the Basic settings view of tJavaFlex, select the Data
Auto Propagate check box to automatically propagate data to
the component that follows.In this example, we do not want to do any transformation on the retrieved
data. -
In the Start code field, enter the code
to be executed in the initialization phase.In this example, the code indicates the initialization of tJavaFlex by displaying the START message and
sets up the loop and the variables to be used afterwards in the Java
code:12345System.out.println("## START#");String [] valueArray = {"Miss", "Mrs", "Mr"};for (int i=0;i<valueArray.length;i++) { -
In the Main code field, enter the code
you want to apply on each of the data rows.In this example, we want to display each key with its value:12row1.key = i;row1.value = valueArray[i]; Warning:
In the Main
code field, “row1” corresponds to the name of the
link that comes out of tJavaFlex.
If you rename this link, you have to modify the code of this field
accordingly. -
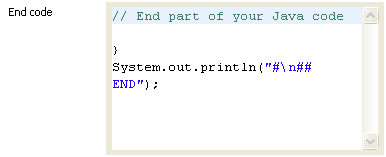
In the End code field, enter the code
that will be executed in the closing phase.In this example, the brace (curly bracket) closes the loop and the code
indicates the end of the execution of tJavaFlex by displaying the END message:123}System.out.println("### END");
-
If needed, double-click tLogRow and in
its Basic settings view, click the
[…] button next to Edit schema to make sure that the schema has been
correctly propagated.
Saving and executing the Job
- Save your Job by pressing Ctrl+S.
-
Execute the Job by pressing F6 or
clicking Run on the Run tab. The three personal titles are displayed on the console along with their
corresponding keys.
Processing rows of data with tJavaFlex
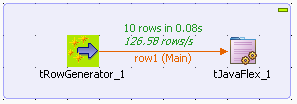
This scenario describes a two-component Job that generates random data and then
collects that data and does some transformation on it line by line using Java code
through the tJavaFlex component.

Setting up the Job
-
Drop tRowGenerator and tJavaFlex from the Palette
onto the design workspace. -
Connect the components together using a Row
Main link.
Configuring the input component
-
Double-click tRowGenerator to display its
Basic settings view and the RowGenerator Editor dialog box where you can
define the component properties.
-
Click the plus button to add four columns: number,
txt, date and
flag. -
Define the schema and set the parameters to the four columns according to
the above capture. -
In the Functions column, select the
three-dot function […] for each of the
defined columns. -
In the Parameters column, enter 10
different parameters for each of the defined columns. These 10 parameters
corresponds to the data that will be randomly generated when executing
tRowGenerator. -
Click OK to validate your changes and
close the editor.
Configuring the tJavaFlex component
-
Double-click tJavaFlex to display its
Basic settings view and define the
components properties.
-
Click Sync columns to retrieve the schema
from the preceding component. -
In the Start code field, enter the code
to be executed in the initialization phase.In this example, the code indicates the initialization of the tJavaFlex component by displaying the START
message and defining the variable to be used afterwards in the Java
code:123System.out.println("## START#");int i = 0; -
In the Main code field, enter the code to
be applied on each line of data.In this example, we want to show the number of each line starting from 0
and then the number and the random text transformed to upper case and
finally the random date set in the editor of tRowGenerator. Then, we create a condition to show if the
status is true or false and we increment the number of the line:12345678System.out.print(" row" + i + ":");System.out.print("# number:" + row1.number);System.out.print (" | txt:" + row1.txt.toUpperCase());System.out.print(" | date:" + row1.date);if(row1.flag) System.out.println(" | flag: true");else System.out.println(" | flag: false");i++; Warning:
In the Main
code field, “row1” corresponds to the name of the
link that connects to tJavaFlex. If
you rename this link, you have to modify the code. -
In the End code field, enter the code
that will be executed in the closing phase.In this example, the code indicates the end of the execution of tJavaFlex by displaying the END message:12System.out.println("### END");
Saving and executing the Job
- Save your Job by pressing Ctrl+S.
-
Execute the Job by pressing F6 or
clicking Run on the Run tab. The console displays the randomly generated data that was modified by the
java command set through tJavaFlex.
Using tJavaFlex to display file content based on a dynamic schema
This scenario applies only to subscription-based Talend products.
This scenario describes a three-component Job that uses Java code through a tJavaFlex component to display the content of a file being
transferred from the source to the target. As all the components in this Job support the
dynamic schema feature, we can leverage this feature to save the time of configuring
each column of the schema.
Setting up the Job
-
Drop tFileInputDelimited, tJavaFlex, and tFileOutputDelimited from the Palette
onto the design workspace. -
Connect the components in a series using Row > Main links.

- Label the components according to their roles in the Job.
Configuring the input and output components
-
Double-click the tFileInputDelimited
component, which is labeled Source, to
display its Basic settings view where you
can define the component properties. Warning:
The dynamic schema feature is only supported in Built-In mode and requires the input file
to have a header row. -
In the File name/Stream field, type in
the path to the input file in double quotation marks, or browse to the path
by clicking the […] button. -
In the Header field, type in 1 to use the first line of the file as the
header. -
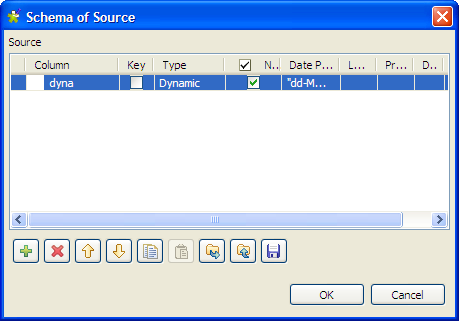
Click the […] button next to Edit schema to open the Schema dialog box.

-
Click the [+] button to add a column,
give a name to the column, dyna in this
example, and select Dynamic from the
Type list. This dynamic column will
retrieve the three columns, FirstName,
LastName and Address, of the input file. -
Click OK to validate the setting and
close the dialog box. -
Double-click the tFileOutputDelimited
component, which is labeled Target, to
display its Basic settings view where you
can define the component properties.
-
Define the output file path in the File
Name field. -
Select the Include Header check box to
include the header in the output file. Leave all the other settings are they
are.
Configuring the tJavaFlex component
-
Double-click tJavaFlex to display its
Basic settings view and define the
components properties.
-
Click Sync columns to make sure that the
schema is correctly retrieved from the preceding component. -
In the Start code field, enter the
following code:12System.out.println("Content of file being transferred:"); -
In the Main code field, enter the code to
be applied on each line of data.In this example, we want to display the content of the source file based
on the defined dynamic schema column:1System.out.println(row1.dyna);Warning:In the Main
code field, “row1” refers to the name of the link
that connects to tJavaFlex. If you
rename this link, you have to modify the code. -
In the End code field, enter the code
that will be executed in the closing phase.In this example, the code indicates the end of the execution of tJavaFlex by displaying the “End of file”
message:12System.out.println("End of file");
Saving and executing the Job
- Save your Job by pressing Ctrl+S.
-
Execute the Job by pressing F6 or
clicking Run on the Run tab. The console displays the content of the input file. As the Data Auto Propagate check box is selected by
default, the content of the file is intactly transferred to the output
component.