tMysqlConnection
subJob or subJobs.
tMysqlConnection Standard properties
These properties are used to configure tMysqlConnection running in the Standard Job framework.
The Standard
tMysqlConnection component belongs to the Databases and the ELT families.
The component in this framework is available in all Talend
products.
connector. The properties related to database settings vary depending on your database
type selection. For more information about dynamic database connectors, see Dynamic database components.
Basic settings
| Database |
Select a type of database from the list and click |
|
Property type |
Either Built-in or |
|
|
Built-in: No property data stored |
|
|
Repository: Select the repository file |
|
Host |
Database server IP address. |
|
Port |
Listening port number of DB server. |
|
Database |
Name of the database. |
|
Additional JDBC parameters |
Specify additional connection properties for the DB connection |
|
Username and Password |
DB user authentication data. To enter the password, click the […] button next to the |
|
Use or register a shared DB Connection |
Select this check box to share your This option is This check box is not available when the Specify a data source |
| Specify a data source alias |
Select this check box and specify the alias of a data source created on the |
Advanced settings
|
Auto Commit |
Select this check box to commit any changes to the database With this check box selected, you cannot use the corresponding Note that the auto commit function commits each SQL statement as a |
|
tStatCatcher Statistics |
Select this check box to gather the job processing metadata at a |
Usage
|
Usage rule |
This component is more commonly used with other tMysql* |
Inserting data in mother/daughter tables
The following Job is dedicated to advanced database users, who want to carry
out multiple table insertions using a parent table id to feed a child table.
As a prerequisite to this Job, follow the steps described below to create the
relevant tables using an engine such as innodb:
-
In a command line editor, connect to your Mysql server.
-
Once connected to the relevant database, type in the following command to
create the parent table:1create table f1090_mum(id int not null auto_increment, name varchar(10), primary key(id)) engine=innodb; -
Then create the second table:
1create table f1090_baby (id_baby int not null, years int) engine=innodb;
Back in
Talend Studio
, the Job requires seven components including tMysqlConnection and tMysqlCommit.
Linking the components
-
Drag and drop the following components from the Palette: a tFileList, a
tFileInputDelimited, a tMap, a tMysqlConnection, a tMysqlCommit and two tMysqlOutput. - Connect tMysqlConnection to tFileList using an OnComponentOk link.
- Connect tFileList to tMysqlCommit using an OnComponentOk link.
-
Connect the tFileList component to the
input file component using an Iterate link
as the name of the file to be processed will be dynamically filled in from
the tFileList directory using a global
variable. -
Connect the tFileInputDelimited component
to the tMap and dispatch the flow between
the two output Mysql DB components. Use a Row link for each for these connections representing the
main data flow.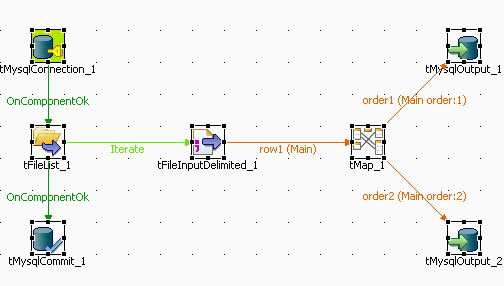
Configuring the components
-
Set the tFileList component properties,
such as the directory name where files will be fetched from. -
In the tMysqlConnection Component view,
set the connection details manually or fetch them from the
Repository if you centrally stored them as a Metadata DB connection
entry. For more information about Metadata, see
Talend Studio User Guide
. -
On the tFileInputDelimited component’s
Basic settings panel, press Ctrl+Space bar to access the variable list. Set
the File Name field to the global variable:
tFileList_1.CURRENT_FILEPATH

-
Set the rest of the fields as usual, defining the row and field
separators according to your file structure. -
Then set the schema manually through the Edit
schema feature or select the schema from the Repository. In
Java version, make sure the data type is correctly set, in accordance with
the nature of the data processed. -
In the tMap Output area, add two output
tables, one called mum for the parent table, the second called baby, for the
child table.Drag the Name column from the Input area, and drop it to the mum table.Drag the Years column from the Input area and drop it to the baby table.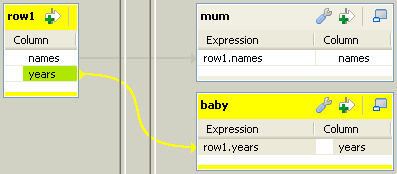
-
Make sure the mum table is on the top of the baby table as the order is
determining for the flow sequence hence the DB insert to perform
correctly.Connect the output row link to distribute correctly the flow to the
relevant DB output component. -
In the Basic settings
tab of the two tMysqlOutput components,
select the Use an existing connection
check box to retrieve the tMysqlConnection details.
-
Set the Table name,
making sure it corresponds to the correct table, in this example either f1090_mum or f1090_baby.There is no action on the table as they are already
created.Select Insert as
Action on data for both output
components.Click on Sync columns to retrieve the schema set in the
tMap. -
Switch to the Advanced
settings tab of the DB output component corresponding to the
child table (that is, f1090_baby).- In the id-baby row of the Additional
columns table, fill the SQL
expression field with "(Select
Last_Insert_id())". - Set the Position field to
Before. - Set the Reference column field to
years.
These settings allow the f1090_baby table to use the ID key of the
f1090_mum as its key. - In the id-baby row of the Additional
-
Clear the Extend insert
check box of both database output components.
Executing the Job
- Press Ctrl + S to save your Job.
-
Press F6 to execute it.
 The parent table id has been reused to feed the
id_baby column.
Rollback from inserting data in
mother/daughter tables
Based on Inserting data in mother/daughter tables, insert a rollback function in order to prevent
unwanted commit.

-
Drag and drop tMysqlRollback to the design
workspace. tMysqlRollback ensures that the transaction will not
be partly committed. - Connect tFileList to tMysqlRollback with an OnSubjobError trigger.
-
Double-click tMysqlRollback to enter its
Basic settings view. -
From the Component List, select the
connection component.
Sharing a database connection between a parent Job and child
Job
This scenario shows how a database connection is shared between a parent Job and a
child Job. The parent Job first calls the child Job to write some randomly generated
data to a MySQL database, and then reads the data from the MySQL database and displays
it on the console. A connection to the MySQL database is set up only once and used in
both Jobs.
Setting up the child Job
Adding and linking components
-
Add the following components by typing the component names on the design
workspace or dropping them from the Palette:-
a tMysqlConnection component, to
open a connection to the MySQL database, -
a tRowGenerator, to generate
random input data, -
a tMysqlOutput component, to
write data to the MySQL database.
-
-
Connect the tRowGenerator component to
the tMysqlOutput component using a
Row > Main connection. -
Connect the tMysqlConnection component to
the tRowGenerator using a Trigger > OnSubjobOk connection.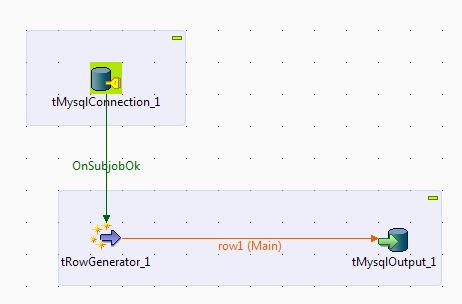
Configuring the database connection
-
Double-click the tMysqlConnection
component to open its Basic settings
view.
-
With the Property Type set to Built-In, specify the connection details in the
relevant fields, including:-
the host name or IP address of your database server
-
the listening port number
-
the database name
-
the user name and password for your database
authentication.
If you have stored your connection details under the Metadata node in the Repository tree view, you can simply drop your centralized
metadata item onto the tMysqlConnection
component. For information on how to centralize a database connection, see
the chapter on managing metadata of the
Talend Studio
User Guide. -
-
Select the Use or register a shared DB
Connection check box so that the database connection open by
this component can be shared across different Jobs. Then, enter a name for
the shared connection between double quotes in the Shared DB Connection Name field, shared_mysql_connection in this example.
Configuring the input data
-
Double-click the tRowGenerator component
to open the Row Generator editor.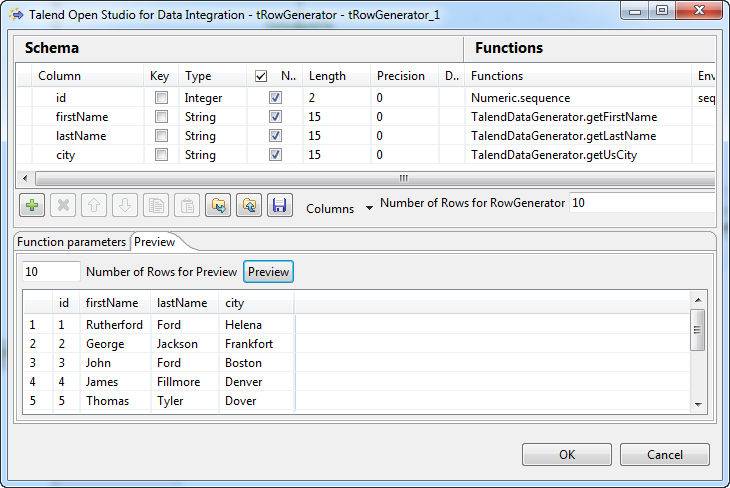
-
Click the [+] button to add four columns
and set their properties:-
id, type Integer, 2 characters
long. -
firstName, type String, 15
characters long -
lastName, type String, 15
characters long -
city, type String, 15
characters long
-
-
Define the function for each column:
-
For the id column, select
Numeric.sequence from the
Function list to generate
sequence numbers. -
For the firstName column,
select TalendDataGenerator.getFirstName from the Function list to generate random first
names. -
For the lastName column, select
TalendDataGenerator.getLastName
from the Function list to generate
random family names. -
For the city column, select
TalendDataGenerator.getUsCity
from the Function list to generate
random city names.
-
-
In the Number of Rows for RowGenerator
field, specify the number of data rows you want to generate, 10 in this example. -
Click the Preview button on the Preview tab to validate the generator
settings. -
When done, click OK to close the editor
and click Yes when prompted to propagate
the schema to the next component.
Configuring the database output
-
Double-click the tMysqlOutput component
to open its Basic settings view.
-
Select the Use an existing connection
check box and, in case you have more than one connection component in the
Job, select the connection component to be used from the Component List drop-down list. -
In the Table field, enter the name of the
database table you are going to write data to, customers in this example. -
From the Action on table list, select the
Drop table if exists and create option
to ensure a clean table is created. -
From the Action on data list, select
Insert. -
Click the […] button next to Edit schema to check the output schema. If
needed, click Sync columns to retrieve the
schema from the preceding component. - Press Ctrl+S to save the Job.
Setting up the parent Job
Arranging data flow for the parent Job
-
Add the following components by typing the component names on the design
workspace or dropping them from the Palette:-
a tRunJob component, to call the
child Job, -
a tMysqlConnection component, to
open the MySQL database connection, -
a tMysqlInput component, to read
the data written to the MySQL database by the child Job. -
a tLogRow component to display
the data on the console, -
a tMysqlCommit component to
commit data upon transation and close the database
connection.
-
-
Connect the tRunJob component to the
tMysqlConnection compnent using a
Trigger > OnSubjobOk connection. -
Connect the tMysqlConnection component to
the tMysqlInput component using a Trigger > OnSubjobOk connection. -
Connect the tMysqlInput component to the
tLogRow component using a Row > Main
connection. -
Connect the tMysqlInput component to the
tMysqlCommit component using a
Trigger > OnSubjobOk connection.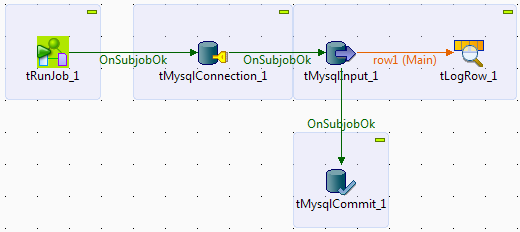
Configuring the components
-
Double-click the tRunJob component to
open its Basic settings view.If a child Job has been already specified in the component, you
can open its Basic settings view by
right-clicking it and selecting Settings from
the contextual menu, or by clicking the component and then selecting the Component tab.
-
Click the […] button next to the
Job field and select the child Job from
the Repository Content dialog box. Leave
all the other parameters as default. -
In the Basic settings view of the
tMysqlConnection component, select the
Use or register a shared DB Connection
check box. Then, in the Shared DB Connection
Name field, enter the name of the shared connection defined
in the child Job, shared_mysql_connection
in this example.Leave all the other parameters blank or as default.
-
Double-click the tMysqlInput component to
open its Basic settings view.
-
Select the Use an existing connection
check box and, in case you have more than one connection component in the
Job, select the connection component to be used from the Component List drop-down list. -
Click the […] button next to Edit schema to open the Schema editor, and define the same data structure as in
the child Job. When done, click OK to close the dialog
and click Yes when prompted to propagate
the schema to the next component. -
Specify the table name in the Table Name
list, and click Guess Query to get the
query statement automatially filled in the Query field. -
In the Basic settings view of the
tLogRow component, select the Table mode to display the execution result in
table cells.Leave the settings of the tMysqlCommit
component unchanged.
Execute the Job
- Press Ctrl+S to save the Job.
-
Press F6 or click the Run button on the Run console to execute the Job.
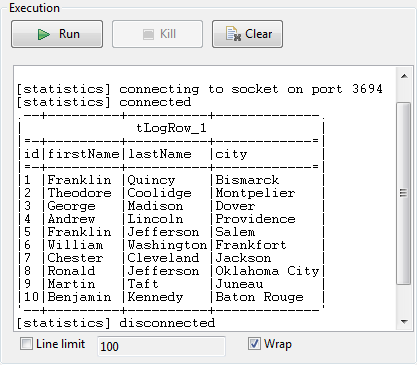 The Job first calls the child Job to write data to the database and then
reads the data from the database and displays it on the console.