tOracleCDCOutput
Synchronizes data changes in the Oracle XStream CDC mode.
This component replicates data changes from an XStream inbound server to a target table
using CDC.
tOracleCDCOutput Standard properties
These properties are used to configure tOracleCDCOutput running in the Standard Job framework.
The Standard
tOracleCDCOutput component belongs to the Databases family.
The component in this framework is available in all subscription-based Talend products.
connector. The properties related to database settings vary depending on your database
type selection. For more information about dynamic database connectors, see Dynamic database components.
Basic settings
| Database |
Select a type of database from the list and click |
|
Property of the CDC connection |
Either Built-in or Repository. |
|
|
Built-In: You create and store the schema locally for this component |
|
|
Repository: You have already created the schema and stored it in the |
|
Use an existing connection |
Select this check box and in the Component List click the relevant connection component to Note: When a Job contains the parent Job and the child Job, if you
need to share an existing connection between the two levels, for example, to share the connection created by the parent Job with the child Job, you have to:
For an example about how to share a database connection |
|
DB Version |
Select the version of the Oracle database being used. |
|
Local Service Name |
Specify the local service name of the Oracle database. |
|
Oracle schema |
Specify the name of the Oracle schema. |
|
Username and |
Specify the user authentication data of the Oracle To enter the password, click the […] button next to the |
|
Schema and Edit |
A schema is a row description, it defines the number of fields to Click Edit
|
|
|
Built-In: You create and store the schema locally for this component |
|
|
Repository: You have already created the schema and stored it in the |
|
Input field |
Select an input field from the drop-down list. |
|
Inbound server name |
Specify the XStream inbound server name. |
|
Set data table schema |
Select this check box to specify the schema of the CDC table. |
|
Set target table |
Select this check box to specify the table to which data changes from the inbound |
Advanced settings
|
Acknowledge interval(seconds) |
Specify the value for the OCI_ATTR_XSTREAM_ACK_INTERVAL attribute for the inbound For more information about this attribute, see http://docs.oracle.com/cd/E18283_01/server.112/e16545/xstrm_oci_intro.htm#CEGDICBB. |
|
tStatCatcher Statistics |
Select this check box to collect the log data at component |
Global Variables
|
Global Variables |
NB_LINE: the number of rows processed. This is an After
ERROR_MESSAGE: the error message generated by the A Flow variable functions during the execution of a component while an After variable To fill up a field or expression with a variable, press Ctrl + For further information about variables, see |
Usage
|
Usage rule |
This component is used as an output component. It requires an input component and |
Extracting and synchronizing data changes using XStream mode
This scenario applies only to subscription-based Talend products.
This scenario describes a Job that inserts data into an empty source table PERSON in one Oracle database on which the XStream outbound
server is configured, then extracts and synchronizes the data changes into an empty
target table PERSON_BAK in another Oracle database on
which the XStream inbound server is configured using Oracle CDC XStream mode, and
finally displays the data in the source and target tables on the console.

Prerequisites: The Oracle database connections dedicated to
the XStream outbound and inbound servers have been set up in the Repository tree view in the Studio, and the CDC has been added to the
empty source and target tables. For more information about how to set up an Oracle
database connection and configure CDC in Oracle XStream mode, see
Talend Studio
User Guide.
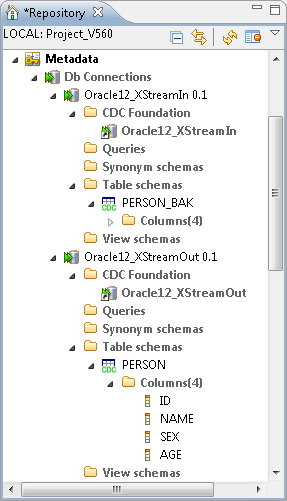
Dropping and linking the components
-
Create a new Job and add the following components by typing their names in
the design workspace or dropping them from the Palette: a tFixedFlowInput
component, a tOracleOutput component, a
tOracleCDC component, a tOracleCDCOutput component, two tOracleInput components, and two tLogRow components. - Connect tFixedFlowInput to tOracleOutput using a Row > Main link.
-
Do the same to connect tOracleCDC to
tOracleCDCOutput, the first tOracleInput to the first tLogRow, and the second tOracleInput to the second tLogRow. -
Connect tFixedFlowInput to tOracleCDC using a Trigger > On Subjob Ok
connection. -
Do the same to connect tOracleCDC to the
first tOracleInput and the first tOracleInput to the second tOracleInput.
Configuring the components
Inserting data into the source table
-
Double-click tFixedFlowInput to open its
Basic settings view.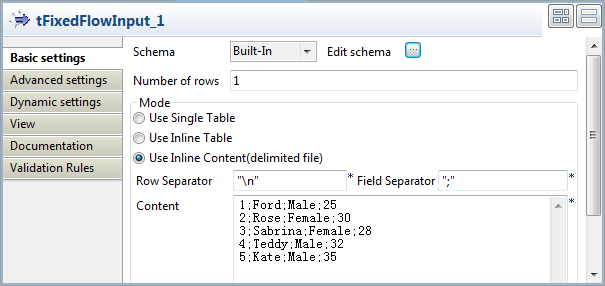
-
Click the […] button next to Edit schema to open the schema editor.
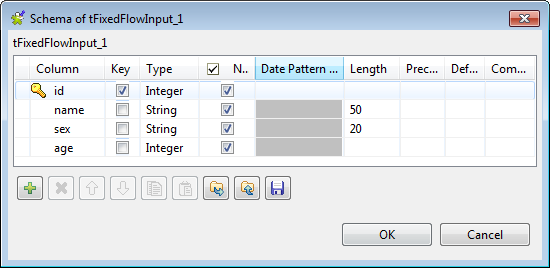 Click four times the [+] button to add four columns:
id and age of the integer type, name and sex of the
string type.Click OK to close the schema editor and
accept the propagation prompted by the pop-up dialog box. -
Select Use Inline Content(delimited file) in the
Mode area, and then enter the following
input data in the Content field:123451;Ford;Male;252;Rose;Female;303;Sabrina;Female;284;Teddy;Male;325;Kate;Male;35 -
Double-click tOracleOutput to open its
Basic settings view.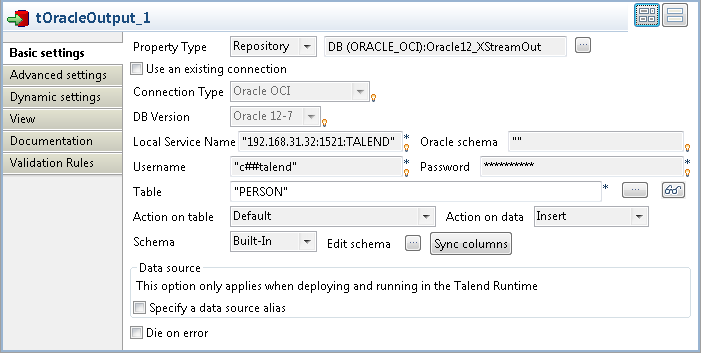
-
Set Property Type to Repository and select the connection metadata corresponding
to the Oracle database on which the XStream outbound server is configured,
Oracle12_XStreamOut in this example. The connection
type, database version and other connection details information will be
completed automatically. -
In the Table field, enter the name of the
table into which the input data will be inserted. In this example, it is
PERSON. -
Click the […] button next to Edit schema to open the schema editor to ensure
the schema has been synced up.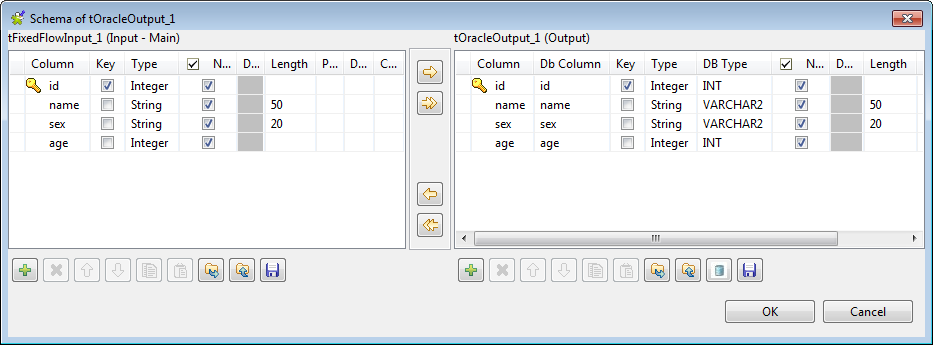
Extracting and synchronizing data changes to the target table
-
Double-click tOracleCDC to open its
Basic settings view.
-
Set Property of the CDC connection to Repository and select the connection metadata
corresponding to the Oracle database on which the XStream outbound server is
configured, Oracle12_XStreamOut in this
example. The connection type, database version and other connection details
information will be completed automatically. -
Select LCR Object from the Generate LCR type drop-down list.
In the Table using CDC field, enter the name of the
source table from which changes made to data are to be captured. In this
example, it is PERSON.In the Outbound server name field, enter
the XStream outbound server name. In this example, it is xout. -
Click the […] button next to Edit schema to open the schema editor, and you
will see that the schema has been set by default.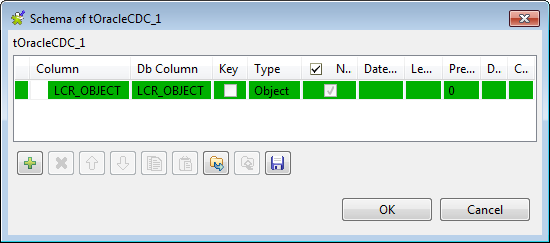
-
Click Advanced settings to open its
view. In the Idle timeout(seconds) field, enter the number of
seconds of idle time that the outbound server waits for an LCR before
terminating the call to get or receive an LCR stream. Considering the
network latency and the database response rate, the idle time is set to
60 seconds in this example. -
Double-click tOracleCDCOutput to open its
Basic settings view.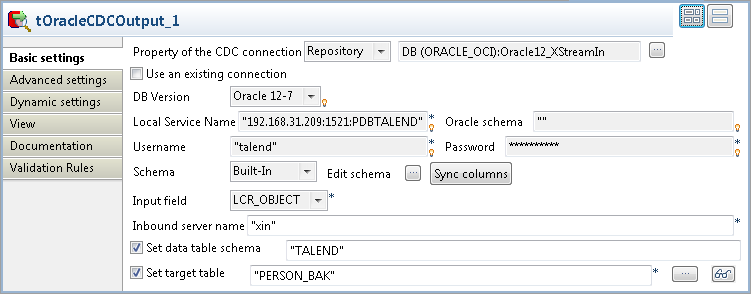 Set Property of the CDC connection to Repository and select the connection metadata
corresponding to the Oracle database on which the XStream inbound server is
configured, Oracle12_XStreamIn in this
example. The database version and other connection details information will
be completed automatically. -
In the Inbound server name field, enter
the XStream inbound server name. In this example, it is xin.Select the Set data table schema check
box and specify the schema of the CDC table. In this example, it is
TALEND.Select the Set target table check box and
specify the table to which data changes from the inbound server will be
replicated. In this example, it is PERSON_BAK.
Retrieving data from the source and target table
-
Double-click the first tOracleInput to
open its Basic settings view.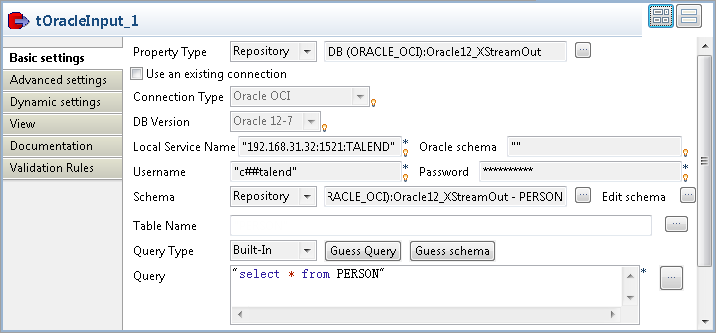
-
Set Property Type to Repository and select the connection metadata corresponding
to the Oracle database on which the XStream outbound server is configured,
Oracle12_XStreamOut in this example.
The connection type, database version and other connection details
information will be completed automatically.Set Schema to Repository and select the source table from the Repository. In this example, it is PERSON. -
In the Query field, enter the following SQL statement to
retrieve all the data from the source table:1select * from PERSON -
Double-click the second tOracleInput to
open its Basic settings view.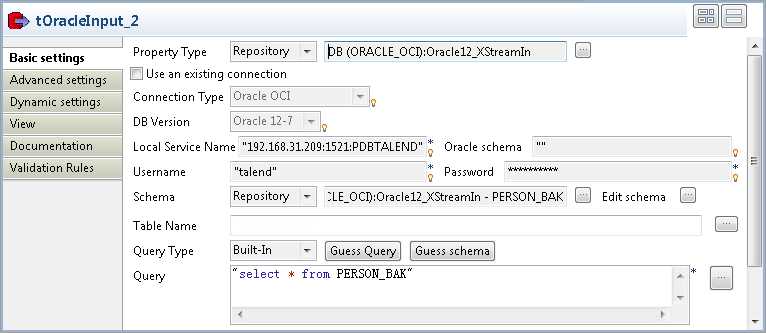
-
Set Property Type to Repository and select the connection metadata corresponding
to the Oracle database on which the XStream inbound server is configured,
Oracle12_XStreamIn in this example.
The connection type, database version and other connection details
information will be completed automatically.Set Schema to Repository and select the target table from the Repository. In this example, it is PERSON_BAK. -
In the Query field, enter the following SQL statement to
retrieve all the data from the target table:1select * from PERSON_BAK -
Double-click the first tLogRow to open
its Basic settings view. In the Mode area, select Table (print values in cells of a table) for a
better display of the result. - Do the same to configure the second tLogRow.
Saving and executing the Job
- Press Ctrl + S to save the Job.
-
Press F6 to run the Job.
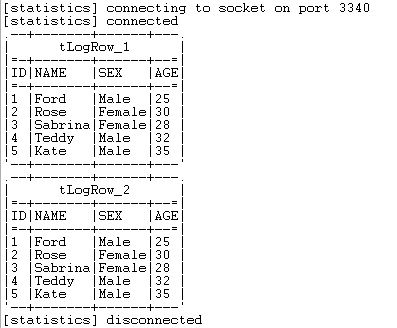 As shown above, the input data is inserted into the source table and then
the data changes are synchronized into the target table.