tS3Copy
bucket.
tS3Copy Standard properties
These properties are used to configure tS3Copy running in the Standard Job
framework.
The Standard
tS3Copy component belongs to the Cloud family.
The component in this framework is available in all Talend
products.
Basic settings
|
Use an existing |
Select this check box and in the Component List click the relevant connection component to |
|
Access Key |
Specify the Access Key ID that uniquely |
|
Secret Key |
Specify the Secret Access Key, constituting the To enter the secret key, click the […] button next to |
|
Inherit credentials from AWS |
Select this check box to obtain AWS security credentials |
|
Assume role |
If you temporarily need some access permissions associated |
|
Region |
Specify the AWS region by selecting a region name from the |
|
Source Bucket |
Specify the name of the source bucket that |
|
Source Key |
Specify the path to the object to be Warning: This field must not start with a slash (/).
|
|
Destination Bucket |
Specify the name of the destination bucket to |
|
Destination Key |
Specify the path to the destination object, If:
Warning: This field must not start with a slash (/).
|
| Server-Side Encryption |
Select this check box For more information about the server-side encryption, see Protecting Data Using Server-Side Encryption. |
| Use KMS |
Select this check box This property is |
| Customer Master Key |
Specify your own This property is |
|
Die on error |
Select this check box to stop the execution of Clear the check box to skip any rows on error |
Advanced settings
|
Config client |
Select this check box and specify the client
This check box is available only when the |
|
Part size (Mb) for file larger than |
Specify the part size in MB. This parameter takes effect only Note that in the copy operation, the object’s metadata may drop |
|
STS Endpoint |
Select this check box and in the field displayed, specify the This check box is available only when the Assume role check box is selected. |
|
tStatCatcher Statistics |
Select this check box to gather the Job processing metadata at the Job level |
Global Variables
|
ERROR_MESSAGE |
The error message generated by the component when an error occurs. This is an After |
Usage
|
Usage rule |
This component can be used as a standalone |
Copying an S3 object from one bucket to another
This scenario describes a Job that uploads a new object to an existing empty S3 bucket
bucket-src, then copies the object from
the bucket bucket-src to another existing empty
S3 bucket bucket-dst, finally lists the object in
the bucket bucket-dst to see whether the object
is successfully copied.

Setting up the Job
-
Create a new Job and add a tS3Connection component, a tS3Put component, a tS3Copy component, a
tS3List component,
a tIterateToFlow component,
and a tLogRow component by
typing their names on the design workspace or dropping them
from the Palette. -
Link the tS3List component to
the tIterateToFlow
component using a Row >
Iterate
connection. -
Link the tIterateToFlow
component to the tLogRow
component using a Row >
Main
connection. -
Link the tS3Connection
component to the tS3Put
component using a Trigger >
On Subjob Ok
connection. -
Do the same to link the tS3Put component to the tS3Copy component and the
tS3Copy component
to the tS3List
component.
Configuring the components
Creating a connection to Amazon S3
-
Double-click the tS3Connection component to open its
Basic settings view
on the Component
tab.
-
In the Access Key and
Secret Key fields,
enter the authentication credentials required to access
Amazon S3. -
From the Region drop-down
list, select an AWS region where the object will be uploaded
and copied. In this example, we keep the default
setting.
Uploading an object to an Amazon S3 bucket
-
Double-click the tS3Put
component to open its Basic
settings view on the Component tab.
-
Select the Use an existing
connection check box to reuse the Amazon
S3 connection information you have defined in the tS3Connection
component. -
In the Bucket field, enter
the name of the S3 bucket where the object will be uploaded.
In this example, it is bucket-src that already exists in Amazon
S3. -
In the Key field, enter the
key for the object to be uploaded. In this example, it is
tS3Copy_icon32_src.png. -
In the File field, browse to
or enter the path to the object to be uploaded. In this
example, it is D:/tS3Copy_icon32.png.
Copying the uploaded object to another Amazon S3 bucket
-
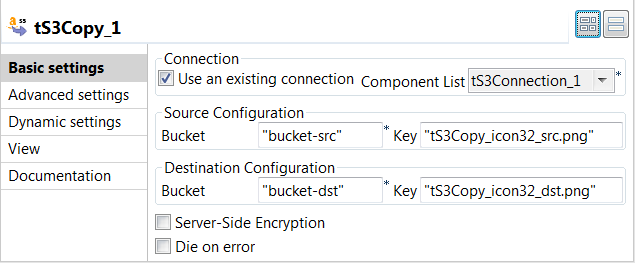
Double-click the tS3Copy
component to open its Basic
settings view on the Component tab.
-
Select the Use an existing
connection check box to reuse the Amazon
S3 connection information you have defined in the tS3Connection
component. -
In the Bucket field in the
Source
Configuration area, enter the name of the
bucket which contains the object to be copied. In this
example, it is bucket-src. -
In the Key field in the
Source
Configuration area, enter the key of the
object to be copied. In this example, it is tS3Copy_icon32_src.png. -
In the Bucket field in the
Destination
Configuration area, enter the name of the
bucket to which the object will be copied. In this example,
it is the empty one bucket-dst that already exists in Amazon
S3. -
In the Key field in the
Destination
Configuration area, enter the new key for
the object after being copied to the destination bucket. In
this example, it is tS3Copy_icon32_dst.png.
Listing the object in the destination bucket
-
Double-click the tS3List
component to open its Basic
settings view on the Component tab.
-
Select the Use an existing
connection check box to reuse the Amazon
S3 connection information you have defined in the tS3Connection
component. -
Clear the List all buckets
objects check box, and then click the
[+] button to add
one row in the Bucket table
displayed and set the value for each column. In this
example, bucket-dst for
the Bucket name column and
empty value for the Key
prefix column, this way only the objects
in the bucket-dst bucket
will be listed. -
Double-click the tIterateToFlow component to open its
Basic settings view
on the Component
tab.
-
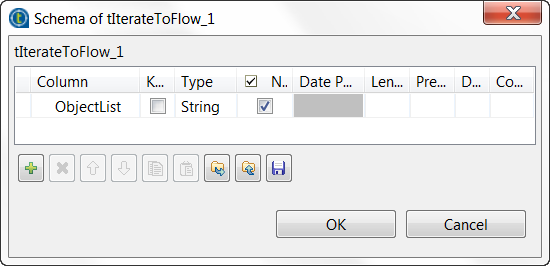
Click the […] button next
to Edit schema and in the
pop-up schema dialog box define the schema by adding one
column ObjectList of
String type.
-
Click OK to save the changes
and in the pop-up dialog box click Yes to accept the propagation. -
Double-click the tLogRow
component to open its Basic
settings view on the Component tab.
-
In the Mode area, select
Table (print values in cells
of a table) for better readability of the
result.
Saving and executing the Job
-
Press Ctrl + S to save the
Job. -
Press F6 to run the
Job. As shown above, the uploaded object has been copied to the
destination bucket successfully.