tSalesforceInput
tSalesforceInput Standard properties
These properties are used to configure tSalesforceInput running
in the Standard Job framework.
The Standard
tSalesforceInput component belongs to the Business
and the Cloud families.
The component in this framework is available in all Talend
products.
Basic settings
|
Property Type |
Select the way the connection details
This property is not available when other connection component is selected |
|
Connection Component |
Select the component that opens the database connection to be reused by this |
|
Connection type |
Select the type of the connection from the drop-down list. The
|
|
User Id |
The Salesforce username. This property is available |
|
Password |
The Salesforce password associated with the username. This property is available |
|
Security Token |
The Salesforce security token. For more information, see Reset Your Security Token. This property is available |
|
Issuer |
The OAuth Consumer Key, generated This property is available only |
|
Subject |
The Salesforce username. This property is available only |
|
Audience |
Json Web Token audience. You can set your own Json Web Token This property is available only |
|
Expiration time (in seconds) |
The expiration time of the assertion (in seconds) within five This property is available only |
|
Key store |
The path to the keystore file in Java Keystore (JKS) format. The keystore file can be generated by creating a certificate signed by This property is available only |
|
Key store password |
The keystore password. This property is available only |
|
Certificate alias |
The unique name of the certificate signed by Salesforce. This property is available only |
|
Client Id |
The OAuth Consumer Key, generated This property is available |
|
Client Secret |
The OAuth Consumer Secret, generated when your connected app is This property is available |
|
Callback Host |
The host value in the OAuth authentication callback URL that is This property is available |
|
Callback Port |
The port value in the OAuth authentication callback URL that is This property is available |
|
Token File |
The path to the token file that stores the refresh token used to get This property is available |
|
Module Name |
Click the […] button next to |
|
Schema and Edit schema |
A schema is a row description. It defines the number of fields Click Edit
In this component the schema is related to the Module To retrieve a column from a linked module it is necessary to
This This dynamic schema feature is designed for the purpose of |
|
Query Mode |
Select the query mode from the drop-down list, either
|
|
Condition |
Enter the query used to select the data to be extracted between This property |
|
Manual Query |
Select this check box and in the Full SOQL query string field displayed, enter the full SOQL |
| Guess schema |
Click this button to generate the schema columns based on the query specified This property Note that there are some |
| Guess query |
Click this button to generate the query in the Full SOQL query For more information about how to set the module and schema correctly when This property Note that there are some |
|
Include deleted |
Select this check box to query all the records, including the This property is |
Advanced settings
|
Salesforce URL |
The Webservice URL required to connect to Salesforce. |
|
API version |
The Salesforce API version. This property is available only when the |
|
Use or save the connection |
Select this check box and in the Session This session file can be shared by different Jobs to retrieve a When an expired session is detected, if the correct connection This property is available |
|
Need compression |
Select this check box to activate SOAP message compression, which can |
|
Trace HTTP message |
Select this check box to This property is |
|
Use HTTP Chunked |
Select this check box to use the This property is |
|
Client Id |
Enter the ID of the real user to differentiate between those who use |
|
Timeout |
Enter the intended number of query timeout in milliseconds in |
|
Use Proxy |
Select this check box to use a proxy server, and in the Host, Port, |
|
Batch Size |
Enter the number of registrations in each processed batch. This property is |
|
Normalize Delimiter |
Enter the characters, strings or regular expressions used to This property is |
|
Column Name Delimiter |
Enter the characters, strings or regular expressions used to This property is |
| Safety Switch |
Clear this check box if the length of any column of the module to be queried is This property is |
| Complete Job timeout |
The timeout value, in seconds, within which your bulk query Job must be Salesforce has its own limit for bulk query. If it takes time longer than This property is |
|
Enable PK Chunking |
Select this check box to enable PK (Primary Key, i.e., the object’s record ID) This property is |
|
tStatCatcher Statistics |
Select this check box to gather the Job processing metadata at the Job level |
Global Variables
|
NB_LINE |
The number of rows processed. This is an After variable and it returns an integer. |
|
ERROR_MESSAGE |
The error message generated by the component when an error occurs. This is an After |
Usage
|
Usage rule |
This component is usually used as a start component of a Job or |
How to set schema for the guess query feature of tSalesforceInput
both standard objects and fields and custom objects and fields, based on the defined module
and schema. This section demonstrates how to set the module and schema when generating an SOQL
query.
There are two types of SOQL queries: simple query and relationship query.
Simple query retrieves data from only one object. For more information about how to set the
module and schema for generating simple queries, see How to set schema for generating the simple query.
Relationship query retrieves data from more than a single type of object, including
child-to-parent and parent-to-child relationship queries.
For more information about how to set the module and schema for generating child-to-parent
relationship queries, see How to set schema for generating the child-to-parent relationship query.
For more information about how to set the module and schema for generating parent-to-child
relationship queries, see How to set schema for generating the parent-to-child relationship query.
Note that before setting the module name and schema columns for generating the relationship
query in the Basic settings view of
tSalesforceInput, you need to first identify the relationship type
(child-to-parent or parent-to-child) of the query to be generated, because the methods of
setting the schema column names for these two kinds of relationship queries are somewhat
different. The main difference between the child-to-parent and parent-to-child relationship
queries is that the parent-to-child relationship query is specified by using the subquery
enclosed in parentheses, while the child-to-parent relationship query is not. For more
information about the relationship queries in SOQL and how to identify the relationship
queries, see Relationship Queries.
How to set schema for generating the simple query
This section demonstrates how to set the module name and schema columns for generating
the simple query.
The following two simple query examples will be used for demonstration purpose in the
following steps.
-
SELECT Id, Name, BillingCity FROM Account, a simple query with
standard object and fields, and -
SELECT Name__c, LastName__c FROM Mother__c, a simple query with
custom object and fields.
-
Set the module name with the name of the object specified in the
FROMclause,Accountand
Mother__cfor above examples. -
Create a column for each field in the field list (separated by commas) after
SELECTin the schema dialog box and set the column name
with the field name.For the first example, you need to create three columns
Id,
Name, andBillingCityfor the three
fields.For the second example, you need to create two columns
Name__candLastName__cfor the two
fields.
How to set schema for generating the child-to-parent relationship query
This section demonstrates how to set the module name and schema columns for
generating a child-to-parent relationship query.
The following two child-to-parent relationship query examples will be used for
demonstration purpose in the following steps.
-
SELECT Name, Account.Name, Account.Owner.Name FROM Contact, a
child-to-parent relationship query with standard object and fields, and -
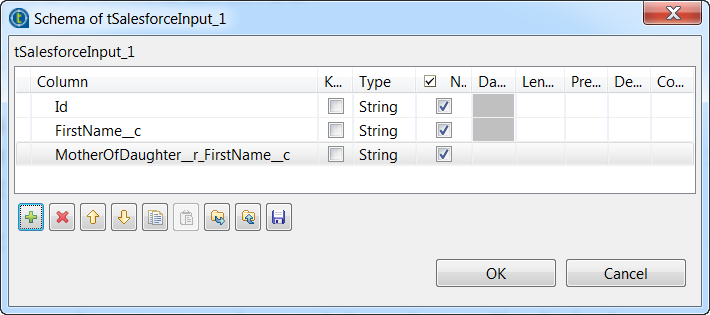
SELECT Id, FirstName__c, MotherOfDaughter__r.FirstName__c FROM, a child-to-parent relationship query with custom
Daughter__c
object and fields.Note that here you must use the relationship name with
__r
instead of__c. For more information, see Understanding Relationship Names, Custom
Objects, and Custom Fields.
-
Set the module name with the name of the object specified in the
FROMclause,Contactand
Daughter__cin above examples. -
Create a column for each field in the field list (separated by commas) after
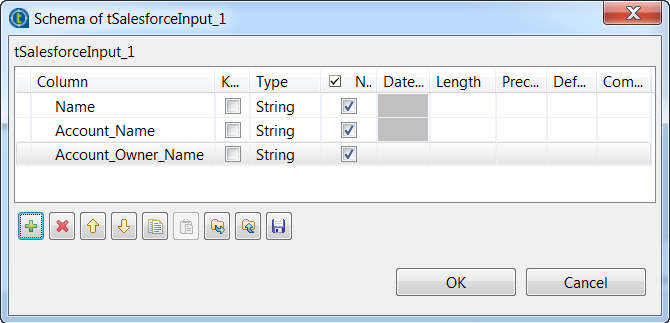
SELECTin the schema dialog box.For the first example, you need to create three columns for the three fields
Name,Account.Name, and
Account.Owner.Name.For the second example, you need to create three columns for the three fields
Id,FirstName__c, and
MotherOfDaughter__r.FirstName__c. -
Set the name of each column with the name of each field and replace all dots in
the column name with underscore characters.For the first example, the names of the three columns are set to
Name, Account_Name, and
Account_Owner_Name.For the second example, the names of the three columns are set to
Id, FirstName__c, and
MotherOfDaughter__r_FirstName__c. -
Set the type of each column.
The schema for the first example should be set like this:
And the schema for the second example should be set like this:
Note that the underscore character ‘_’ is
used as a separator between the relationship name and the field name in
Talend
schema, so only the underscore character ‘_’ that goes after ‘__r’ or ‘__c’
will be replaced by the dot character ‘.’ when generating the query. If the
underscore character ‘_’ is a part of any custom name in the schema, for
example,Contact_custom_field__c, which should be
Contact.custom_field__cin the query, you need to
replace ‘_’ in the generated query with ‘.’ manually.
How to set schema for generating the parent-to-child relationship query
This section demonstrates how to set the module name and schema columns for
generating a parent-to-child relationship query.
The following two parent-to-child relationship query examples will be used for
demonstration purpose in the following steps.
-
SELECT Name, Owner.Name (SELECT CreatedBy.Name FROM Notes) FROM, a parent-to-child relationship query with standard object
Account
and fields, and -
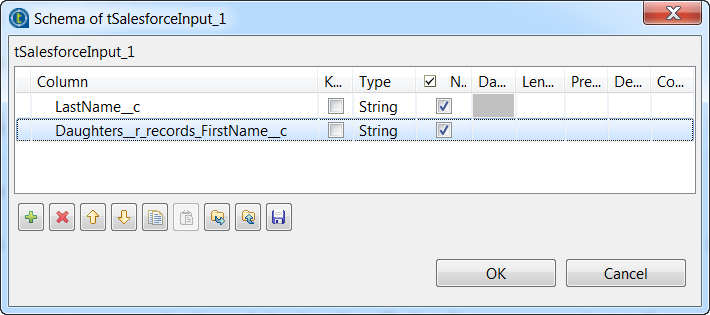
SELECT LastName__c, (SELECT FirstName__c FROM Daughters__r) FROM, a parent-to-child relationship query with custom object
Mother__c
and fields.Note that here you must use the relationship name with
__r
instead of__c. For more information, see Understanding Relationship Names, Custom
Objects, and Custom Fields.
-
Set the module name with the name of the object specified in the outer query
FROMclause,Accountand
Mother__cin above examples. -
Create a column for each field (inclulding the fields in subquery) after
SELECTin the schema dialog box.For the first example, you need to create three columns for the three fields,
including two fieldsNameandOwner.Name
after the outerSELECT, and one field
CreatedBy.Nameafter the subquery
SELECT.For the second example, you need to create two columns for the two fields,
including the fieldLastName__cafter the outer
SELECT, and the fieldFirstName__c
after the subquerySELECT. -
For the fields in the outer
SELECTclause, which are outside
parentheses, set the name of each column with the name of each field and replace
all dots in the column name with underscore characters.For the first example, the column names for the two fields
Name and Owner.Name in the
outerSELECTclause are set to Name
and Owner_Name.For the second example, there is no dot in the field name, so the column name
is same as the field name. -
For the fields in the subquery
SELECT, construct the column
names using the pattern<$XXX>_records_<$YYY>, where
<$XXX>corresponds to the name of the object specified
in the subqueryFROMclause, and<$YYY>
will be the field name with all dots replaced by underscore characters.For the first example, the column name for the field
CreatedBy.Name in the subquery is set to
Notes_records_CreatedBy_Name.For the second example, the column name for the field
FirstName__c in the subquery is set to
Daughters__r_records_FirstName__c. -
Set the type of each column.
The schema for the first example should be set like this:

And the schema for the second example should be set like this:
Note that the underscore character ‘_’ is
used as a separator between the relationship name and the field name in
Talend
schema, so only the underscore character ‘_’ that goes after ‘__r’ or ‘__c’
will be replaced by the dot character ‘.’ when generating the query. If the
underscore character ‘_’ is a part of any custom name in the schema, for
example,Contact_custom_field__c, which should be
Contact.custom_field__cin the query, you need to
replace ‘_’ in the generated query with ‘.’ manually.