tSqoopMerge
Performs an incremental import that updates an older dataset with newer records.
The file types of the newer and the older datasets must be the same.
tSqoopMerge reads two datasets in
HDFS and combines them both using a merge class that is able to parse the datasets, with
the newer records overwriting the older records.
Sqoop is typically installed in every Hadoop distribution. But if the Hadoop
distribution you need to use have no Sqoop installed, you have to install one on your
own and ensure to add the Sqoop command line to the PATH variable of that distribution.
For further information about how to install Sqoop, see the documentation of Sqoop.
tSqoopMerge Standard properties
These properties are used to configure tSqoopMerge running in the Standard Job framework.
The Standard
tSqoopMerge component belongs to the Big Data and the File families.
The component in this framework is available in all Talend products with Big Data
and in Talend Data Fabric.
Basic settings
|
Mode |
Select the mode in which Sqoop is called in a Job execution.
Use Commandline: the Sqoop shell is used to call Sqoop.
Use Java API: the Java API is used to call Sqoop. In |
|
Hadoop properties |
Either Built-in or Repository:
|
|
Distribution |
Select the cluster you are using from the drop-down list. The options in the
list vary depending on the component you are using. Among these options, the following ones requires specific configuration:
|
|
Hadoop Version |
Select the version of the Hadoop distribution you are using. The available |
|
NameNode URI |
Type in the URI of the Hadoop NameNode, the master node of a |
|
JobTracker Host |
Select this check box and in the displayed field, enter the location of the This property is required when the query you want to use is executed in Then you can continue to set the following parameters depending on the
configuration of the Hadoop cluster to be used (if you leave the check box of a parameter clear, then at runtime, the configuration about this parameter in the Hadoop cluster to be used will be ignored ):
For further information about these parameters, see the documentation or For further information about the Hadoop Map/Reduce framework, see the |
|
Use kerberos authentication |
If you are accessing the Hadoop cluster running
with Kerberos security, select this check box, then, enter the Kerberos principal name for the NameNode in the field displayed. This enables you to use your user name to authenticate against the credentials stored in Kerberos.
In addition, since this component performs Map/Reduce computations, you This check box is available depending on the Hadoop distribution you are |
| Use a keytab to authenticate |
Select the Use a keytab to authenticate Note that the user that executes a keytab-enabled Job is not necessarily |
|
Hadoop user name |
Enter the user name under which you want to execute the Job. Since a file or a directory in |
|
Old data directory |
Enter the path to the older dataset to be merged. |
|
New data directory |
Enter the path to the newer dataset to be merged. |
|
Target directory |
Enter the directory where you need to put the output of the |
|
Merge key |
Enter the name of the column used as the key of each record for This primary key must be unique. |
|
Need to generate the JAR file |
Select this check box to generate the merge jar file and the merge As this jar file is generated from the source table of the |
|
JDBC property |
Either Built-in or Repository:
|
|
Connection |
Enter the JDBC URL used to connect to the database where the source data is |
|
User name and |
Enter the authentication information used to connect to the source database. To enter the password, click the […] button next to the |
|
Table Name |
Type in the name of the source table. This name is used to name the generated jar file. |
|
Driver JAR |
In either the Use Commandline mode or the This driver jar is required only when you need to connect to the |
|
JAR file |
If a required merge class already exists and is available, specify In this situation, you need to enter the name of the class in the |
|
Print Log |
Select this check box to activate the Verbose |
|
Verbose |
Select this check box to print more information while working, for example, the |
Advanced settings
|
Custom class name |
Select this check box to display the Class This check box must be clear if you use Generate the JAR file in the Basic settings tab. |
|
Additional arguments |
Complete this table to use additional arguments if needs be. By adding additional arguments, you are able to perform multiple operations in |
|
Hadoop properties |
Talend Studio uses a default configuration for its engine to perform operations in a Hadoop distribution. If you need to use a custom configuration in a specific situation, complete this table with the property or properties to be customized. Then at runtime, the customized property or properties will override those default ones.
For further information about the properties required by Hadoop and its related systems such
as HDFS and Hive, see the documentation of the Hadoop distribution you are using or see Apache’s Hadoop documentation on http://hadoop.apache.org/docs and then select the version of the documentation you want. For demonstration purposes, the links to some properties are listed below:
|
|
Mapred job map memory mb and |
You can tune the map and reduce computations by In that situation, you need to enter the values you need in the Mapred The memory parameters to be set are Map (in Mb), |
|
Path separator in server |
Leave the default value of the Path separator in |
|
tStatCatcher Statistics |
Select this check box to collect log data at the component |
Global Variables
|
Global Variables |
ERROR_MESSAGE: the error message generated by the
EXIT_CODE: the exit code of the remote command. This is A Flow variable functions during the execution of a component while an After variable To fill up a field or expression with a variable, press Ctrl + For further information about variables, see |
Usage
|
Usage rule |
This component is used standalone. It respects the Sqoop prerequisites. You need We recommend using the Sqoop of version 1.4+ in order to benefit the full For further information about Sqoop, see the Sqoop manual on: http://sqoop.apache.org/docs/ |
|
Prerequisites |
The Hadoop distribution must be properly installed, so as to guarantee the interaction
For further information about how to install a Hadoop distribution, see the manuals |
|
Limitation |
If you have selected the Use Commandline |
|
Connections |
Outgoing links (from this component to another):
Trigger: Run if; On Subjob Ok; On Incoming links (from one component to this one): Row: Iterate;
Trigger: Run if; On Subjob Ok; On For further information regarding connections, see |
Merging two datasets in HDFS
This scenario applies only to Talend products with Big Data.
This scenario illustrates how to use tSqoopMerge to merge two datasets that are sequentially imported to HDFS
from the same MySQL table, with modifications of a record in between.

scenario reads as follows:
|
1 2 3 4 5 6 |
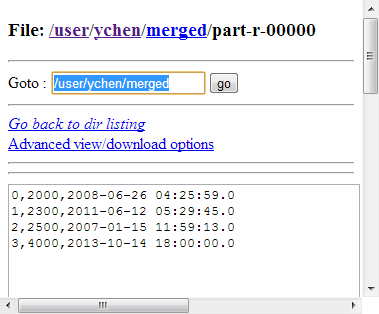
id,wage,mod_date 0,2000,2008-06-26 04:25:59 1,2300,2011-06-12 05:29:45 2,2500,2007-01-15 11:59:13 3,3000,2010-05-02 15:34:05 |
The path to it in HDFS is /user/ychen/target_old.
follows:
|
1 2 3 4 5 6 |
id,wage,mod_date 0,2000,2008-06-26 04:25:59 1,2300,2011-06-12 05:29:45 2,2500,2007-01-15 11:59:13 3,4000,2013-10-14 18:00:00 |
The path to it in HDFS is /user/ychen/target_new.
These datasets were both imported by tSqoopImport. For a scenario about how to use tSqoopImport, see Importing a MySQL table to HDFS.
The Job in this scenario merges these two datasets with the newer record
overwriting the older one.
Before starting to replicate this scenario, ensure that you have appropriate
rights and permissions to access the Hadoop distribution to be used. Then proceed as
follows:
Dropping the component
-
In the
Integration
perspective
of the Studio, create an empty Job from the Job
Designs node in the Repository tree view.For further information about how to create a Job, see
Talend Studio User Guide. -
Drop tSqoopMerge onto the
workspace.In this scenario, the required jar file for the merge is not available,
you then need to use tSqoopMerge to
generate it at runtime from the source MySQL table..
Configuring tSqoopMerge
-
Double-click tSqoopMerge to open its
Component view.
- In the Mode area, select Use Java API.
-
In the Version area, select the Hadoop
distribution to be used and its version. If you cannot find from the list
the distribution corresponding to yours, select Custom so as to connect to a Hadoop distribution not
officially supported in the Studio.For a step-by-step example about how to use this Custom option, see Connecting to a custom Hadoop distribution. -
In the NameNode URI
field, enter the location of the master node, the NameNode, of the distribution
to be used. For example, hdfs://talend-cdh4-namenode:8020. If you are using WebHDFS, the location should be
webhdfs://masternode:portnumber; WebHDFS with SSL is not
supported yet. -
In the Resource Manager
field, enter the location of the ResourceManager of your distribution. -
If the distribution to be used requires Kerberos authentication, select
the Use Kerberos authentication check box
and complete the authentication details. Otherwise, leave this check box
clear.If you need to use a Kerberos keytab file to log in, select Use a keytab to authenticate. A keytab file contains
pairs of Kerberos principals and encrypted keys. You need to enter the principal to
be used in the Principal field and the access
path to the keytab file itself in the Keytab
field. This keytab file must be stored in the machine in which your Job actually
runs, for example, on a Talend
Jobserver.Note that the user that executes a keytab-enabled Job is not necessarily
the one a principal designates but must have the right to read the keytab file being
used. For example, the user name you are using to execute a Job is user1 and the principal to be used is guest; in this
situation, ensure that user1 has the right to read the keytab
file to be used. -
In the Old data directory and the
New data directory fields, enter the
path, or browse to the directory in HDFS where the older and the newer
datasets are stored, respectively. -
In the Target directory field, enter the
path, or browse to the folder you need to store the merge result in. -
In the Merge key field, enter the column
to be used as the key for the merge. In this scenario, the column is
id. -
Select Need to generate the JAR file to
display the connection parameters to the source database table. -
In the Connection field, enter the URI of
the MySQL database where the source table is stored. For example, jdbc:mysql://10.42.10.13/mysql. -
In the Table Name field, enter the name
of the source table. In this scenario, it is sqoopmerge. - In Username and Password, enter the authentication information.
-
Under the Driver JAR table, click the
[+] button to add one row, then in this
row, click the […] button to display the
drop-down list and select the jar file to be used from that list. In this
scenario, it is mysql-connector-java-5.1.30-bin.jar.If the […] button does not appear,
click anywhere in this row to make it displayed. -
If the field delimiter of the source table is not comma (,), you still need
to specify the delimiter in the Additional
Arguments table in the Advanced
settings tab. The argument to be used is codegen.output.delimiters.field for the
Use Java API mode or –fields-terminated-by for the Use Commandline mode.
Executing the Job
Then you can press F6 to run this Job.
During the execution, the jar file and the class for the merge are generated in
the local machine.

Once done, you can verify the results in the target directory you have specified,
in the web console of the Hadoop distribution used.
If you need to obtain more details about the Job, it is recommended to use the web
console of the Jobtracker provided by the Hadoop distribution you are using.
If you continue to import updated datasets to HDFS from the same source table, you
can reuse the generated merge class to merge the datasets.