tTeradataTPump
Inserts, updates, or deletes data in the Teradata database with the TPump loading
utility which allows near-real-time data to be achieved in the data warehouse.
Use this component particularly for environments where batch windows are
shrinking and warehouse maintenance overlaps normal working hours.
tTeradataTPump Standard properties
These properties are used to configure tTeradataTPump running in the Standard Job framework.
The Standard
tTeradataTPump component belongs to the Databases family.
The component in this framework is available in all Talend
products.
Basic settings
|
Property type |
Either Built-in or |
|
|
Built-in: No property data stored |
|
|
Repository: Select the repository |
|
Execution platform |
Select the Operating System type you use. |
|
Host |
Host name or IP address of the database server. |
|
Database |
Database name. |
|
Username and |
DB user authentication data. To enter the password, click the […] button next to the |
|
Table |
Name of the table to be written. Note that only one table can be |
|
Schema and Edit |
A schema is a row description. It defines the number of fields |
|
|
Built-In: You create and store the schema locally for this component |
|
|
Repository: You have already created the schema and stored it in the |
|
Click Edit
|
|
|
Script generated folder |
Browse your directory and select the destination of the file which |
|
Action to data |
On the data of the table defined, you can perform:
Insert: Add new entries to the
Update: Make changes to existing Insert or update: Insert a new record. If
Delete: Remove entries Warning:
It is necessary to specify at least one |
|
Where condition in case Delete |
Type in a condition, which, once verified, will delete the This field appears only when Delete is selected from the Action to data drop-down list. |
|
Load file |
Browse your directory and select the file from which you want to |
|
Field separator |
Character, string or regular expression to separate fields. |
|
Error file |
Browse your directory and select the destination of the file where |
Advanced settings
|
Define Log table |
This check box is selected to define a log table you want to use |
|
BEGIN LOAD |
This field allows you to define your BEGIN LOAD command to
For more information, see Teradata Parallel Data Pump |
|
Return tpump error |
Select this check box to specify the exit code number to indicate |
|
Define character set |
Specify the character encoding you need use for your system |
|
tStat |
Select this check box to collect log data at the component |
Global Variables
|
Global Variables |
EXIT_VALUE: the process exit code. This is an After
ERROR_MESSAGE: the error message generated by the A Flow variable functions during the execution of a component while an After variable To fill up a field or expression with a variable, press Ctrl + For further information about variables, see |
Usage
|
Usage rule |
This component offers the flexibility of the DB query and covers |
Inserting data into a Teradata database table
In this scenario, you create a Job using tTeradataTPump to insert customer data into a Teradata database table and
specify the exit code to be displayed in the event of an exception error.
Three components are used in this Job:
-
tRowGenerator: generates rows as required using
random customer data taken from a list. -
tFileOutputDelimited: outputs the customer data
into a delimited file. -
tTeradataTPump: inserts the customer data into the
Teradata database table in the Tpump mode.
Dropping components
- Drop the required components: tRowGenerator, tFileOutputDelimited and tTeradataTPump from the Palette onto the design workspace.
-
Link tRowGenerator to tFileOutputDelimited using a Row > Main
connection. -
Link tRowGenerator to tTeradataTPump using a Trigger > On SubjobOk
connection.
Configuring the components
-
Double click tRowGenerator to open the
tRowGenerator Editor window.In the tRowGenerator Editor window,
define the data to be generated. For this Job, the schema is composed of two
columns: ID and Name.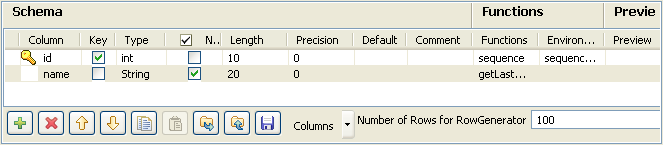 Enter the Number of Rows for
RowGenerator to generate. -
Double click tFileOutputDelimited to
define its properties in the Component
view. -
Next to File Name, browse to the output
file or enter a name for the output file to be created. -
Between double quotation marks, enter the delimiters to be used next to
Row Separator and Field Separator. Click Edit schema and check that the
schema matches the input schema. If need be, click Sync Columns. -
Double click tTeradataTPump to open its
Component view.In the Basic settings tab of the
Component view, define the tTeradataTPump parameters. I
-
Enter the Database name, User name and Password in accordance with your database authentication
information. -
Specify the Table into which you want to
insert the customer data. In this scenario, it is called
mytable. -
In the Script generated folder field,
browse to the folder in which you want to store the script files
generated. -
In the Load file field, browse to the
file which contains the customer data. -
In the Error file field, browse to the
file in which you want to log the error information. -
In the Action on data field, select
Insert.
Executing the Job
- Press F6 to execute the Job.
-
The Run view console reads as
follows: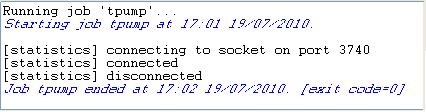
-
Double-click the tTeradataTPump
component to go back to its Component
view. -
On the Advanced settings tab, select the
Return tpump error check box and type
in the exit code number to indicate the point at which an error message
should be displayed in the console. In this example, enter the number
4 and use the default values for the other
parameters.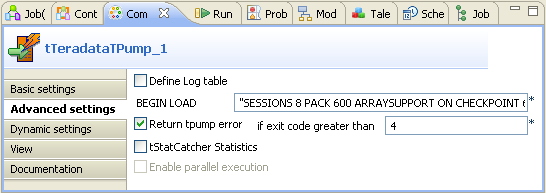
- Press F6 to run the Job.
-
The Run view console reads as
follows: An exception error occurs and
TPump returned exit code 12is
displayed. If you need to view detailed information about the exception
error, you can open the log file stored in the directory you specified in
the Error file field in the Basic settings tab of the Component view.