tXSDValidator
Helps at controlling data and structure quality of the file or flow to
be processed.
tXSDValidator
validates an input XML file or an input XML flow against an XSD file and sends the
validation log to the defined output.
tXSDValidator Standard properties
These properties are used to configure tXSDValidator running in the Standard Job framework.
The Standard
tXSDValidator component belongs to the XML family.
The component in this framework is available in all Talend
products.
Basic settings
|
Mode |
Select the validation mode from the drop-down list.
|
|
Schema and Edit |
A schema is a row description. It defines the number of fields to be Note that when File Mode is selected |
|
XSD file |
Specify the path to the XSD reference file. The HTTP URL is also This field is available only when File |
|
XML file |
Specify the path to the XML file to be validated. This field is available only when File |
|
If XML is valid, display |
Type in the message to be displayed on the console if the XML file is This field is available only when File |
|
If XML is invalid, display |
Type in the message to be displayed on the console if the XML file is This field is available only when File |
|
Print to console |
Select this check box to display the validation message on the This check box is available only when File |
|
Allocate |
Click the [+] button to add as many
This table is available only when Flow |
Advanced settings
|
Enable Features |
Click the [+] button to add as many For more information about the features, see https://xerces.apache.org/xerces2-j/features.html. |
|
Encoding |
Enter the encoding type between double quotation marks. |
|
tStatCatcher Statistics |
Select this check box to gather the Job processing metadata at the Job level |
Global Variables
|
Global Variables |
ERROR_MESSAGE: the error message generated by the
DIFFERENCE: the result of the validation. This is a Flow
VALID: the validation result. This is a Flow variable and
XSD_ERROR_MESSAGE: the xsd error message generated by the A Flow variable functions during the execution of a component while an After variable To fill up a field or expression with a variable, press Ctrl + For further information about variables, see |
Usage
|
Usage rule |
When File Mode is selected, this |
Validating data flows against an XSD file
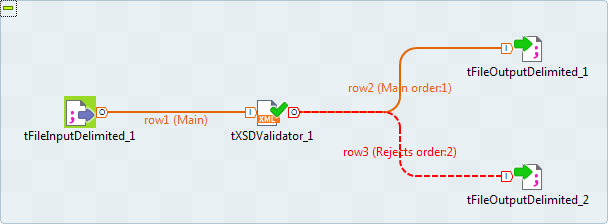
This scenario describes a Job that validates an XML column in the input file ShipOrder.csv against the XSD reference file ShipOrder.xsd and then outputs valid rows into the delimited
file ShipOrder_Valid.csv and invalid rows and error
messages into the delimited file ShipOrder_Invalid.csv.
For a similar use case that validates an XML file, see Validating XML files.

The content of the input file ShipOrder.csv that
includes the XML column ShipOrder to be validated is as
follows:
|
1 2 3 4 5 |
ID;ShipOrder 000001;<shiporder orderid="000001"><orderperson>George Bush</orderperson><shipto><name>John Adams</name><address>Oxford Street</address></shipto><item><title>Empire Burlesque</title><note>Special Edition</note><quantity>1</quantity><price>10.90</price></item></shiporder> 000002;<shiporder orderid="000002"><orderperson>Judy Liu</orderperson><shipto><name>Jack Liu</name><address>Wangfujing Street</address></shipto><item><title>Hide Your Heart</title><quantity>1</quantity><price>9.90</price></item></shiporder> 000003;<shiporder><orderperson>Peter Qian</orderperson><shipto><name>Thomas Wang</name><address>Wangfujing Street</address></shipto><item><title>The Power of Habit</title><quantity>1</quantity><price>8.99</price></item></shiporder> |
The content of the XSD reference file ShipOrder.xsd is
as follows:
|
1 2 3 4 5 6 7 8 9 10 11 12 13 14 15 16 17 18 19 20 21 22 23 24 25 26 27 28 29 30 |
<?xml version="1.0" encoding="ISO-8859-1" ?> <xs:schema xmlns:xs="http://www.w3.org/2001/XMLSchema"> <xs:element name="shiporder"> <xs:complexType> <xs:sequence> <xs:element name="orderperson" type="xs:string"/> <xs:element name="shipto"> <xs:complexType> <xs:sequence> <xs:element name="name" type="xs:string"/> <xs:element name="address" type="xs:string"/> </xs:sequence> </xs:complexType> </xs:element> <xs:element name="item" maxOccurs="unbounded"> <xs:complexType> <xs:sequence> <xs:element name="title" type="xs:string"/> <xs:element name="note" type="xs:string" minOccurs="0"/> <xs:element name="quantity" type="xs:positiveInteger"/> <xs:element name="price" type="xs:decimal"/> </xs:sequence> </xs:complexType> </xs:element> </xs:sequence> <xs:attribute name="orderid" type="xs:string" use="required"/> </xs:complexType> </xs:element> </xs:schema> |
Adding and linking components
-
Create a new Job and add a tFileInputDelimited component, a tXSDValidator component, and two tFileOutputDelimited components by typing their names in the
design workspace or dropping them from the Palette. -
Double-click the tXSDValidator component to
open its Basic settings view and select
Flow Mode from the Mode drop-down list. -
Link the tFileInputDelimited component to the
tXSDValidator component using a Row > Main
connection. -
Link the tXSDValidator component to the first
tFileOutputDelimited component using a
Row > Main connection to output valid rows. -
Link the tXSDValidator component to the
second tFileOutputDelimited component using a
Row > Rejects connection to output invalid rows.
Configuring the components
-
Double-click the tFileInputDelimited
component to open its Basic settings view on
the Component tab.
-
In the File name/Stream field, specify the
path to the input file. In this example, it is E:/ShipOrder.csv.In the Header field, enter 1 to skip the first header row of the input
file.Click the […] button next to Edit schema and define the schema by adding two
columns ID and ShipOrder of String type.
-
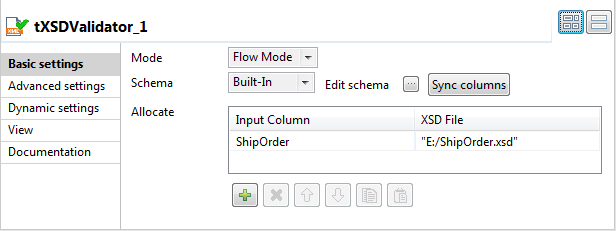
Double-click the tXSDValidator component to
open its Basic settings view on the Component tab.
-
Click the Sync columns button to retrieve the
schema from the preceding tFileInputDelimited
component, and in the pop-up dialog box, click Yes to propagate the schema to the two tFileOutputDelimited components.Add a row in the Allocate table by clicking
the [+] button. Then click the Input Column cell and select the XML column ShipOrder to be validated from the drop-down list.
And in the XSD File cell, enter the path to the
XSD reference file, E:/ShipOrder.xsd in this
example. -
Double-click the first tFileOutputDelimited
component to open its Basic settings view on
the Component tab.
-
In the File Name field, specify the path to
the output file that will store valid rows. In this example, it is E:/ShipOrder_Valid.csv.Select the Include Header check box to
include column headers in the output file. -
Double-click the second tFileOutputDelimited
component to open its Basic settings view on
the Component tab.
-
Click the […] button next to Edit schema to view its schema.
 You can see an extra column errorMessage that
holds the error information for invalid rows is added automatically into the
schema in addition to the two propagated columns. -
In the File Name field, specify the path to
the output file that will store invalid rows and error messages. In this
example, it is E:/ShipOrder_Invalid.csv.Select the Include Header check box to
include column headers in the output file.
Saving and executing the Job
- Press Ctrl+S to save the Job.
-
Press F6 to run the Job.
 As shown above, the output file ShipOrder_Valid.csv contains two valid rows, and the output file
ShipOrder_Invalid.csv contains one
invalid row that doesn’t define the orderid
attribute and the error message.