|
Component Family |
Messaging |
|
|
Function |
cCXFRS provides integration with |
|
|
Purpose |
cCXFRS is used to provide or |
|
|
Basic settings |
Endpoint |
The service endpoint URL where the REST service is provided. |
|
|
Type |
Select which type you want to use to provide the REST service. Either Manual or resourceClass. Manual: Determine the REST API mapping manually in the resourceClass: Select this type to provide the |
|
|
REST API Mapping |
This table appears when the Manual service type is Click [+] under the table to add as many rows as Output Flow: Specify the name of an output HTTP Verb: Select a HTTP method from GET, POST, PUT, URI pattern: Fill this field with the REST URI that Consumes: Select the format type of the consume Produces: Select the format type of the produce Bean class: Set the bean class when the HTTP Verb is POST or PUT and the |
|
|
Resource Class |
This field appears when the resourceClass service type |
|
|
Operation |
This field appears when the resourceClass service type |
|
Relative Path |
This field appears when the Manual service type is |
|
|
HTTP Method |
This option appears when the Manual service type is |
|
|
Content Type |
This option appears when the Manual service type is Select XML, JSON, or |
|
|
Accept Type |
This field appears when the Manual service type is Select the media type the client end is prepared to accept for the response from the |
|
|
Response Class |
This field appears when the Manual service type is |
|
|
Use Service Locator |
Select this check box to enable the Service Locator. Specify the |
|
|
Use Service Activity Monitor |
Select this check box to enable the Service Activity Monitor. |
|
|
Use Authentication |
Select this check box to enable the authentication option. Select When the cCXFRS component is used as consumer, enter a |
|
|
Use Authorization |
This option is only available if you subscribed to Talend When the cCXFRS component is used as the service When the cCXFRS component is used as the service |
|
|
Use Business Correlation |
Select this check box to create a correlation ID in this You can specify a correlation ID in the Correlation |
|
|
Advanced settings |
Log messages |
Select this check box to log the message exchanges in the |
| Arguments | Set the optional arguments in the corresponding table. Click [+] as many times as required to add arguments to the table. Then click the corresponding Value field and enter a value. See the site http://camel.apache.org/cxfrs.html for available URI options. |
|
|
Usage |
cCXFRS can be a start component in a Route as the |
|
|
Limitation |
Due to the license incompatibility, one or more JAR files required to use this component are |
|
This scenario demonstrates how to use the cCXFRS component
to provide and consume a REST service. To do so, two Routes are built, a service
provider Route and a consumer Route.
This Route provides a REST Web service which will be accessible for requests.
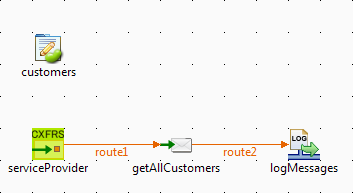
Dropping and linking the components
-
From the Palette, drag and drop a cCXFRS, a cSetBody, a
cLog and a cBeanRegister component onto the design workspace. -
Link the cCXFRS, cSetBody and cLog using the
Row > Route connection. -
Label the components for better identification of their roles.
Configuring the components
-
Double-click the cBeanRegister component
to display its Basic settings view in the
Component tab.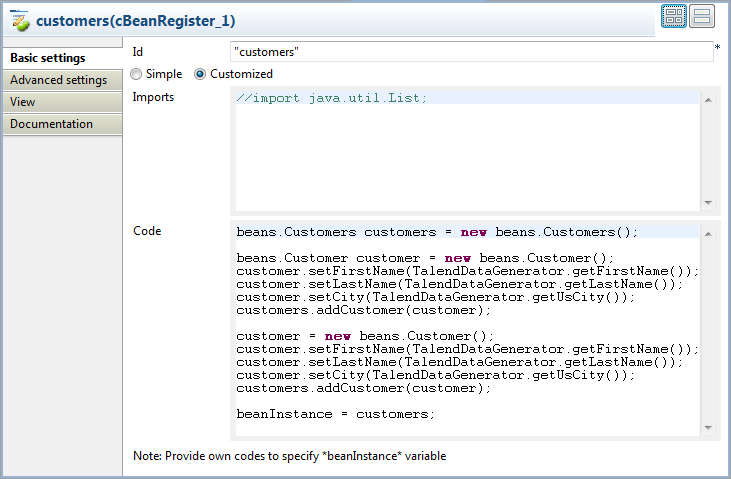
-
In the Id field, enter
“customers” to name the bean.Select the Customized option and enter the following
code in the Code box to create two
customers and set thefirstName,lastName,
city, andidvalues for each of
them:123456789101112131415beans.Customers customers = new beans.Customers();beans.Customer customer = new beans.Customer();customer.setFirstName(TalendDataGenerator.getFirstName());customer.setLastName(TalendDataGenerator.getLastName());customer.setCity(TalendDataGenerator.getUsCity());customers.addCustomer(customer);customer = new beans.Customer();customer.setFirstName(TalendDataGenerator.getFirstName());customer.setLastName(TalendDataGenerator.getLastName());customer.setCity(TalendDataGenerator.getUsCity());customers.addCustomer(customer);beanInstance = customers; -
Double-click the cCXFRS component to display its
Basic settings view in the Component tab.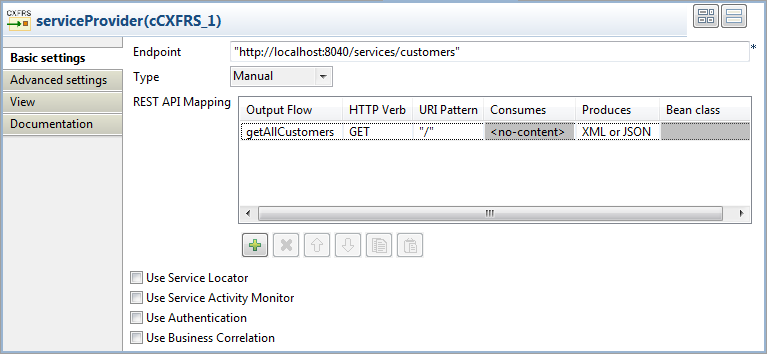
-
In the Endpoint field, type in the endpoint URL where
the Web service will be provided, “http://localhost:8040/services/customers” in this
example.From the Type list, select Manual to determine the REST API mapping
manually.In the REST API mapping table, click [+] to add a row in the table. In the Output Flow field, enter
getAllCustomers as the name of it. Select GET in the HTTP
Verb list. Keep the default settings in the other
columns. -
Double-click the cSetBody component to display its
Basic settings view in the Component tab.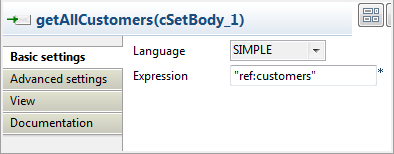
-
Select SIMPLE from the Dataformat list. In the Expression field, enter “ref:customers”
to refer to the bean defined in the cBeanRegister component. -
Keep the default settings of the cLog
component to log the message exchanges.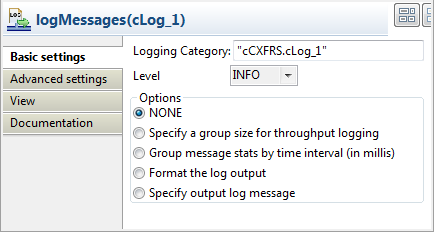
-
Press Ctrl+S to save your route.
Viewing code and executing the Route
-
Click the Code tab at the bottom of the
design workspace to have a look at the generated code.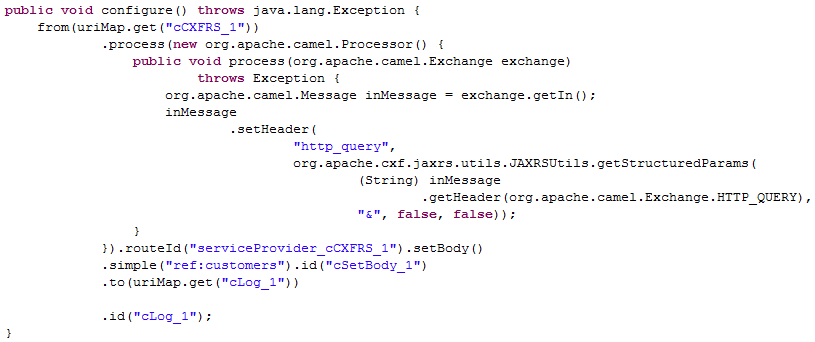
As shown in the code, the Route is built
from
cCXFRS_1, set message body incSetBody_1and then
tocLog_1. -
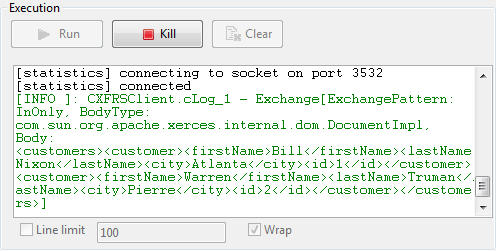
Click the Run view to display it and
click the Run button to launch the
execution of your Route. You can also press F6 to execute it.RESULT: The service is successfully started. You can access it from a Web browser using
the service endpoint URL.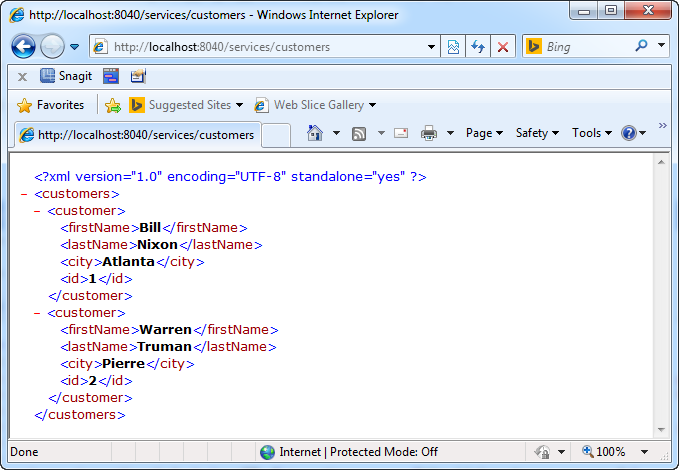
This Route will consume the REST service that is built in the provider Route.
Dropping and linking the components
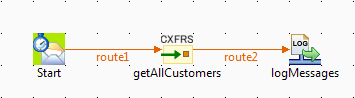
-
From the Palette, drag and drop a
cTimer, a cCXFRS, and a cLog
component onto the design workspace. -
Link the cTimer, cCXFRS
and cLog using the Row > Route
connection. -
Label the components for better identification of their roles.
Configuring the components
-
Double-click the cTimer component to display its
Basic settings view in the Component tab.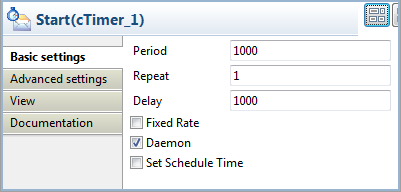
-
In the Repeat field, enter 1 to
generate the message exchange one time. Keep the default settings of the
other options. -
Double-click the cCXFRS component to
display its Basic settings view in the
Component tab.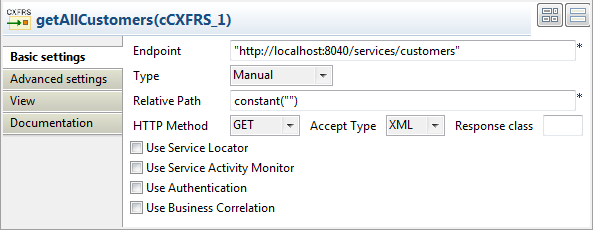
-
In the Endpoint field, type in the URL of the Web
service built in the provider Route, “http://localhost:8040/services/customers” in this
example.Select Manual from the Type list. In the Relative
Path field, enter constant(“”). Select
GET in the HTTP
Method list. Keep the default settings of the other
options. -
Keep the default settings of the cLog
component to log the message exchanges.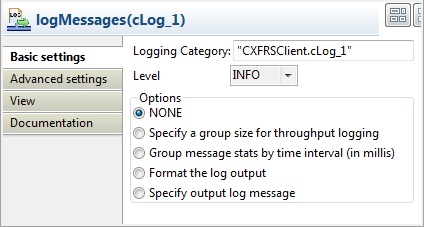
-
Press Ctrl+S to save your route.
Viewing code and executing the Route
-
Click the Code tab at the bottom of the
design workspace to have a look at the generated code.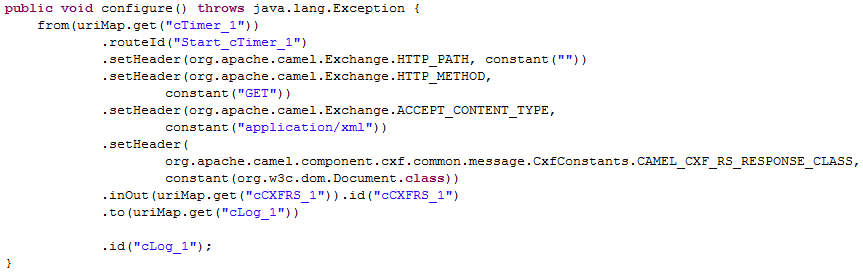
As shown in the code, the Route is built
from
cTimer_1. TheHTTP_PATH,HTTP_METHOD,
ACCEPT_CONTENT_TYPE, and
CxfConstants.CAMEL_CXF_RS_RESPONSE_CLASSare set in
cCXFRS_1. The message is then routed to
cLog_1. -
Click the Run view to display it and
click the Run button to launch the
execution of your Route. You can also press F6 to execute it.RESULT: The customers information is displayed in the console.