tSAPBapi
Extracts data from or loads data to an SAP server using multiple input/output
parameters or the document type parameter.
tSAPBapi connects to an SAP server and calls a BAPI function to extract
data from or load data to the SAP server.
tSAPBapi Standard properties
These properties are used to configure tSAPBapi running in the Standard Job framework.
The Standard
tSAPBapi component belongs to the Business family.
The component in this framework is available in all subscription-based Talend products.
Basic settings
|
Property Type |
Either Built-in or Repository. |
|
|
Built-In: You create and store the schema locally for this component |
|
|
Repository: You have already created the schema and stored it in the |
|
Use an existing connection |
Select this check box and from the list displayed select the When a Job contains a parent Job and a child Job, the list |
|
Server Type |
Select the type of the server to be connected, either Application Server or Message Server. |
|
Client |
Specify the SAP system client ID. |
|
UserId and Password |
Specify the user connection ID and password. To enter the password, click the […] button next to the |
|
Language |
Specify the language of the SAP system. |
|
Host name |
Enter the name or IP address of the host on which the SAP server is |
|
System number |
Enter the system number. This field appears only when Application |
|
System ID |
Enter the system ID. This field appears only when Message |
|
Group Name |
Enter the group name. This field appears only when Message |
|
SAP Function |
Specify the name of the BAPI function to be called. |
|
tick it to enable multiple input/output;not tick it to enable |
Select this check box to use multiple input and output parameters when Clear this check box to use the document type input and output |
|
Schema and Edit schema |
A schema is a row description. It defines the number of fields Click Edit
The Schema list and the Edit schema button appear only when the |
|
Input |
Click the [+] button below the table
This table appears only when the tick it to |
|
Output |
Click the [+] button below the table
This table appears only when the tick it to |
Advanced settings
|
SAP Properties |
If you need to use custom configuration for the SAP system being used,
complete this table with the property or properties to be customized. For example,
|
|
tStatCatcher Statistics |
Select this check box to gather the Job processing metadata at a Job |
Global Variables
|
Global Variables |
ERROR_MESSAGE: the error message generated by the A Flow variable functions during the execution of a component while an After variable To fill up a field or expression with a variable, press Ctrl + For further information about variables, see |
Usage
|
Usage rule |
This component is usually used as a start component together with |
|
Support |
tSAPBapi should be used to interact with the ERP part |
|
Connections |
For further information about connections, see |
|
Limitation |
Specific jar and dll files provided by SAP must be added to your
Studio and the workstation hosting your Studio. The exact procedure varies among platforms such as 32-bit or 64-bit Windows or Linux.
|
Retrieving data from an SAP system by calling a BAPI function using multiple
input/output parameters
This scenario applies only to subscription-based Talend products.
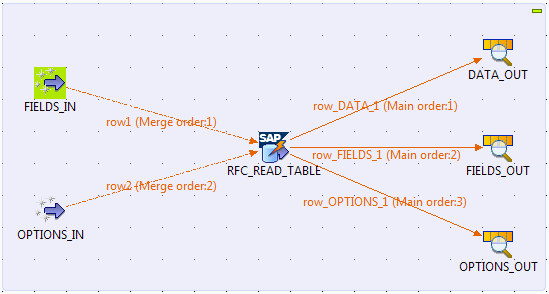
This scenario describes a Job that retrieves data from a table named VBRK in an SAP system by calling the BAPI function RFC_READ_TABLE with multiple input and output parameters
defined.
Prerequisites:
An SAP connection has been set up in the Repository
tree view, with the RFC_READ_TABLE function and
VBRK table retrieved. For more information about
how to set up an SAP connection and retrieve SAP functions and tables, see
Talend Studio
User Guide.

Adding and linking components
-
Create a Job and drop the node RFC_READ_TABLE in the
SAP Bapi folder of the SAP connection
onto the design workspace as a tSAPBapi
component to reuse the connection to the SAP system and the input and output
schemas of the SAP function RFC_READ_TABLE. -
Add the following components to the Job by typing theirs names in the
design workspace or dropping them from the Palette:-
two tFixedFlowInput components: to generate two input
data flows for the FIELDS and
OPTIONS input parameters of
table type respectively.Note that there is no input data flow for the DATA
input parameter of table type, since it does not need an input value
in this example. -
three tLogRow components: to display the output data
corresponding to the DATA,
FIELDS, and OPTIONS output parameters
respectively.
-
-
Connect the first tFixedFlowInput to tSAPBapi using a Row > Main
connection. -
Connect the second tFixedFlowInput to tSAPBapi using a Row > Main
connection. -
Connect tSAPBapi to the first tLogRow using the Row >
row_DATA_1 connection. -
Connect tSAPBapi to the second tLogRow using the Row >
row_FIELDS_1 connection. -
Connect tSAPBapi to the third tLogRow using the Row >
row_OPTIONS_1 connection. - Label the components to better identify their roles in the Job.
Configuring the components
Configuring the input components
-
Double-click the first tFixedFlowInput to
open its Basic settings view on the
Component tab.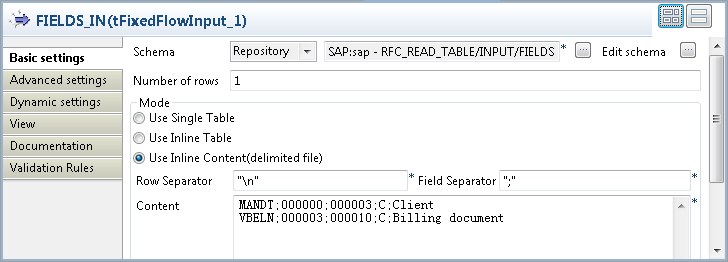
-
Select Repository from the Schema drop-down list and click the […] button next to it to open the Repository Content dialog box.

-
Select the schema of the FIELDS input parameter from
the Repository Content dialog box, then
click OK to close the dialog box and
propagate the schema to the next component. -
In the Mode area, select Use
Inline Content(delimited file) and then enter the following
input data for the FIELDS input parameter
in the Content field.12MANDT;000000;000003;C;ClientVBELN;000003;000010;C;Billing document -
Double-click the second tFixedFlowInput
to open its Basic settings view on the
Component tab.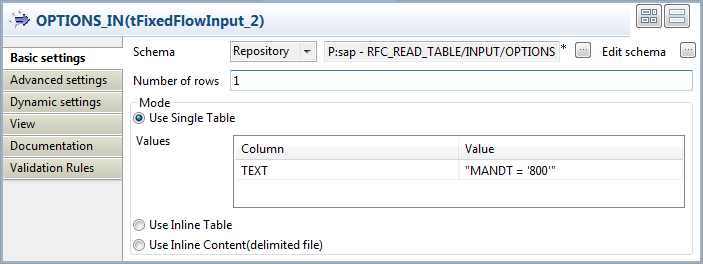
- Select Repository from the Schema drop-down list and click the […] button next to it to open the Repository Content dialog box.
-
Select the schema of the OPTIONS input parameter from
the Repository Content dialog box, then
click OK to close the dialog box and
propagate the schema to the next component. -
In the Mode area, select the Use
Single Table option, and enter the value of the parameter in
the Value field. In this example, it is
MANDT = ‘800’.
Configuring the tSAPBapi component
-
Double-click tSAPBapi to open its
Basic settings view on the Component tab.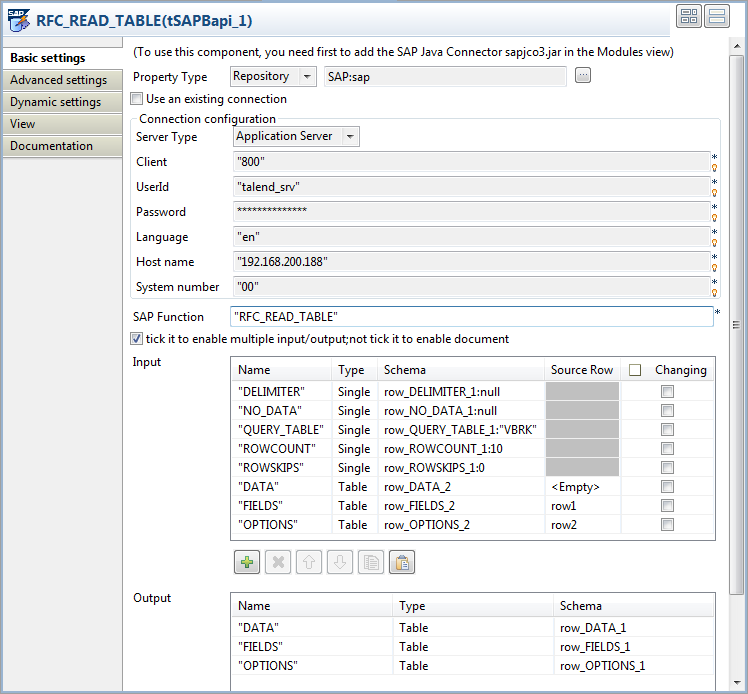 The SAP Function field has already been
filled automatically with the name of the function to be called. In this
example, it is RFC_READ_TABLE.The Input and Output tables have already been filled automatically with
the input and output schemas of the function RFC_READ_TABLE. -
In the Input table, click in the Schema field for the QUERY_TABLE input parameter and click the […] button in the cell. In the pop-up dialog
box, enter the value for the QUERY_TABLE
input parameter between double quotation marks in the Value column. In this example, the table to be queried is
VBRK.
-
Do the same to set the value for the ROWCOUNT and ROWSKIPS
input parameters to 10 and 0 respectively. - Click in the Source Row field for the FIELDS input parameter and select row1 from the drop-down list.
- Do the same to select row2 for the OPTIONS input parameter.
Configuring the output components
-
Double-click the first tLogRow to open
its Basic settings view on the Component tab.
-
In the Mode area, select Table (print values in cells of a table) for a
better display of the result. - Do the same to configure the second and the third tLogRow components.
Saving and executing the Job
- Press Ctrl + S to save the Job.
-
Press F6 to run the Job.
 As shown above, ten rows of data from the VBRK table
is retrieved and displayed on the console.
Retrieving data from an SAP system by calling a BAPI function using document
type parameters
This scenario applies only to subscription-based Talend products.
This scenario describes a Job that retrieves data from a table named SFLIGHT in an SAP system by calling the BAPI function RFC_READ_TABLE with defined input and output parameters of
type Document.

Prerequisites:
tree view, with
-
the RFC_READ_TABLE function retrieved
and saved under the SAP Bapi folder of the
SAP connection, -
and the XML metadata for the input and output schemas of the RFC_READ_TABLE function retrieved and saved
under the File xml node.
For more information about how to set up an SAP connection and retrieve SAP functions
and SAP function schemas as XML metadata, see
Talend Studio
User Guide.

Adding the components
-
Create a Job and drop the node RFC_READ_TABLE in the
SAP Bapi folder of the SAP connection
onto the design workspace as a tSAPBapi
component to reuse the connection to the SAP system. -
Add the following components to the Job by typing theirs names in the
design workspace or dropping them from the Palette:-
a tFixedFlowInput component: to
generate the input data flow. -
two tXMLMap components: to map and transform the input
and output data flows respectively. -
three tLogRow components: to display the output data
corresponding to the DATA,
FIELDS, and OPTIONS output parameters
respectively.
-
Configuring the components
Configuring the input component
-
Double-click tFixedFlowInput to open its
Basic settings view on the Component tab.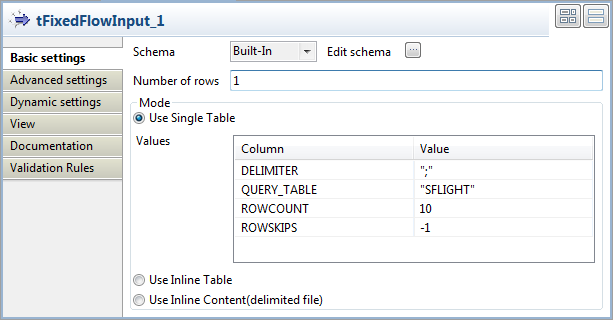
-
Click the […] button next to Edit schema to open the schema editor to define the input
schema. In this example, the input schema is composed of four columns:
DELIMITER and QUERY_TABLE of string type, and ROWCOUNT and ROWSKIPS of
integer type. -
In the Mode area, select the Use
Single Table option and specify the value for each column. In
this example, “;” for the DELIMITER column, “SFLIGHT” for the QUERY_TABLE column, 10
for the ROWCOUNT column, and -1 for the ROWSKIPS column. -
Connect tFixedFlowInput to the first tXMLMap using a Row > Main
connection.
Configuring the tSAPBapi component
-
Double-click tSAPBapi to open its
Basic settings view on the Component tab.
-
Clear the tick it to enable multiple input/output;not tick it to
enable document check box to allow using input and output
parameters of type Document. -
Click the […] button next to Edit schema to open the schema editor.

-
Click the [+] button to add a column doc of type Document.
When done, click OK to close the schema
editor. -
Right-click the first tXMLMap, select Row > *New Output*
(Main) from the contextual menu and click tSAPBapi. In the pop-up dialog box, enter
in and then click OK and accept schema propagation from the target
component tSAPBapi. The first tXMLMap will be connected to tSAPBapi using a link named in (Merge order:1).
Mapping the input data flow
-
Double-click the first tXMLMap to open its map editor.
In the in table on the right side,
right-click the node doc and select
Import From Repository from the
contextual menu.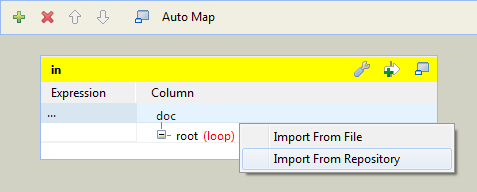
-
In the pop-up Metadata dialog box, select Input_Schema in the folder RFC_READ_TABLE and click OK to close the dialog box. The schema is added to the XML
tree.
-
Drag and drop all columns in the input table main:row1
on the left side to the corresponding elements in the in table on the right side. Then in the
in table, delete the other elements
that do not need an input value.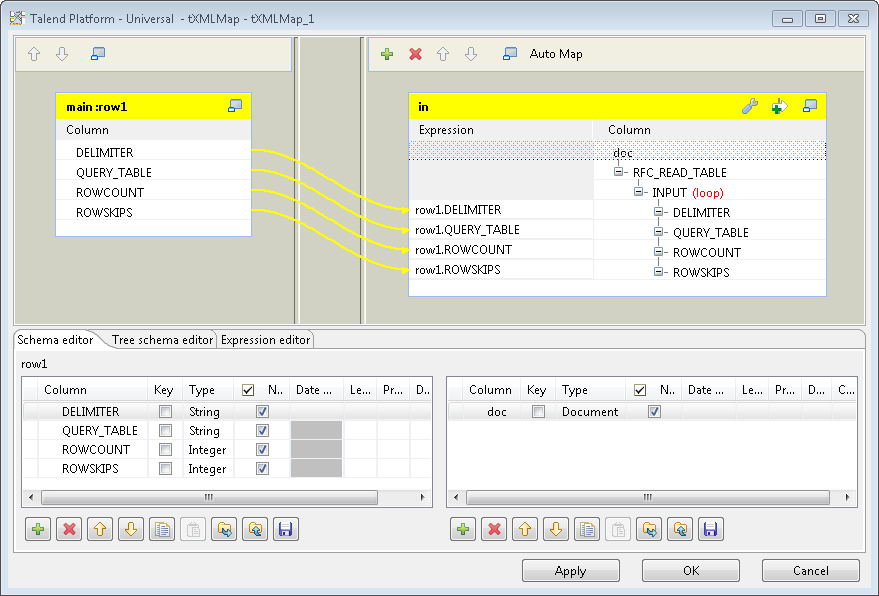
-
Click OK to save the settings and close
the map editor. -
Connect tSAPBapi to the second tXMLMap using a Row >
Main connection.
Mapping the output data flow
-
Right-click the second tXMLMap, select Row > *New Output*
(Main) from the contextual menu and click the first tLogRow. In the pop-up dialog box, enter
DATA and then click OK. The second tXMLMap will be connected to the first tLogRow using a connection named DATA (Main order:1). -
Do the same to connect the second tXMLMap to the second
tLogRow using a connection named
FIELDS (Main order:2), and to the
third tLogRow using a connection named
OPTIONS (Main order:3). -
Double-click the second tXMLMap to open its map editor.
In the main:row2 table on the left side,
right-click the node doc and select
Import From Repository from the
contextual menu. In the pop-up Metadata
dialog box, select Output_Schema in the
folder RFC_READ_TABLE and click OK to close the dialog box. The schema is added
to the XML tree.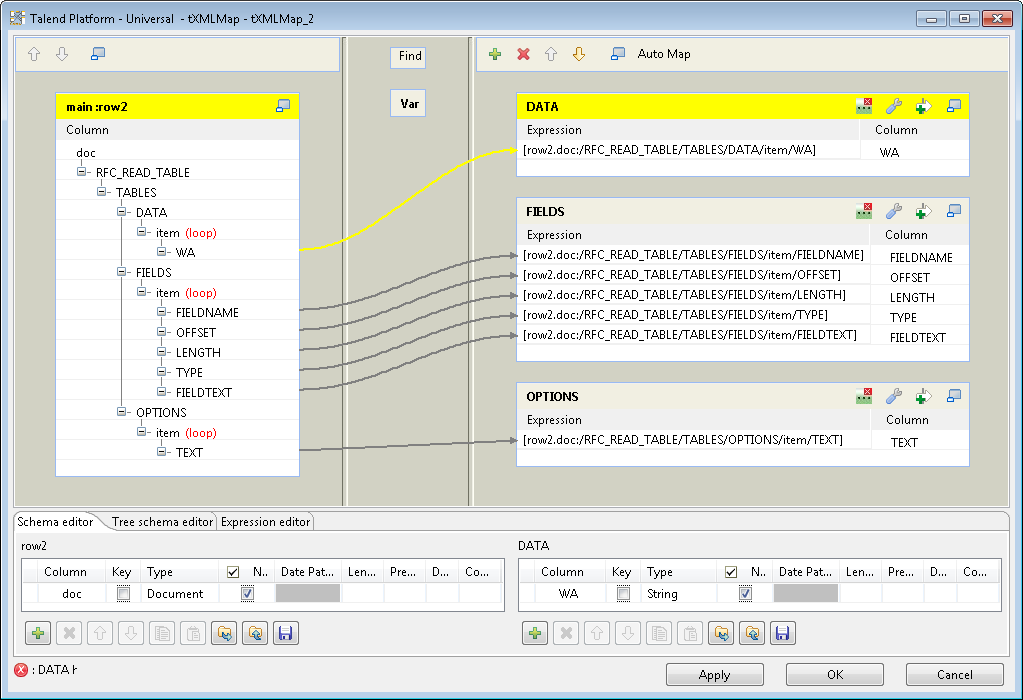
- Drag and drop the node WA under the DATA element in the input table main:row2 on the left side into the DATA table on the right side.
-
Do the same to drag and drop the nodes FIELDNAME,
OFFSET, LENGTH, TYPE, and
FIELDTEXT under the FIELDS element in the input table main:row2 on the left side into the FIELDS table on the right side, and drag and
drop the node TEXT under the OPTIONS element in the input table main:row2 on the left side into the OPTIONS table on the right side. -
Right-click the item node under the DATA node and select As
loop element from the contextual menu to set it as the loop
element. -
Do the same to set the item nodes under
the FIELDS and OPTIONS nodes as the loop element. -
Click the set Loop Function button on the
upper-right corner in the DATA table to
configure the source loop. Click the [+] button to add a row, and then click in the
Xpath field and select the source loop
row2.doc:/RFC_READ_TABLE/TABLES/DATA/item from the drop-down
list. When done, click OK to close the
dialog box. -
Do the same to set the source loop for the FIELDS and
OPTIONS tables to row2.doc:/RFC_READ_TABLE/TABLES/FIELDS/item and
row2.doc:/RFC_READ_TABLE/TABLES/OPTIONS/item
respectively. - Click OK to close the map editor.
Configuring the output components
-
Double-click the first tLogRow to open
its Basic settings view on the Component tab.
-
Click the Sync columns button to retrieve
the schema from the preceding component. -
In the Mode area, select Table (print values in cells of a table) for a
better display of the result. - Do the same to configure the second and the third tLogRow components.
Saving and executing the Job
- Press Ctrl + S to save the Job.
-
Press F6 to run the Job.
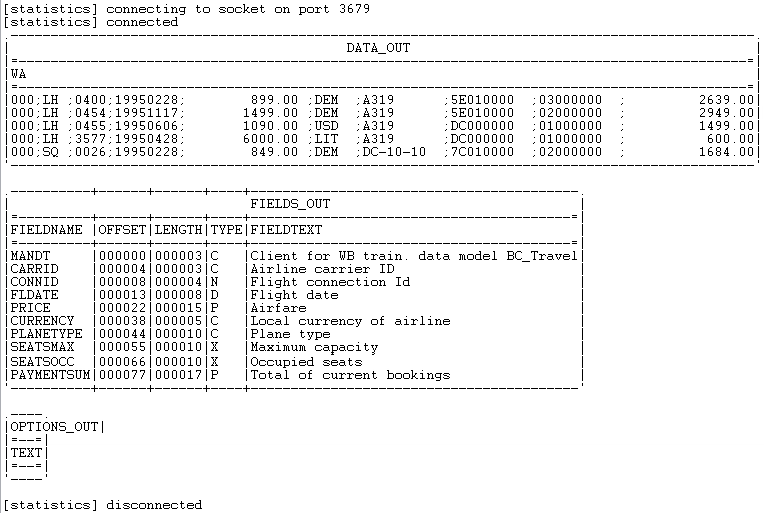 As shown above, ten rows of data from the SFLIGHT
table is retrieved and displayed on the console.