
|
Component Family |
Messaging |
|
|
Function |
cFile provides access to file |
|
|
Purpose |
cFile allows files to be |
|
|
Basic settings |
Path |
Path to the file or files to be accessed or saved. |
|
|
Parameters/Noop |
Select this check box to keep the file or files in the original |
|
|
Parameters/Flatten |
Select this check box to flatten the file name path to strip any |
|
|
Parameters/AutoCreate |
Select this check box to create the directory specified in the Path field automatically if it does not exist. |
|
|
Parameters/BufferSize(kb) |
Write buffer sized in bytes. |
| Encoding | Specify the encoding of the file, ISO-8859-15, UTF-8, or CUSTOM. |
|
| FileName | The name of the file to be processed. Use this option if you want to consume only a single file in the specified directory. |
|
| Advanced settings | Advanced | Set the optional arguments in the corresponding table. Click [+] as many times as required to add arguments to the table. Then click the corresponding Value field and enter a value. See the site http://camel.apache.org/file2.html for available URI options. |
|
Usage |
cFile can be a start, middle or |
|
|
Limitation |
n/a |
|
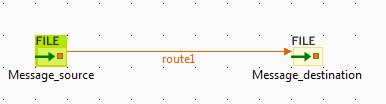
In this scenario, an input cFile component is
configured to visit a local file directory and send the files in the directory to an
output cFile component which writes the files in
another directory.
-
From the Palette, expand the Messaging folder and select the cFile component. Drop one as the input component
and another as the output component onto the design workspace. -
Right-click the input cFile component,
select Row > Route in the contextual menu and click the output cFile component. -
Label the components to better identify their respective
functionality.
-
Double-click the input cFile component to
display its Basic settings view in the
Component tab.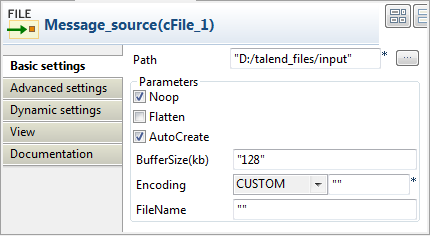
-
In the Path field, browse to or enter the
input file path, and leave the other parameters as they are. -
Double-click the output cFile component
to display its Basic settings view in the
Component tab.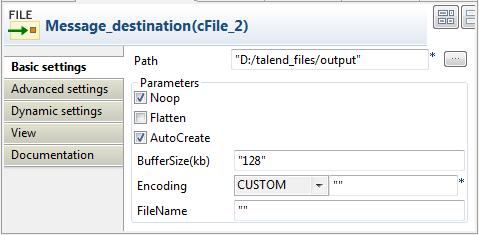
-
In the Path field, browse to or enter the output file
path, as shown above. Leave the other parameters as they are. -
Press Ctrl+S to save your route.
-
Click the Code tab at the bottom of the
design workspace to have a look at the generated code.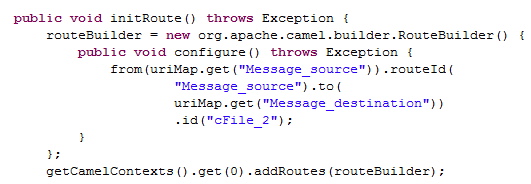
As shown in the code, a message route is built
fromone endpoint
.toanother. -
Click the Run view to display it and
click the Run button to launch the
execution of your Route. You can also press F6 to execute it.RESULT: The input files are written to specified output directory.