tMarketoOutput
Marketo.
tMarketoOutput Standard properties
These properties are used to configure tMarketoOutput running in the Standard Job framework.
The Standard
tMarketoOutput component belongs to
two
families: Business and
Cloud.
The component in this framework is generally available.
Basic settings
|
Property Type |
Select the way the connection details
This property is not available when other connection component is selected |
| Connection component |
Select the component whose connection details will be used |
| Endpoint address |
Enter the API Endpoint URL of the Marketo Web Service. The API |
| Client access ID |
Enter the client Id for the access to the Marketo Web The client Id and client secret can be found on the Marketo Admin > LaunchPoint panel, by clicking View Details for the service to be |
| Secret key |
Enter the client secret for the access to the Marketo Web To enter the secret key, click the […] button next to |
| Schema and Edit schema |
A schema is a row description. It defines the number of fields (columns) to
The schema of this component is predefined and it will be Note that when the API mode is changed, you need to refresh the Click Edit schema to make changes to the schema.
Click Sync columns to retrieve the schema from This component offers the This dynamic schema Note that the dynamic schema feature for this |
| Operation |
Select an operation that allows you to synchronize data
|
| Operation type |
Select a type of sync operation to be performed from the drop-down
This list is available only in the REST API mode when |
| Lookup field |
Select the lookup field that will be used to find the duplicate. This list is available only in the REST API mode when |
| Mappings |
Complete this table to map the column names of the component schema Note that because some column names in Marketo may contain blank This table is available only in the SOAP API mode. |
| Dedupe prospects record using the email address |
Select this check box to de-duplicate records using email address. Clear this check box to create another record which contains the same |
| Delete leads in batch |
Select this check box to delete the leads in batch. This check box is available only when deleteLeads |
| Batch Size |
Specify the number of records to be processed in each batch. This field is available when:
|
| Sync method |
Select a type of sync operation to be performed from the drop-down This list is available only when syncCustomObjects |
| Dedupe by |
Specify the field on which the records will be deduplicated. This field is available only when |
| Delete by |
Select the field by which the delete operation will be performed. This list is available only when |
| Custom object name |
Specify the name of the custom object. This field is available only when |
| Die on error |
Select the check box to stop the execution of the Job when an error Clear the check box to skip any rows on error and complete the When errors are skipped, you can collect the |
Advanced settings
| API Mode |
Select the Marketo API mode, either REST API For more information about the Marketo REST API, see http://developers.marketo.com/documentation/rest/. For more information about the Marketo SOAP API, see http://developers.marketo.com/documentation/soap/. |
| Timeout |
Enter the timeout value (in milliseconds) for the connection to the |
| Max reconnection attemps |
Enter the maximum number of reconnect attempts to the |
| Attempt interval time |
Enter the time period (in milliseconds) between subsequent |
|
tStatCatcher Statistics |
Select this check box to gather the Job processing metadata at the Job level |
Global Variables
| NUMBER_CALL |
The number of calls. This is an After variable and it returns an |
| ERROR_MESSAGE |
The error message generated by the component when an error occurs. This |
Usage
|
Usage rule |
This component is usually used as an end component of a Job or Subjob and it |
Data transmission with Marketo using REST API
Here is an example of using Talend components to connect to
Marketo, insert several lead records into Marketo, then retrieve these records from Marketo
and display them on the console.

Setting up the Job for data transmission with Marketo using REST
API
-
Add a tMarketoConnection component, two
tFixedFlowInput components, a
tMarketoOutput component, a tMarketoInput component, and a tLogRow component by typing their names on the
design workspace or dropping them from the Palette. -
Make sure REST is selected from the
API Mode drop-down list on the Advanced
settings view of tMarketoOutput and
tMarketoInput. -
Connect the first tFixedFlowInput component to the tMarketoOutput component using a Row > Main connection.
In the pop-up dialog box, click Yes so
that the first tFixedFlowInput component
can get the schema from the target tMarketoOutput component. -
Connect the second tFixedFlowInput component to the tMarketoInput component using a Row > Main
connection. In the pop-up dialog box, click No and the second tFixedFlowInput component will not get the schema from the
target tMarketoInput component. -
Connect the tMarketoInput component to the tLogRow component using a Row > Main
connection. -
Connect the tMarketoConnection component to the first
tFixedFlowInput component using a
Trigger > On Subjob Ok
connection. - Do the same to connect the first tFixedFlowInput component to the second tFixedFlowInput component.
Connecting to Marketo using REST API
Before connecting to Marketo using the REST API endpoint, you need to make sure a
custom service, which provides credentials to authenticate with Marketo and allows
you to access the data in Marketo, has been created and associated with a single
API-only user by your Marketo administrator. For more information about the Marketo
Custom Service, see Custom Services.
-
Double-click the tMarketoConnection component to open
its Basic settings view.
-
In the Endpoint address
field, enter the REST API endpoint URL that can be found on the Marketo
Admin > Web Services panel. -
In the Client Access ID and Secret key fields, enter the client Id and
client secret required to access Marketo.The client Id and client secret can be found on the Marketo Admin > LaunchPoint panel, by clicking View Details for
the service to be accessed.
Inserting lead records into Marketo using REST API
-
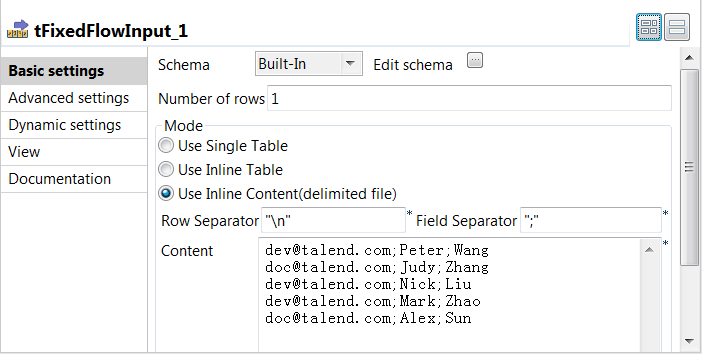
Double-click the first tFixedFlowInput component to open its Basic settings view.
-
Click the […] button
next to Edit schema to open the schema
dialog box.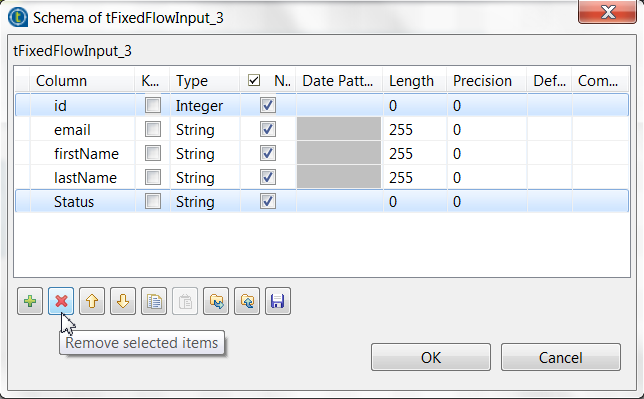
-
In the schema dialog box, select the id
and Status columns that don’t need input values and click
the button to remove them. Then click OK to save the settings and close the schema
dialog box. -
In the Mode area, select
Use Inline Content(delimited file)
and enter the following input data in the Content field.12345dev@talend.com;Peter;Wangdoc@talend.com;Judy;Zhangdev@talend.com;Nick;Liudev@talend.com;Mark;Zhaodoc@talend.com;Alex;Sun -
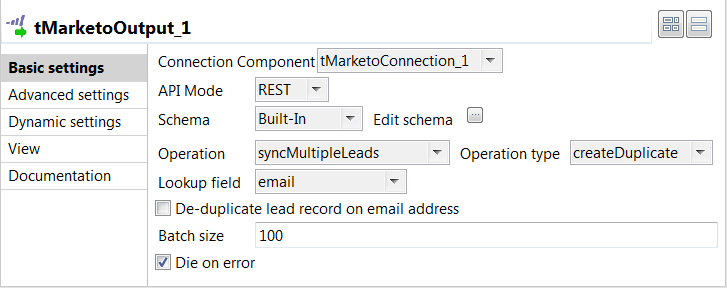
Double-click the tMarketoOutput component to open its Basic settings view.
-
From the Connection Component drop-down list, select the
component whose connection details will be used to set up the connection to
Marketo, tMarketoConnection_1 in this example. -
From the Operation
drop-down list, select SyncMultipleLeads
to insert multiple lead records. -
From the Operation type drop-down list, select
createDuplicate to allow duplicated
leads to be created.
Retrieving lead records from Marketo using REST API
-
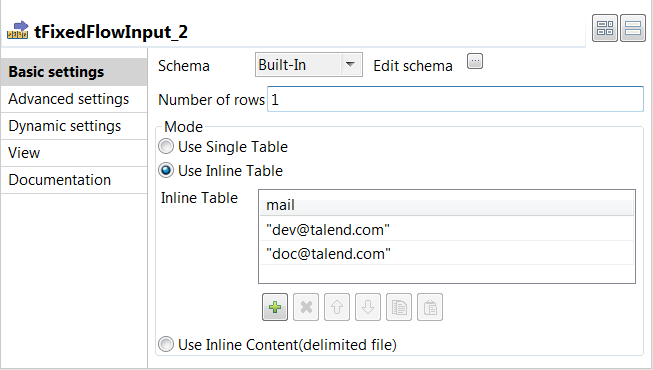
Double-click the second tFixedFlowInput component to open its Basic settings view.
-
Click the

button next to Edit schema and in the
schema dialog box displayed, define the schema by adding one column
mail of String
type. Then click OK to save the changes
and close the schema dialog box.
-
In the Mode area, select
Use Inline Table. Then click the
 button twice
below the table displayed to add two rows and fill each row with respective
values. In this example, two email values dev@talend.com
and doc@talend.com are added so that the lead records
identified by these email values can be retrieved. -
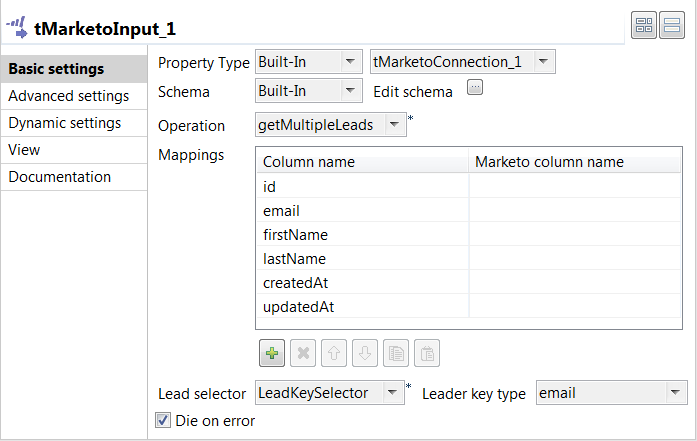
Double-click the tMarketoInput component to open its Basic settings view.
-
From the Connection Component drop-down list, select the
component whose connection details will be used to set up the connection to
Marketo, tMarketoConnection_1 in this example. -
Select getMultipleLeads
from the Operation drop-down list to
retrieve a batch of lead records. -
Select LeadKeySelector from the Lead
selector drop-down list, and select email
from the Lead key type list and
email from the Lead key values
list to retrieve the leads identified by the email values passed from the second
tFixedFlowInput component. -
Double-click the tLogRow
component to open its Basic settings
view. -
In the Mode area, select
Table (print values in cells of a
table) for better readability of the result.
Executing the Job to transmit data with Marketo using REST API
- Press Ctrl + S to save the Job.
-
Press F6 to execute the
Job.
As shown above, the inserted lead records in Marketo are retrieved and
displayed on the console.