tMatchPredict
Labels suspect records automatically and groups suspect records which match the
label(s) set in the component properties.
tMatchPredict labels suspect pairs based on the pairing and matching
models generated by the tMatchPairing and
tMatchModel components.
If the input data is new and has not been paired previously, you can define the input
data as “unpaired” and set the path to the pairing model folder to separate the exact
duplicates from unique records.
tMatchPredict can also output unique records, exact duplicates and
suspect duplicates from a new data set.
This component can run only with the following Hadoop distributions with Spark 1.6+ and
2.0:
-
Spark 1.6: CDH5.7, CDH5.8, HDP2.4.0, HDP2.5.0, MapR5.2.0, EMR4.5.0, EMR4.6.0.
-
Spark 2.0: EMR5.0.0.
tMatchPredict properties for Apache Spark Batch
These properties are used to configure tMatchPredict running in the Spark Batch Job framework.
The Spark Batch
tMatchPredict component belongs to the Data Quality family.
This component is available in the Palette of the Studio only if you have subscribed to any Talend Platform product with Big Data or Talend Data Fabric.
Basic settings
|
Define a storage configuration |
Select the configuration component to be used to provide the configuration If you leave this check box clear, the target file system is the local The configuration component to be used must be present in the same Job. For |
|
Schema and Edit Schema |
A schema is a row description. It defines the number of fields (columns) to Click Sync columns to retrieve the schema from Click Edit schema to make changes to the schema.
The output schema of this component has read-only columns in its
LABEL: used only with the Suspect duplicates output link. It holds
COUNT: used only with the Exact duplicates output link. It holds the
GROUPID: used only with the Suspect duplicates output link. It holds |
|
|
Built-In: You create and store the |
|
|
Repository: You have already created |
|
Pairing |
From the Input type list,
paired: to use as input the suspect
unpaired: to use as input new data
Pairing model folder: (available only The button for browsing does not work with the Spark Local mode; if you are using the Spark Yarn or the Spark Standalone mode, For further information, see tMatchPairing. |
|
Matching |
Matching model location: Select from – from file system: Set the path to – from current Job: Set the name of
Matching model folder: Set the path The button for browsing does not work with the Spark Local mode; if you are using the Spark Yarn or the Spark Standalone mode, For further information, see tMatchModel. |
|
Clustering classes |
Add in the table one or more of the label(s) you used on the sample The component then groups suspect records which match the label(s) set |
Usage
|
Usage rule |
This component is used as an intermediate step. This component, along with the Spark Batch component Palette it belongs to, appears only Note that in this documentation, unless otherwise |
|
Spark Batch Connection |
You need to use the Spark Configuration tab in
the Run view to define the connection to a given Spark cluster for the whole Job. In addition, since the Job expects its dependent jar files for execution, you must specify the directory in the file system to which these jar files are transferred so that Spark can access these files:
This connection is effective on a per-Job basis. |
Scenario: Labeling suspect pairs with assigned labels
This scenario applies only to a subscription-based Talend Platform solution with Big data or Talend Data Fabric.
For further information about the two workflows used when
matching with Spark, see the documentation on Talend Help Center (https://help.talend.com).
The use case described here uses:
-
a tFileInputDelimited
component to read the input suspect pairs generated by tMatchPairing; -
a tMatchPredict component to
label suspect records automatically and groups together suspect records which
match the label set in the component properties; and -
a tFileOutputDelimited component output the
labeled duplicate records and the groups created on the suspect records which
match the label set in tMatchPredict properties.
Setting up the Job
-
Drop the following components from the Palette onto the design workspace: tFileInputDelimited, tMatchPredict and
tFileOutputDelimited. - Connect tFileInputDelimited to tMatchPredict using the Main link.
-
Connect tMatchPredict to
tFileOutputDelimited using the Suspect duplicates link. -
Check that you have defined the connection to the Spark cluster and activated
checkpointing in the Run > Spark Configuration view. For more information about selecting the Spark mode, see
the documentation on Talend Help Center (https://help.talend.com).

Configuring the input component
-
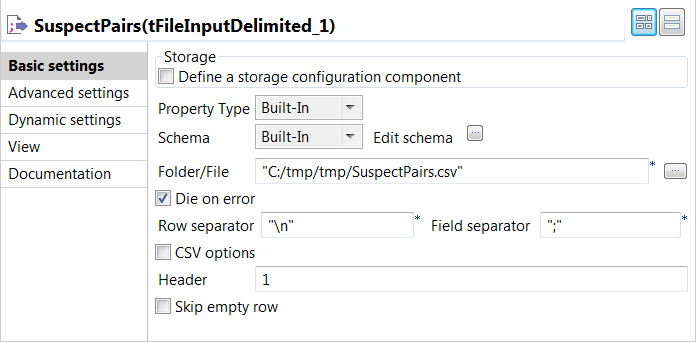
Double-click tFileInputDelimited to open its Basic settings view in the Component tab.
The input data to be used with
tMatchPredict is the suspect data pairs
generated by tMatchPairing. You can find examples
of how to compute suspect pairs and suspect sample from source data on
Talend Help Center (https://help.talend.com). -
Click the […] button next to Edit
schema to open a dialog box and add columns to the input schema:
Original_Id, Source,
Site_name, Address,
PAIR_ID and SCORE.SCORE is a Double-typed column. The other ones are
String-typed columns. -
In the Folder/File
field, set the path to the input file. -
Set the row and field separators in the corresponding fields,
and limit the header to 1.
Applying the matching model on the data set
-
Double-click tMatchPredict to display the Basic
settings view and define the component properties.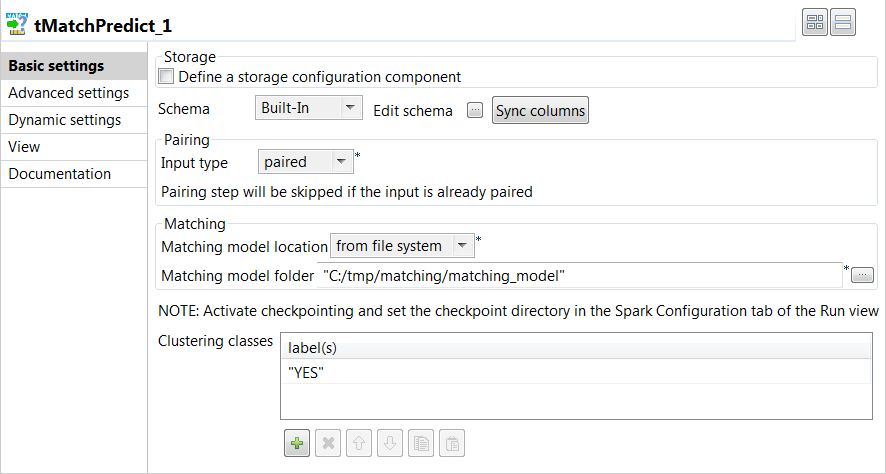
-
Click Sync columns to
retrieve the schema defined in the input component. -
From the Input type
list, select paired as the input data is
already paired with tMatchPairing. -
From the Matching model
location list, select from file
system and then set the path to the matching model in the
folder field. -
In the Clustering
classes table, add one or more of the labels you used on the
sample suspects generated by tMatchPairing, YES in this
example.The labels were set manually or through Talend Data Stewardship.
The tMatchPredict component will group suspect records
which match the YES label.
Configuring the output components to write the labeled suspect
pairs
-
Double-click the first tFileOutputDelimited
component to display the Basic settings view and
define the component properties.You have already accepted to propagate the schema to the output
components when you defined the input component. -
Clear the Define a storage configuration component check
box to use the local system as your target file system. -
In the Folder field, set the path to the folder
which will hold the output data. -
From the Action list, select the operation for
writing data:-
Select Create when you run the Job for the
first time. -
Select Overwrite to replace the file every
time you run the Job.
-
- Set the row and field separators in the corresponding fields.
-
Select the Merge results to single file check box, and
in the Merge file path field set the path where to output
the file of the labeled suspect pairs.
Executing the Job to label suspect pairs with assigned labels
tMatchPredict labels the suspect pairs, groups the suspect
records which match the YES label and writes all the suspect
pairs in the output file.
The suspect records which match the YES label belong to groups
because tMatchPredict was configured to groups records which
match this clustering class.

The records labeled with the NO label do not belong to any
group.
You can now create a single representation of each duplicates group and merge these
representations with the unique rows computed by
tMatchPairing.
You can find an example of how to create a clean and
deduplicated dataset on Talend Help Center (https://help.talend.com).