tPigCoGroup
Performs the Pig COGROUP operation to group and aggregate data incoming from
multiple Pig flows.
The tPigCoGroup groups data from as many inputs as
needed incoming from its preceding Pig components and aggregates the grouped data using
some given function before sending the data to the next Pig component.
tPigCoGroup Standard properties
These properties are used to configure tPigCoGroup running in the Standard Job framework.
The Standard
tPigCoGroup component belongs to the Big Data and the Processing families.
The component in this framework is available when you are using one of the Talend solutions with Big Data.
Basic settings
|
Schema and Edit |
A schema is a row description. It defines the number of fields (columns) to Click Edit schema to make changes to the schema.
|
|
|
Built-In: You create and store the |
|
|
Repository: You have already created |
|
Group by |
Click the [+] button to add one |
|
Output mapping |
This table is automatically filled with the output schema you have
Function: select the function you
Source schema: select the input
Expression: select the column to be |
Advanced settings
|
Group optimization |
Select the Pig algorithm depending on the situation of the input For further information, see Apache’s documentation about |
|
Use partitioner |
Select this check box to call a Hadoop partitioner in order to partition records and Note that this partitioner class must be registered in the Register jar table provided |
|
Increase parallelism |
Select this check box to set the number of reduce tasks for the |
|
tStatCatcher Statistics |
Select this check box to gather the Job processing metadata at the |
Global Variables
|
Global Variables |
ERROR_MESSAGE: the error message generated by the A Flow variable functions during the execution of a component while an After variable To fill up a field or expression with a variable, press Ctrl + For further information about variables, see |
Usage
|
Usage rule |
This component is commonly used as intermediate step together with |
|
Prerequisites |
The Hadoop distribution must be properly installed, so as to guarantee the interaction
For further information about how to install a Hadoop distribution, see the manuals |
|
Limitation |
Knowledge of Pig scripts is required. |
Scenario: aggregating data from two relations using COGROUP
This scenario applies only to a Talend solution with Big Data.
In this scenario, a four-component Job is designed to aggregate two relations on top of a given Hadoop cluster.

-
This12345678Alice,turtle,17Alice,goldfish,17Alice,cat,17Bob,dog,18Bob,cat,18John,dog,19Mary,goldfish,16Bill,dog,20
relation is composed of three columns that read owner, pet and age (of the owners). -
This123456Cindy,AliceMark,AlicePaul,BobPaul,JaneJohn,MaryWilliam,Bill
relation provides a list of students’ names alongside their friends, of
which some are pet owners displayed in the first relation. Therefore, the
schema of this relation contains two columns: student and friend.
Before replicating this scenario, you need to write the sample data into the HDFS system of
the Hadoop cluster to be used. To do this, you can use tHDFSOutput. For further information about this component, see tHDFSOutput.
The data used in this scenario is inspired by the examples that Pig’s documentation
uses to explain the GROUP and the GOGROUP operators. For related information, please see
Apache’s documentation for Pig.
Linking the components
-
In the
Integration
perspective of the Studio, create
an empty Job from the Job Designs node in
the Repository tree view.For further information about how to create a Job, see
Talend Studio User Guide. -
In the workspace, enter the name of the component to be used and select this component
from the list that appears. In this scenario, the components are two
tPigLoad components, a tPigCoGroup component and a tPigStoreResult component. One of the two tPigLoad components is used as the main loading
component to connect to the Hadoop cluster to be used. -
Connect the main tPigLoad component to tPigCoGroup using the Row >
Main link. -
Do the same to connect the second tPigLoad component to tPigCoGroup. The Lookup
label appears over this link. - Repeat the operation to connect tPigCoGroup to tPigStoreResult.
Reading data into the Pig flow
Reading the owner-pet sample data
-
Double-click the main tPigLoad component to open its
Component view.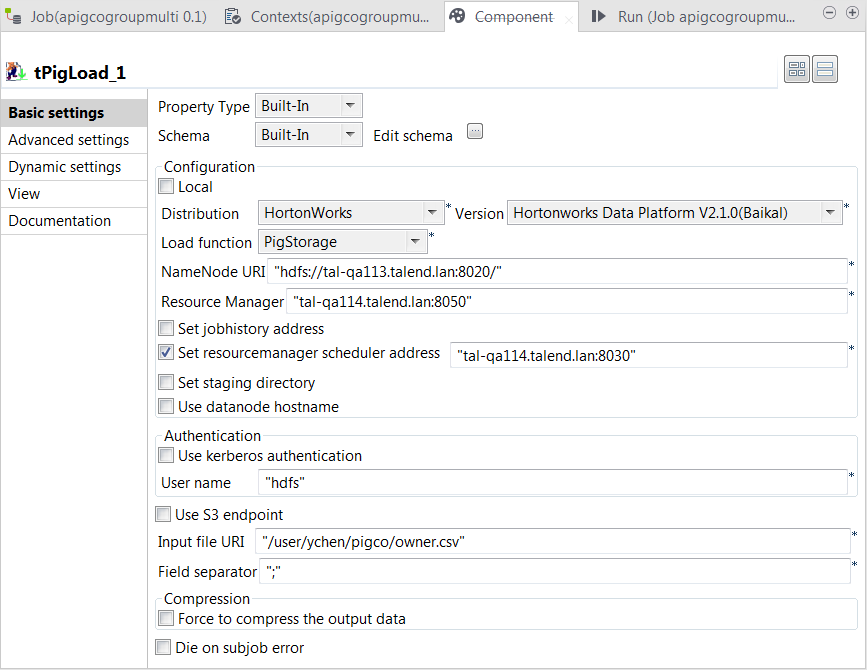
-
Click the […] button next to Edit
schema to open the schema editor and click the [+] button three times to add three rows. -
In the Column column, rename the new rows to owner, pet
and age, respectively, and in the
Type column of the age row, select Integer. - Click OK to validate these changes and accept the propagation prompted by the pop-up dialog box.
-
In the Mode area, select Map/Reduce to use the remote Hadoop cluster to be
used. -
In the Distribution and the Version lists, select the Hadoop distribution you are using.
In this example, HortonWorks Data Platform V2.1.0
(Baikal) is selected. -
In the Load function list, select PigStorage. Then, the corresponding parameters to be set
appear. -
In the NameNode URI and the
Resource manager fields, enter the
locations of those services, respectively. If you are using WebHDFS, the location should be
webhdfs://masternode:portnumber; if this WebHDFS is secured
with SSL, the scheme should be swebhdfs and you need to use
a tLibraryLoad in the Job to load the library required by
the secured WebHDFS. -
Select the Set Resourcemanager scheduler address check box
and enter the URI of this service in the field that is displayed. This
allows you to use the Scheduler service defined in the Hadoop cluster to be
used. If this service is not defined in your cluster, you can ignore this
step. -
In the User name field, enter the name of the user having the
appropriate right to write data in the cluster. In this example, it is
hdfs. -
In the Input file URI field, enter the path pointing to the
relation you need to read data from. As explained previously, the relation
to be read here is the one containing the owner and pet sample data. -
In the Field separator field, enter the separator of the data
to be read. In this example, it is semicolon (;).
Loading the student-friend sample data
-
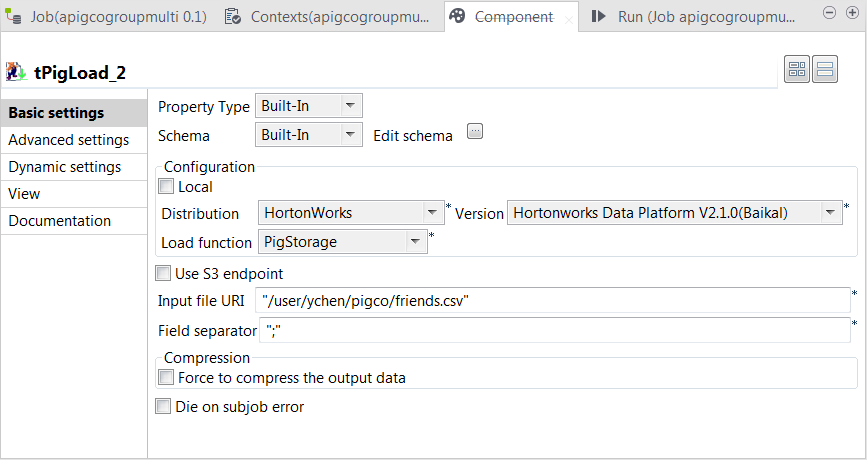
Double-click the second tPigLoad component to open its Component view.
- Click the […] button next to Edit schema to open the schema editor.
-
Click the [+] button twice to add two rows and in the
Column column, rename them to student and friend, respectively.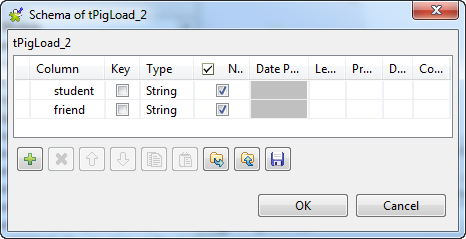
-
Click OK to validate these changes and accept the
propagation prompted by the pop-up dialog box. -
In the Mode area, select Map/Reduce.
This component reuses the Hadoop connection you have configured in
that main tPigLoad component. Therefore, the Distribution
and the Version fields have been
automatically filled with the values from that main loading component. -
In the Load function field, select the
PigStorage function to read the source
data. -
In the Input file URI field, enter the directory where
the source data is stored. As explained previously, this data is from the
second relation containing the student and friend sample data.
Aggregating the relations
-
Double-click tPigCoGroup to open its
Component view.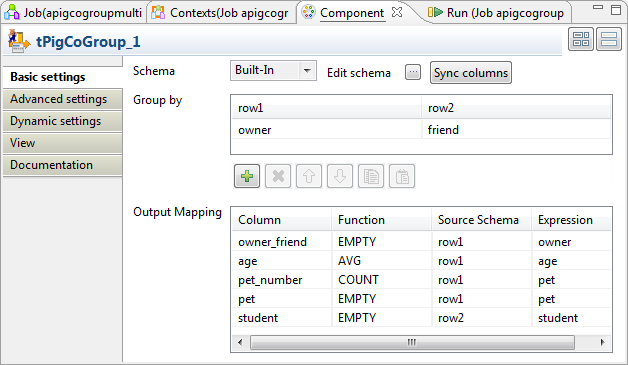
-
Click the […] button next to Edit
schema to open the schema editor. -
Click the [+] button five times to add five rows and in the
Column column, rename them to owner_friend, age, pet_number,
pet and student, respectively. - In the Type column of the age row, select Integer.
-
Click OK to validate these changes and accept the
propagation prompted by the pop-up dialog box. - In the Group by table, click the [+] button once to add one row.
-
Then you need to set the grouping condition in this Group by
table to aggregate the two input relations. In each column representing the
input relation, click the newly added row and select the column you need to
use to compose the grouping condition. In this scenario, the owner column from the owner-pet relation and
the friend column from the student-friend
relation are selected because they have common records. Based on these
columns, the two relations are aggregated into bags.The bags regarding the record Alice might read as
follow:
1Alice,{(Alice,turtle,17),(Alice,goldfish,17),(Alice,cat,17)},{(Cindy,Alice),(Mark,Alice)} -
In the Output mapping table,
the output schema you defined previously has been automatically fed into the
Column column. You need to complete
this table to define how the grouped bags are aggregated into the schema of the
output relation. The following list provides more details about how this
aggregation is configured for this scenario:Column
Description
owner_friend
Receive the literal records incoming from the columns that are used
as the grouping condition.For this reason, select the EMPTY function
from the Function drop-down list so that the
incoming records stay as is. Then select row1 from the
Source schema list and owner from
the Expression list to read the records from
the corresponding input column; you can as well select row2
and friend, the records to be received are the same because
the owner column and the friend column are joined when
they are used as grouping condition.Note that the label row1 is the ID of the input link and thus
may be different in your scenario.age
Receive the age data.
As shown in the example bags in the previous step, the age of an
owner repetitively appears in one of the bags after the grouping.
You can select the AVG function from the
Function list to make the average of the
repetitive values such that this age appears only once in the final
result. Then select row1 from the Source
schema list and age from the
Expression list.pet_number
Receive how many pets an owner has.
Select the COUNT function from the
Function list to perform this
calculation. Then select row1 from the Source
schema list and pet from the
Expression list.pet and student
Receive the grouped records from the input pet and
student columns, respectively.Select EMPTY for both of them and from the
Source schema list of each, select the
corresponding input schema and from the
Expression list, the corresponding
column.
Writing the aggregated data
-
Double-click tPigStoreResult to open its
Component view.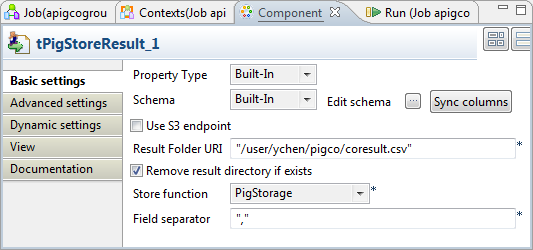
-
If this component does not have the same schema of the preceding component, a warning
icon appears. In this case, click the Sync
columns button to retrieve the schema from the
preceding one and once done, the warning icon disappears. -
In the Result folder URI field, enter the path in HDFS
pointing to the location you want to write the result in. -
Select the Remove result directory if exists check
box. - From the Store function list, select PigStorage.
-
In the Field separator field, enter the separator you want to
use. In this scenario, enter a comma (,).
Executing the Job
Then you can press F6 to run this Job.
Once done, check the result from the HDFS system you are using.
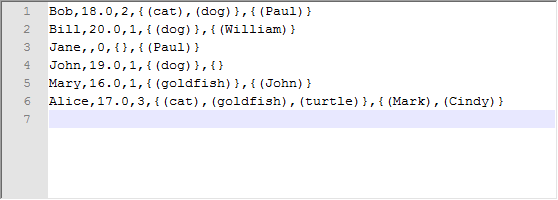
You can read, for example, that the pet owner Alice is
17 years old, has 3 pets, a cat, a goldfish and a turtle and two of her friends are
Mark and Cindy.