tSalesforceOutputBulkExec
Gains in performance while carrying out the intended data operations into your
Salesforce.com.
The tSalesforceOutputBulk and tSalesforceBulkExec components are used together
in a two step process. In the first step, an output file is generated. In the second
step, this file is used to feed the Salesforce database. These two steps are fused
together in the tSalesforceOutputBulkExec component. The advantage of using two separate
steps is that the data can be transformed before it is loaded in the database.
tSalesforceOutputBulkExec Standard properties
These properties are used to configure tSalesforceOutputBulkExec running in the Standard Job framework.
The Standard
tSalesforceOutputBulkExec component belongs to the Business and the Cloud families.
The component in this framework is generally available.
Basic settings
|
Property Type |
Select the way the connection details
This property is not available when other connection component is selected |
|
Connection Component |
Select the component whose connection details |
|
Connection type |
Select the type of the connection from the drop-down list, either Basic or OAuth.
|
|
Module Name |
Click the […] button next to the field and in the |
|
Schema and Edit schema |
A schema is a row description. It defines the number of fields (columns) to Click Edit schema to make changes to the schema.
Click Sync columns to retrieve the schema from This component offers the This dynamic schema |
|
Output Action |
Select one of the following operations to be
performed from the drop-down list.
|
|
Bulk File Path |
Specify the path to the file that stores the data to be processed. |
|
Append |
Select this check box to append new data at the |
|
Ignore Null |
Select this check box to ignore NULL |
Advanced settings
|
Salesforce URL |
Enter the Webservice URL required to connect to |
|
Need compression |
Select this check box to activate SOAP message compression, which can result in increased |
|
Trace HTTP message |
Select this check box to output the HTTP interactions on the console. |
|
Client Id |
Enter the ID of the real user to differentiate between those who use the same account and This field is available only when Query is selected from the Query |
|
Timeout (milliseconds) |
Enter the intended number of query timeout in Salesforce.com. |
|
Use Proxy |
Select this check box to use a proxy server, and in the Host, Port, User Id, and Password fields displayed, specify |
| Relationship mapping for upsert |
Click the [+]
This table is available only when UPSERT is selected from the Output |
|
Concurrency Mode |
Select the concurrency mode for the job.
|
|
Rows to Commit |
Specify the number of lines per data batch to |
|
Bytes to Commit |
Specify the number of bytes per data batch to |
|
Wait Time Check Batch State (milliseconds) |
Specify the wait time for checking whether the |
|
tStatCatcher Statistics |
Select this check box to gather the Job processing metadata at the Job level |
Global Variables
|
Global Variables |
ERROR_MESSAGE: the error message generated by the A Flow variable functions during the execution of a component while an After variable To fill up a field or expression with a variable, press Ctrl + For further information about variables, see |
Usage
|
Usage rule |
This component is mainly used when no particular transformation is |
|
Limitation |
The bulk data to be processed in Salesforce.com should be |
Scenario: Inserting bulk data into Salesforce
This scenario describes a four-component Job that submits bulk data in the file SalesforceAccount.txt used in Scenario 2: Gathering erroneous data while inserting data into a Salesforce object into Salesforce,
executs your intended actions on the data, and ends up with displaying the Job execution
results for your reference.
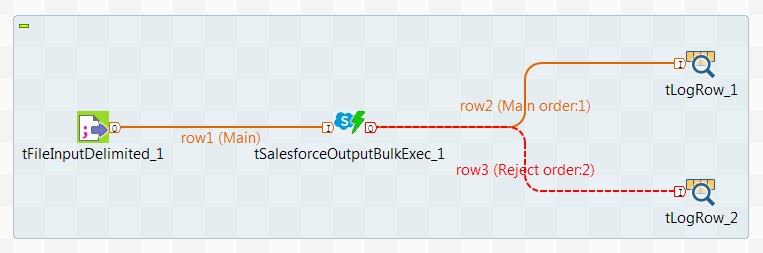
Setting up the Job
-
Create a new Job and add a tFileInputDelimited component, a tSalesforceOutputBulkExec component, and two tLogRow components by typing their names on the
design workspace or dropping them from the Palette. -
Link the tFileInputDelimited component to the
tSalesforceOutputBulkExec component using a
Row > Main
connection. -
Link the tSalesforceOutputBulkExec component
to the first tLogRow component using a
Row > Main
connection.Link the tSalesforceOutputBulkExec component
to the second tLogRow component using a
Row > Reject connection.
Configuring the components
-
Double-click the tFileInputDelimited
component to open its Basic settings
view.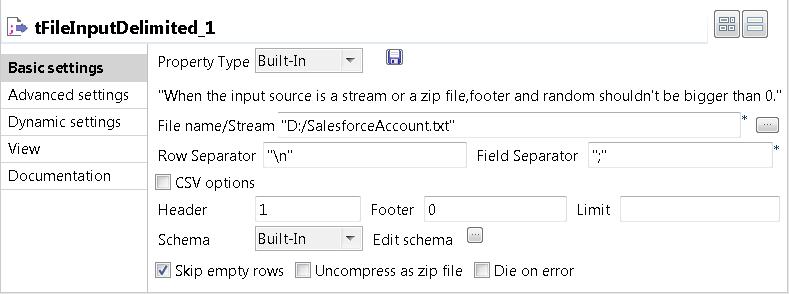
-
In the File name/Stream field, browse to or
enter the path to the input data file. In this example, it is
D:/SalesforceAccount.txt. -
Click the […] button next to Edit schema and in the pop-up schema dialog box,
define the schema by adding four columns Name,
ParentId, Phone and
Fax of String type.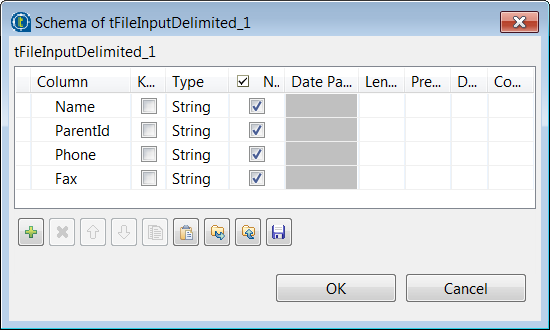 Click OK to save the changes and close the
dialog box.
Setting up the connection to Salesforce
-
Double-click the tSalesforceOutputBulkExec
component to open its Basic settings
view.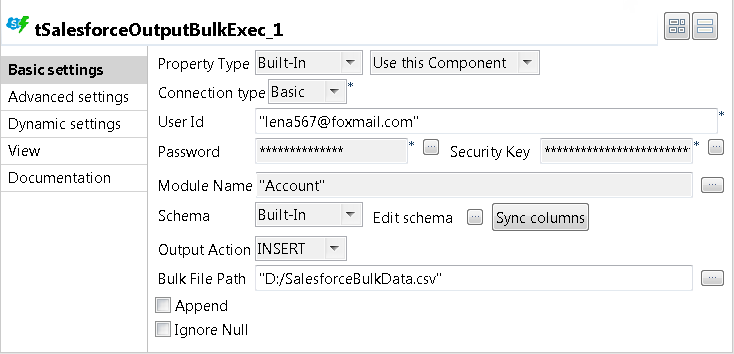
-
In the User Id, Password and Security Key
fields, enter the user authentication information required to access
Salesforce. -
Click the […] button next to the Module Name field and in the pop-up dialog box,
select the object you want to access. In this example, it is Account. -
In the Bulk File Path field, browse to or
enter the path to the CSV file that stores the data for bulk processing.Note that the bulk file here to be processed must be in
.csv format. -
Double-click the first tLogRow component to
open its Basic settings view.
-
In the Mode area, select Table (print values in cells of a table) for better
readability of the results. -
Do the same to configure the second tLogRow
component.
Executing the Job
- Press Ctrl + S to save the Job.
-
Press F6 to execute the Job.
On the console of the Run view, you can check
the execution result.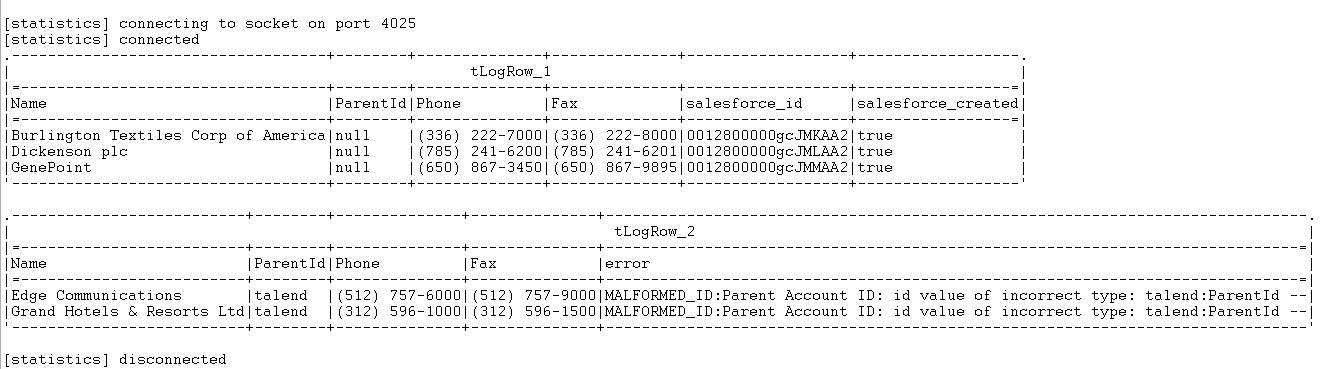 In the tLogRow_1 table, you can read the
data inserted into Salesforce.In the tLogRow_2 table, you can read the
rejected data due to the incompatibility with the Account objects you have accessed.Note that if you want to transform the input data before loading them into
Salesforce, you need to use tSalesforceOutputBulk and tSalesforceBulkExec in cooperation to achieve this purpose. For
further information about the usage of these two components, see Scenario: Inserting transformed bulk data into Salesforce.