tTop
Sorts data and outputs several rows from the first one of this data.
tTop sorts input
records based on their schema columns and sends to its following component a given
number of first rows of the sorted records.
Depending on the Talend solution you
are using, this component can be used in one, some or all of the following Job
frameworks:
-
MapReduce: see tTop MapReduce properties.
The component in this framework is available only if you have subscribed to one
of the
Talend
solutions with Big Data. -
Spark Batch: see tTop properties for Apache Spark Batch.
The component in this framework is available only if you have subscribed to one
of the
Talend
solutions with Big Data. -
Spark Streaming: see tTop properties for Apache Spark Streaming.
The component in this framework is available only if you have subscribed to Talend Real-time Big Data Platform or Talend Data
Fabric.
tTop MapReduce properties
These properties are used to configure tTop running in the MapReduce Job framework.
The MapReduce
tTop component belongs to the Processing family.
The component in this framework is available only if you have subscribed to one
of the
Talend
solutions with Big Data.
Basic settings
|
Schema and Edit |
A schema is a row description. It defines the number of fields (columns) to Click Edit schema to make changes to the schema.
Click Sync columns to retrieve the schema from |
|
|
Built-In: You create and store the |
|
|
Repository: You have already created |
|
Number of line selected |
Enter the number of rows to be outputted. The current component selects this number of |
|
Criteria |
Click [+] to add as many lines as required for the sort |
|
In the Schema column column, select the column from your |
|
|
In the other columns, select how you need the data to be sorted. For example, if you need |
Usage
|
Usage rule |
In a This connection is effective on a per-Job basis. Note that in this documentation, unless otherwise |
|
Hadoop Connection |
You need to use the Hadoop Configuration tab in the This connection is effective on a per-Job basis. |
Related scenarios
No scenario is available for the Map/Reduce version of this component yet.
tTop properties for Apache Spark Batch
These properties are used to configure tTop running in the Spark Batch Job framework.
The Spark Batch
tTop component belongs to the Processing family.
The component in this framework is available only if you have subscribed to one
of the
Talend
solutions with Big Data.
Basic settings
|
Schema and Edit |
A schema is a row description. It defines the number of fields (columns) to Click Edit schema to make changes to the schema.
Click Sync columns to retrieve the schema from |
|
|
Built-In: You create and store the |
|
|
Repository: You have already created |
|
Number of line selected |
Enter the number of rows to be outputted. The current component selects this number of |
|
Criteria |
Click [+] to add as many lines as required for the sort |
|
In the Schema column column, select the column from your |
|
|
In the other columns, select how you need the data to be sorted. For example, if you need |
Usage
|
Usage rule |
This component is used as an intermediate step. This component, along with the Spark Batch component Palette it belongs to, appears only Note that in this documentation, unless otherwise |
|
Spark Connection |
You need to use the Spark Configuration tab in
the Run view to define the connection to a given Spark cluster for the whole Job. In addition, since the Job expects its dependent jar files for execution, you must specify the directory in the file system to which these jar files are transferred so that Spark can access these files:
This connection is effective on a per-Job basis. |
Performing download analysis using a Spark Batch Job
This scenario applies only to a subscription-based Talend solution with Big data.
In this scenario, you create a Spark Batch Job to analyze how often a given product is downloaded.

In this Job, you analyze the download preference of some specific customers known to your
customer base.
follows:
|
1 2 3 4 5 6 7 8 9 10 11 12 13 14 15 16 17 18 19 20 |
10103|Herbert|Clinton|FR|SILVER|28-06-2011|herbert.clinton@msn.com|6571183 10281|Bill|Ford|BE|PLATINUM|13-04-2014|bill.ford@gmail.com|6360604 10390|George|Garfield|GB|SILVER|12-02-2011|george.garfield@gmail.com|7919508 10566|Abraham|Garfield|CN|SILVER|11-10-2012|abraham.garfield@msn.com|9155569 10691|John|Polk|GB|SILVER|05-11-2012|john.polk@gmail.com|6488579 10884|Herbert|Hayes|GB|SILVER|12-10-2007|herbert.hayes@gmail.com|8728181 11020|Chester|Roosevelt|BE|GOLD|28-06-2008|chester.roosevelt@yahoo.com|4172181 11316|Franklin|Madison|BR|SILVER|08-01-2014|franklin.madison@gmail.com|4711801 11707|James|Tyler|ES|GOLD|25-03-2010|james.tyler@gmail.com|7276942 11764|Theodore|McKinley|GB|GOLD|24-08-2013|theodore.mckinley@gmail.com|3224767 11777|Warren|Madison|BE|N/A|23-12-2008|warren.madison@msn.com|6695520 11857|Ronald|Arthur|SG|PLATINUM|01-04-2009|ronald.arthur@msn.fr|6704785 11936|Theodore|Buchanan|NL|SILVER|14-11-2014|theodore.buchanan@yahoo.fr|2783553 11940|Lyndon|Wilson|BR|PLATINUM|27-07-2010|lyndon.wilson@yahoo.com|1247110 12214|Gerald|Jefferson|SG|N/A|06-06-2007|gerald.jefferson@yahoo.com|5879162 12382|Herbert|Taylor|IT|GOLD|22-04-2012|herbert.taylor@msn.com|3873628 12475|Richard|Kennedy|FR|N/A|29-12-2014|richard.kennedy@yahoo.fr|7287388 12479|Calvin|Eisenhower|ES|N/A|06-11-2008|calvin.eisenhower@yahoo.fr|1792573 12531|Chester|Arthur|JP|PLATINUM|23-01-2009|chester.arthur@msn.fr|8772326 12734|Jimmy|Buchanan|IT|SILVER|09-03-2010|jimmy.buchanan@gmail.com|7007786 |
This data contains these customers’ ID numbers known to this customer base, their first and
last names and country codes, their support levels and registration dates, their email
addresses and phone numbers.
|
1 2 3 4 5 6 7 8 9 10 |
10103|/download/products/talend-open-studio 10281|/services/technical-support 10390|/services/technical-support 10566|/download/products/data-integration 10691|/services/training 10884|/download/products/integration-cloud 11020|/services/training 11316|/download/products/talend-open-studio 11707|/download/products/talend-open-studio 11764|/customers |
This data contains the ID numbers of the customers who visited different
Talend
web
pages and the pages they visited.
By reading this data, you can find that the visits come from customers of different
support-levels for different purposes. The Job to be designed is used to identify the
sources of these visits against the sample customer base and analyze which product is most
downloaded by the Silver-level customers.
Note that the sample data is created for demonstration purposes only.
To replicate this scenario, proceed as follows:
Linking the components
-
In the
Integration
perspective of the Studio, create an empty Spark Batch Job from the Job
Designs node in the Repository tree view.For further information about how to create a Spark Batch Job, see
Talend Open Studio for Big Data Getting Started
Guide
. -
In the workspace, enter the name of the component to be used and select this
component from the list that appears. In this scenario, the components are
tHDFSConfiguration, two tFixedFlowInput components (label one to customer_base and the other to web_data), tSqlRow, tCacheOut, tCacheIn,
tMap, tExtractDelimitedFields, tAggregateRow, tTop and tLogRow.The tFixedFlowInput components are used to load
the sample data into the data flow. In the real-world practice, you can use
other components such as tMysqlInput, alone or
even with a tMap, in the place of tFixedFlowInput to design a sophisticated process to
prepare your data to be processed. -
Connect customer_base (tFixedFlowInput), tSqlRow and
tCacheOut using the Row >
Main link. In this Subjob, the records about the Silver-level
customers are selected and stored in cache. -
Connect web_data (tFixedFlowInput) to tMap using
the Row > Main link. This is the main input
flow to the tMap component. - Do the same to connect tCacheIn to tMap. This is the lookup flow to tMap.
-
Connect tMap to tExtractDelimitedFields using the Row >
Main link and name this connection in the dialog box that is
displayed. For example, name it to output. -
Connect tExtractDelimitedFields, tAggregateRow, tTop and
tLogRow using the Row >
Main link. -
Connect customer_base to web_data using the Trigger >
OnSubjobOk link. -
Leave the tHDFSConfiguration component alone
without any connection.
Selecting the Spark mode
-
Click Run to open its view and then click the
Spark Configuration tab to display its view
for configuring the Spark connection. -
Select the Use local mode check box to test your Job locally.
In the local mode, the Studio builds the Spark environment in itself on the fly in order to
run the Job in. Each processor of the local machine is used as a Spark
worker to perform the computations.In this mode, your local file system is used; therefore, deactivate the
configuration components such as tS3Configuration or
tHDFSConfiguration that provides connection
information to a remote file system, if you have placed these components
in your Job.You can launch
your Job without any further configuration. -
Clear the Use local mode check box to display the
list of the available Hadoop distributions and from this list, select
the distribution corresponding to your Spark cluster to be used.This distribution could be:If you cannot find the distribution corresponding to yours from this
drop-down list, this means the distribution you want to connect to is not officially
supported by
Talend
. In this situation, you can select Custom, then select the Spark
version of the cluster to be connected and click the
[+] button to display the dialog box in which you can
alternatively:-
Select Import from existing
version to import an officially supported distribution as base
and then add other required jar files which the base distribution does not
provide. -
Select Import from zip to
import the configuration zip for the custom distribution to be used. This zip
file should contain the libraries of the different Hadoop/Spark elements and the
index file of these libraries.In
Talend
Exchange, members of
Talend
community have shared some ready-for-use configuration zip files
which you can download from this Hadoop configuration
list and directly use them in your connection accordingly. However, because of
the ongoing evolution of the different Hadoop-related projects, you might not be
able to find the configuration zip corresponding to your distribution from this
list; then it is recommended to use the Import from
existing version option to take an existing distribution as base
to add the jars required by your distribution.Note that custom versions are not officially supported by
Talend
.
Talend
and its community provide you with the opportunity to connect to
custom versions from the Studio but cannot guarantee that the configuration of
whichever version you choose will be easy. As such, you should only attempt to
set up such a connection if you have sufficient Hadoop and Spark experience to
handle any issues on your own.
For a step-by-step example about how to connect to a custom
distribution and share this connection, see Connecting to a custom Hadoop distribution. -
Configuring the connection to the file system to be used by Spark
-
Double-click tHDFSConfiguration to open its
Component view. Note that tHDFSConfiguration is used because the Spark Yarn client mode is used to run Spark Jobs in this scenario.Spark uses this component to connect to the HDFS system to which the jar
files dependent on the Job are transferred. -
In the Version area, select the Hadoop distribution
you need to connect to and its version. -
In the NameNode URI field, enter the location of the
machine hosting the NameNode service of the cluster. If you are using WebHDFS, the location should be
webhdfs://masternode:portnumber; if this WebHDFS is secured
with SSL, the scheme should be swebhdfs and you need to use
a tLibraryLoad in the Job to load the library required by
the secured WebHDFS. -
In the Username field, enter the
authentication information used to connect to the HDFS system to be used. Note
that the user name must be the same as you have put in the Spark configuration tab.
Loading the customer base
-
Double-click the tFixedFlowIput component labeled
customer_base to open its Component view.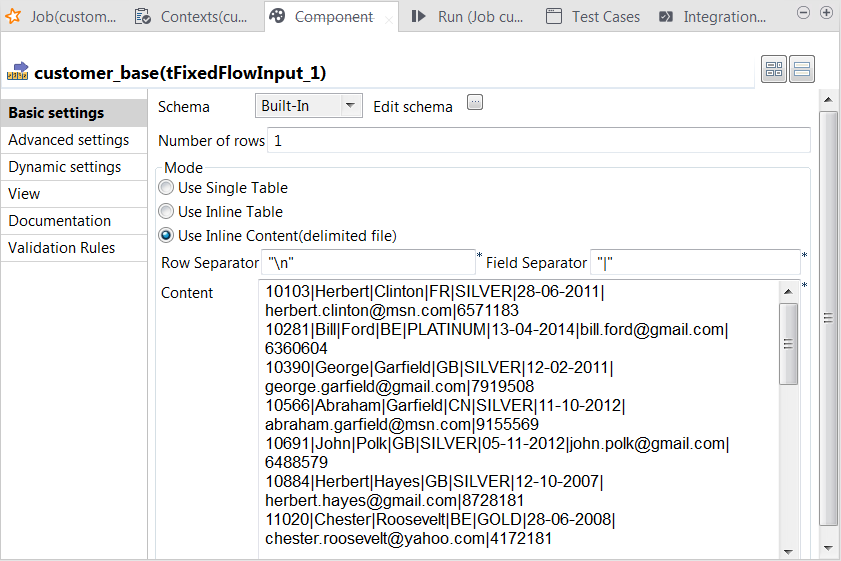
-
Click the […] button next to Edit
schema to open the schema editor. -
Click the [+] button to add the schema columns as shown in
this image.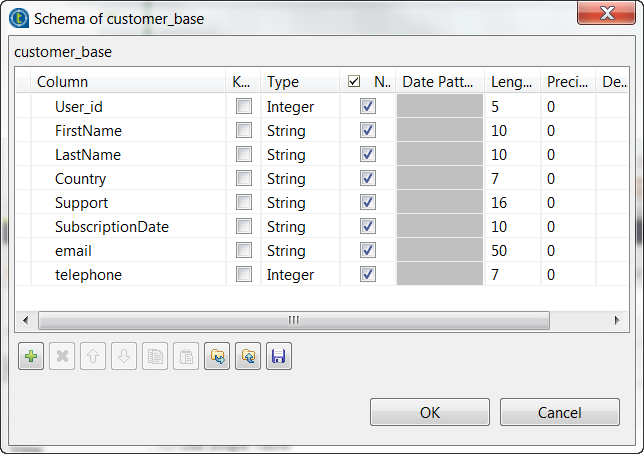
-
Click OK to validate these changes and accept the
propagation prompted by the pop-up dialog box. -
In the Mode area, select the Use Inline
Content radio button and paste the above-mentioned sample
customer base data into the Content field that
is displayed. - In the Field separator field, enter a vertical bar (|).
Selecting the Silver-level customer data
-
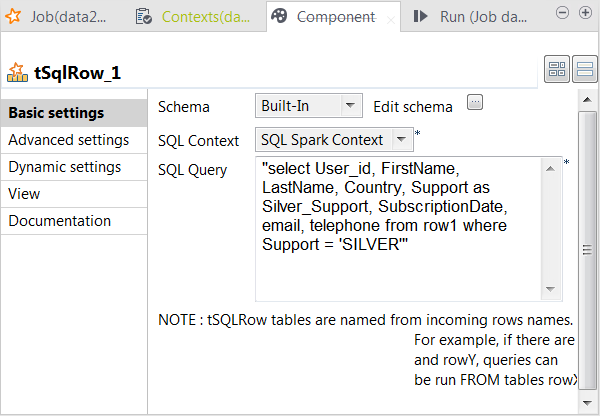
Double-click tSqlRow to open its Component view.
- Click the […] button next to Edit schema to open the schema editor.
-
In the schema on the output side (the right side), change the column name
Support to Silver_Support.
-
From the SQL context drop-down list, select
SQL Spark Context. -
In the SQL Query field, enter the query
statement to be used to select the records about the Silver-level
customers.1select User_id, FirstName, LastName, Country, Support as Silver_Support, SubscriptionDate, email, telephone from row1 where Support = 'SILVER'You can read that the input link row1 is
actually taken as the table in which this query is performed.
Accessing the selected data
-
Double-click tCacheOut to open its
Component view.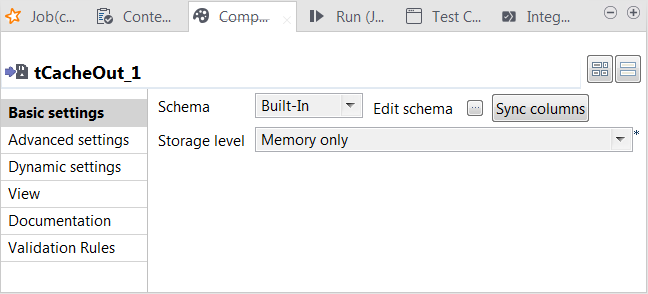 This component stores the selected data into the cache.
 -
Click the […] button next to Edit
schema to open the schema editor to verify the schema is identical to
the input one. If not so, click Sync
columns. -
On the output side of the schema editor, click the

button to export the schema to the local file system and
click OK to close the editor. -
From the Storage level list, select Memory only.
For further information about each of the storage level, see https://spark.apache.org/docs/latest/programming-guide.html#rdd-persistence.
-
Double-click tCacheIn to open its
Component view.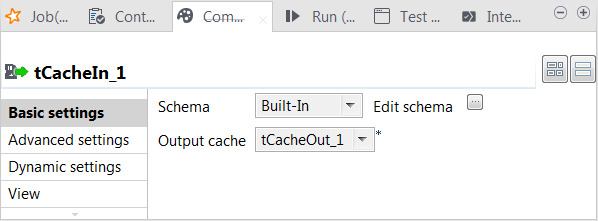
-
Click the […] button next to Edit
schema to open the schema editor and click the
button to import the schema you exported in the previous
step. Then click OK to close the editor. -
From the Output cache list, select the
tCacheOut component from which you need to read
the cached data. At runtime, this data is loaded into the lookup flow of the
Subjob that is used to process the web-click log.
Loading the web-click log
-
Double-click the tFixedFlowIput component labeled
web_data to open its Component view.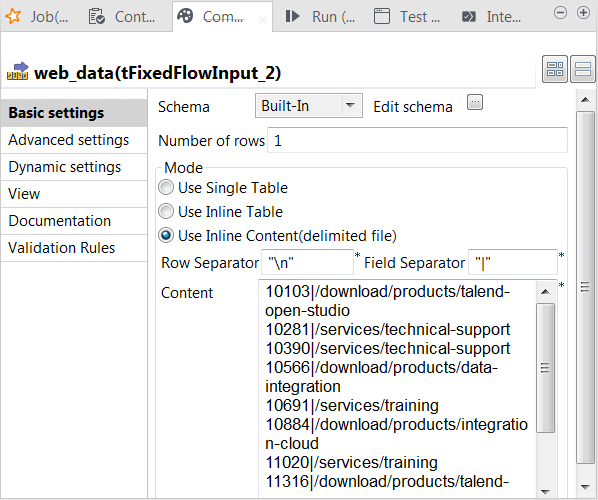
-
Click the […] button next to Edit
schema to open the schema editor. -
Click the [+] button to add the schema columns as shown in
this image.
-
Click OK to validate these changes and accept the
propagation prompted by the pop-up dialog box. -
In the Mode area, select the Use Inline
Content radio button and paste the above-mentioned sample data
about the web-click log into the Content field
that is displayed. - In the Field separator field, enter a vertical bar (|).
Joining the data
-
Double-click tMap to open its
Map editor.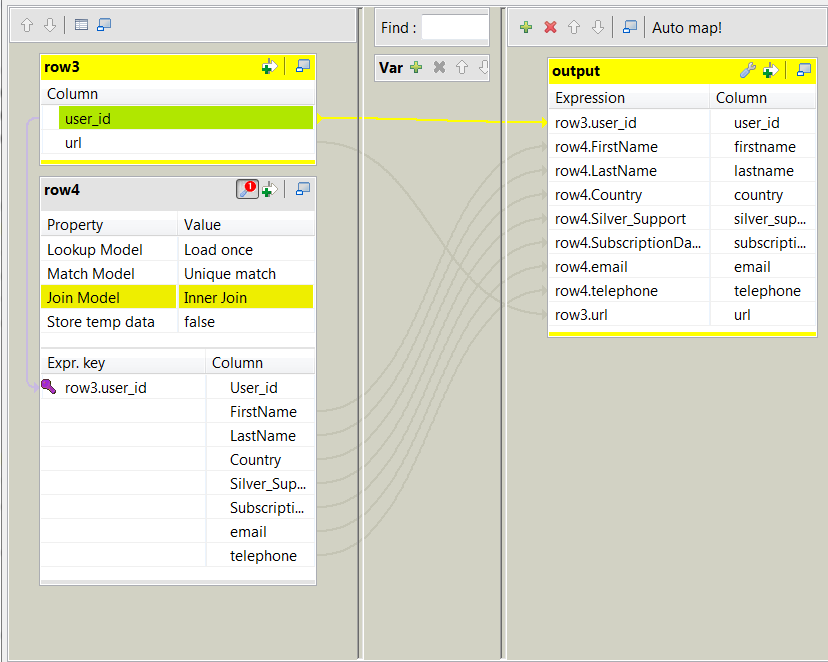 On the input side (the left side), the main flow (labeled row3 in this example) and the lookup flow (labeled
row4 in this example) are presented as two
tables.On the output side (the right side), an empty table is present. -
Drop all of the columns of the schema of the lookup flow into the output flow
table on the right side, except the User_id
column, and drop the user_id column and the
url column from schema of the main flow into
the same output flow table. -
On the left side, drop the user_id column
from the main flow table into the Expr.key
column in the User_id row in the lookup flow
table. This makes the ID numbers of the customers the key for the join of the
two input flows. -
In the lookup flow table, click the wrench icon to display the panel for the
lookup settings and select Inner Join for the
Join model property. -
Click Apply to validate these changes and
click OK to close this editor.
Extracting the fields about the categories of the visited pages
-
Double-click tExtractDelimitedFields to open its Component view.

-
Click the […] button next to Edit
schema to open the schema editor.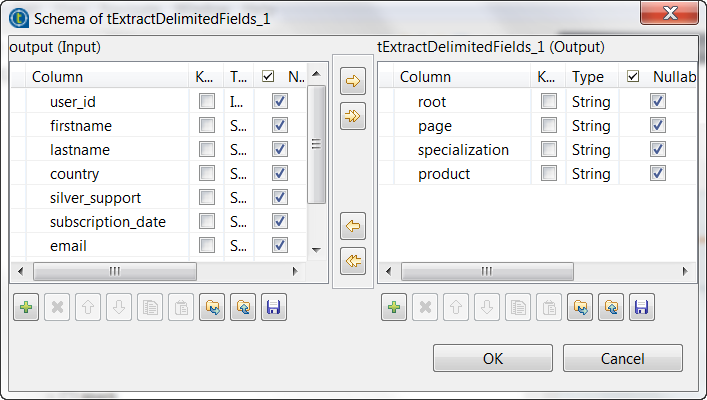
-
On the output side, click the [+] button four
times to add four rows to the output schema table and rename these new schema
columns to root, page, specialization and
product, respectively. These columns are used
to carry the fields extracted from the url
column in the input flow. - Click OK to validate these changes.
-
From the Prev.Comp.Column.List list, select
the column you need to extract data from. In this example, it is url from the input schema. -
In the Field separator field, enter a slash
(/).
Counting the download of each product
-
Double-click tAggregateRow to open its
Component view.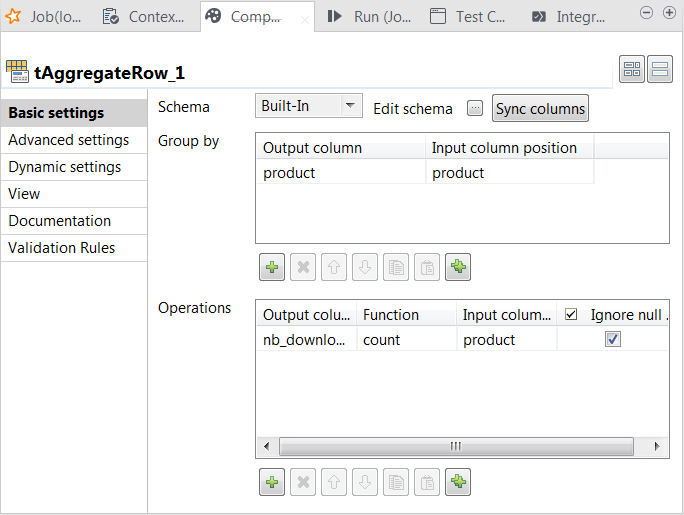
-
Click the […] button next to Edit
schema to open the schema editor.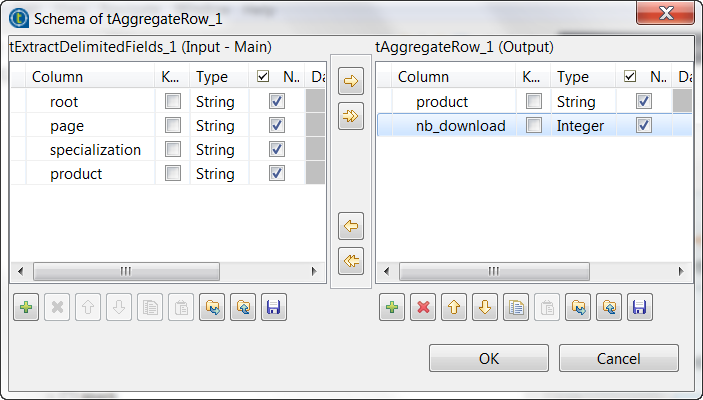
-
On the output side, click the [+] button two times to
add two rows to the output schema table and rename these new schema columns to
product and nb_download, respectively. -
Click OK to validate these changes and accept
the propagation prompted by the pop-up dialog box. -
In the Group by table, add one row by
clicking the [+] button and select product for both the Output
column column and the Input column
position column. This passes data from the product column of the input schema to the product column of the output schema. -
In the Operations table, add one row by
clicking the [+] button. -
In the Output column column, select nb_download, in the Function column, select count and
in the Input column position column, select
product.
Selecting the most downloaded product
-
Double-click tTop to open its
Component view.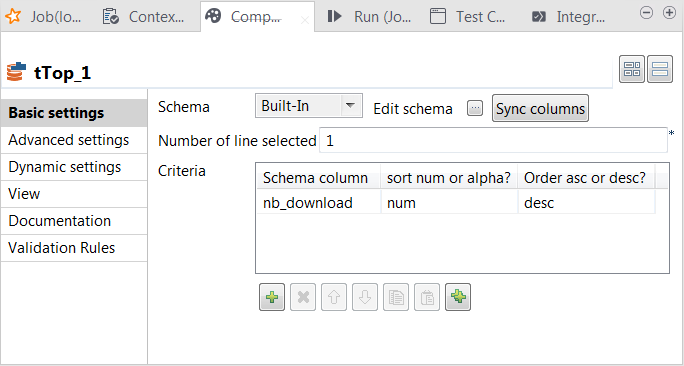
-
In the Number of line selected field, enter
the number of rows to be output to the next component, counting down from the
first row of the data sorted by tTop. -
In the Criteria table, added one row by
clicking the [+] button. -
In the Schema column column, select nb_download, the column for which the data is sorted,
in the sort num or alpha column, select
num, which means the data to be sorted are
numbers, and in the Order asc or desc column,
select desc to arrange the data in descending
order.
Executing the Job
Then you can run this Job.
The tLogRow component is used to present the execution
result of the
Job.
- Double-click the tLogRow component to open the Component view.
-
Select the Define a storage configuration component check box
and select tHDFSConfiguration. -
Press F6 to run this Job.
Once done, in the console of the Run view, you can check the execution result.
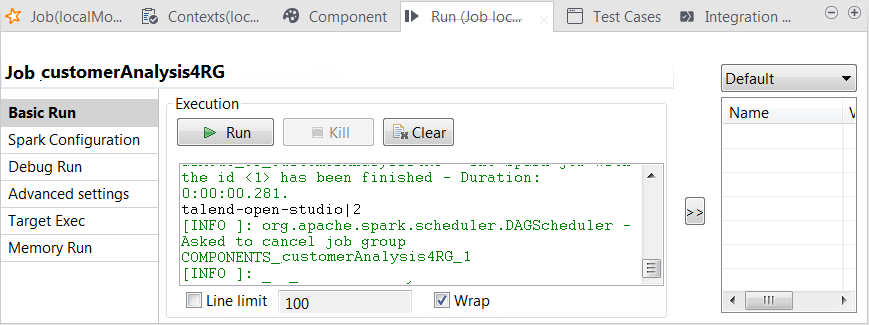
You can read that the most downloaded product is Talend Open
Studio. It counts two of the total five downloads.
Note that you can manage the level of the execution information to be outputted in this
console by selecting the log4jLevel check box in the
Advanced settings tab and then selecting the level of
the information you want to display.
For more information on the log4j logging levels, see the Apache documentation at http://logging.apache.org/log4j/1.2/apidocs/org/apache/log4j/Level.html.
tTop properties for Apache Spark Streaming
These properties are used to configure tTop running in the Spark Streaming Job framework.
The Spark Streaming
tTop component belongs to the Processing family.
The component in this framework is available only if you have subscribed to Talend Real-time Big Data Platform or Talend Data
Fabric.
Basic settings
|
Schema and Edit |
A schema is a row description. It defines the number of fields (columns) to Click Edit schema to make changes to the schema.
Click Sync columns to retrieve the schema from |
|
|
Built-In: You create and store the |
|
|
Repository: You have already created |
|
Number of line selected |
Enter the number of rows to be outputted. The current component selects this number of |
|
Criteria |
Click [+] to add as many lines as required for the sort |
|
In the Schema column column, select the column from your |
|
|
In the other columns, select how you need the data to be sorted. For example, if you need |
Usage
|
Usage rule |
This component is used as an intermediate step. This component, along with the Spark Streaming component Palette it belongs to, appears Note that in this documentation, unless otherwise explicitly stated, a scenario presents |
|
Spark Connection |
You need to use the Spark Configuration tab in
the Run view to define the connection to a given Spark cluster for the whole Job. In addition, since the Job expects its dependent jar files for execution, you must specify the directory in the file system to which these jar files are transferred so that Spark can access these files:
This connection is effective on a per-Job basis. |
Related scenarios
For a related scenario, see Analyzing a Twitter flow in near real-time.