cDirectVM
single CamelContext and across CamelContexts in the same JVM. You can use this mechanism
to communicate across Web applications.
cDirectVM Standard properties
These properties are used to configure cDirectVM running in the Standard Job framework.
The Standard
cDirectVM component belongs to the Core family.
Basic settings
|
When using as a start component in a Route: |
|
|
Endpoint Name |
Type in any string that uniquely identifies the endpoint. |
|
When using as a middle or end component in a Route: |
|
|
Select From Existing(s) |
Click this radio button to select an existing consumer. Click |
|
Input Endpoint Name |
Click this radio button to enter the name of the consumer in the |
|
Block if Consumer is not |
Select this check box to let the producer block if the consumer is not active in the |
|
Timeout |
This option appears when the block is enabled. Specify the time in |
Usage
|
Usage rule |
cDirectVM is used as a start, |
|
Limitation |
n/a |
Direct and synchronous messaging within the same JVM
This scenario applies only to Talend Open Studio for ESB, Talend Data Services Platform and Talend Data Fabric.
In this scenario, a message exchange is triggered in one sub-route and synchronously
consumed in another sub-Route using the Direct-VM mechanism. At the consumer end, the
message content is processed and displayed on the console.
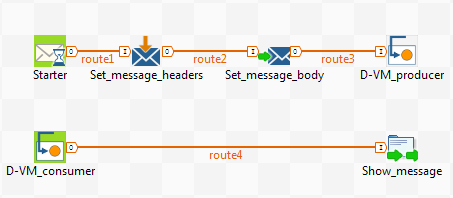
Dropping and linking the components
-
From the Palette, drag and drop the
following components onto the design workspace: a cTimer, a cSetHeader, a
cSetBody, two cDirectVM, and a cProcessor. -
Link the cTimer, the cSetHeader, the cSetBody and the first cDirectVM components using Row > Route connections to
form a sub-route. -
Link the other cDirectVM component to the
cProcessor component using a Row > Route
connection to form another sub-route. -
Label the components to better identify their roles in the Route.
Configuring the components
Configuring the first sub-route
-
Double-click the cTimer component
(labelled Starter in this example) to
display its Basic settings view on the
Component tab.
-
In the Repeat field, enter 1 so that the message exchange is triggered
only once. Leave the other settings as they are. -
Double-click the cSetHeader component (labelled
Set_message_headers in this example)
to display its Basic settings view on the
Component tab.
-
Click the [+] button to add two headers
in the Headers table, and then give each
header a name and a value.In this example, we name the headers Name and Company
respectively, and enter Bill and
Talend as their values. -
Double-click the cSetBody component
(labelled Set_message_body in this
example) to display its Basic settings view
on the Component tab.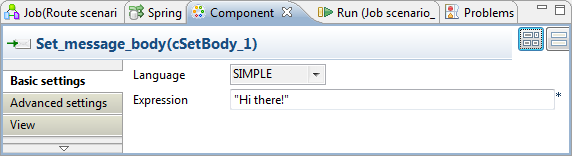
-
Select SIMPLE from the Language list as we will trigger a simple text
message exchange in this example. -
In the Expression field, enter Hi there in double quotation marks as the
content of the message body. -
Double-click the first cDirectVM
component (labelled D-VM_producer in this
example) to display its Basic settings view
on the Component tab.
-
Select an existing consumer endpoint, or specify the name of the consumer
endpoint.In this example, we will name the consumer endpoint dvm, so select the Input Endpoint
Name option, and enter the name of the consumer endpoint
dvm in the Endpoint Name field.
Configuring the second sub-route
-
Double-click the second cDirectVM
component (labelled D-VM_consumer in this
example) to display its Basic settings view
on the Component tab.
-
In the Endpoint Name field, enter
dvm in double quotation marks to name
the endpoint. -
Double-click the cProcessor (labelled
Show_message in this example)
component to display its Basic settings
view.
-
In the Code area, enter the following
code to display the content of the message headers and the message
body:1234567exchange.getOut().setHeader("header1",exchange.getIn().getHeader("Name"));exchange.getOut().setHeader("header2",exchange.getIn().getHeader("Company"));exchange.getOut().setBody(exchange.getIn().getBody(String.class));System.out.println();System.out.println("Message for "+exchange.getOut().getHeader("header1")+" of "+exchange.getOut().getHeader("header2")+":");System.out.println(exchange.getOut().getBody(String.class));
Executing the Route
Click the Run view and click the Run button to launch your Route. You can also press
F6 to execute it.

RESULT: The message generated in the first sub-route is consumed synchronously in
the consumer endpoint and displayed on the console after processing. The message
exchange is triggered once as configured.