cMulticast
ways.
cMulticast Standard properties
These properties are used to configure cMulticast running in the Standard Job framework.
The Standard
cMulticast component belongs to the Routing family.
Basic settings
|
URIS |
Add as many lines as needed in the URIs table to define the |
|
Use ParallelProcessing |
Select this check box to multicast the message(s) to the specified |
|
set timeout |
Select this check box and set a timeout in the Timeout field, in milliseconds. If Note that this check box appears only when the Use ParallelProcessing check box is |
|
Use Aggregation Strategy |
Select this check box to refer to a predefined Java bean as an By default, the last message acts as the outgoing message. |
|
Stop On Exception |
Select this check box to stop the processing immediately when an |
Usage
|
Usage rule |
cMulticast can be used as a middle |
|
Connections |
Route: Select this link to route the |
|
EndBlock: Select this link to route the message(s) from the end block of the Route to the next endpoint. |
|
|
Limitation |
n/a |
Route a message to multiple endpoints and set a new body for each
This scenario applies only to Talend Open Studio for ESB, Talend Data Services Platform and Talend Data Fabric.
In this scenario, a cMulticast component is used to
route a message to two endpoints. The source message and the message on each endpoint is
then set a new body. The cProcessor component is used
to monitor the messages.

Dropping and linking the components
-
From the Palette, expand the Connectivity folder. Drag and drop a cFile and two cMessagingEndpoint components onto the design
workspace. -
From the Routing folder, drag and drop a
cMulticast component onto the design
workspace. -
From the Custom folder, drag and drop four cProcessor components onto the design
workspace. -
From the Core folder, drag and drop three cSetBody components onto the design
workspace. -
Label the components as shown above to better identify their roles in the
Route. -
Right-click the cMulticast component,
select Row > EndBlock in the context menu and click the cProcessor component labeled Monitor_endblock. -
Right-click the cFile component, select
Row > Route in the context menu and click the cMulticast component. Repeat this step to link
the rest components in the Route as shown above using the Row > Route
connection.
Configuring the components
-
Double-click the cFile component labeled
Source_file to open its Basic settings view in the Component tab.
-
In the Path field, fill in or browse to
the path where the source file Hello.txt
is located. Keep the default settings for other fields. -
Double-click the cMulticast component
labeled Multicast to open its Basic settings view in the Component tab.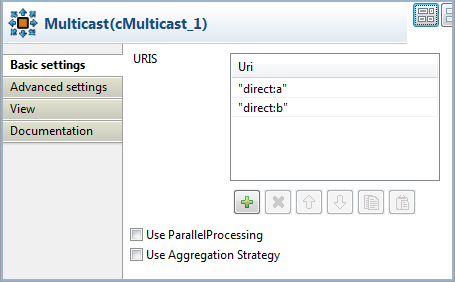
-
In the URIS table, click the plus button
to add two lines and specify the URIs of the endpoints where the message
will be sent, “direct:a” and “direct:b” in this use case. -
Double-click the cMessagingEndpoint
component labeled direct_a to open its
Basic settings view in the Component tab.
-
In the URI field, enter the endpoint URI,
“direct:a” in this use case.Repeat this step to set the endpoint URI for direct_b as “direct:b”. -
Double-click the cProcessor component
labeled Monitor_source to open its
Basic settings view in the Component tab.
-
In the Code box, enter the code below to
print the source message in the console.1System.out.println("The source message is: " + exchange.getIn().getBody(String.class));Repeat this step to customize the code of Monitor_endblock, Monitor_direct_a, and Monitor_direct_b as shown below to print the message of each
endpoint.Monitor_endblock:1System.out.println("The endblock message is: " + exchange.getIn().getBody(String.class));Monitor_direct_a:1System.out.println("direct a just downloaded: "+exchange.getIn().getBody(String.class));Monitor_direct_b:1System.out.println("direct b just downloaded: "+exchange.getIn().getBody(String.class)); -
Double-click the cSetBody component
labeled Set_new_body to open its
Basic settings view in the Component tab.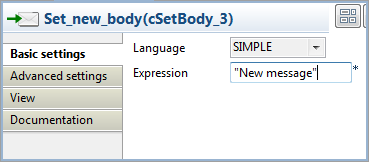
-
Select SIMPLE in the Language list.
In the Expression field, enter “New message” as the new message body.Repeat this step to set the message body for direct:a and direct:b as
“message A” and “message B” respectively. - Press Ctrl+S to save your Route.
Viewing code and executing the Route
-
Click the Code tab at the bottom of the
design workspace to check the generated code.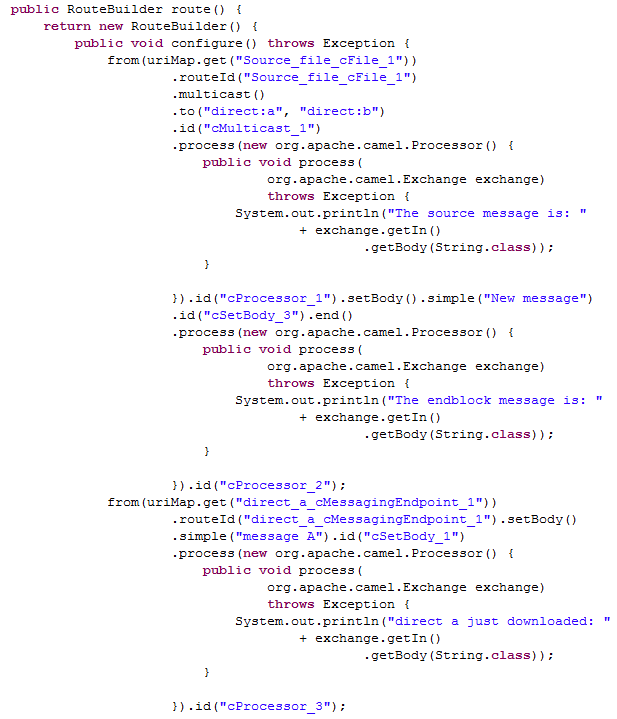 In the partially shown code, the source message is routed
from
"Source_file_cFile_1"
.to
direct:aanddirect:bvia
"cMulticast_1". The message is then processed by
"cProcessor_1"and given the message body"Newby
message""cSetBody_3". The.end
block of the route is processed by"cProcessor_2". The message
from
"direct_a_cMessagingEndpoint_1"is set the message body
"message A"by"cSetBody_1"and processed by
"cProcessor_3". The message fromdirect:bis
processed similarly. -
Click the Run view to display it and
click the Run button to launch the
execution of your Route. You can also press F6 to execute it.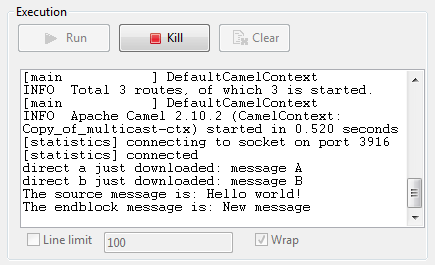 RESULT: The source file message is Hello
world!. The message routed to direct:a and direct:b is
set the message body message A and message
B respectively. The end block message of this Route is
New message that is set by the
component labeled Set_new_body.