tSnowflakeOutputBulkExec
Writes incoming data to files generated in a folder and then loads
the data into a Snowflake database table. The folder can be in an internal Snowflake stage, an Amazon Simple Storage Service (Amazon S3)
bucket, or an Azure container.
This component incorporates the
operations of the tSnowflakeOutputBulk and the tSnowflakeBulkExec components.
tSnowflakeOutputBulkExec Standard properties
These properties are used to configure tSnowflakeOutputBulkExec running in the Standard Job framework.
The Standard
tSnowflakeOutputBulkExec component belongs to the Cloud family.
The component in this framework is available in all subscription-based Talend products.
connector. The properties related to database settings vary depending on your database
type selection. For more information about dynamic database connectors, see Dynamic database components.
Basic settings
| Database |
Select a type of database from the list and click |
|
Property |
Select the way
This property is available when Use this Component is selected from the |
|
Connection Component |
Select the component that opens the database connection to be reused by this |
|
Account |
In the Account field, enter, in double quotation marks, the account name This field is available only when |
| Snowflake Region |
Select an AWS region or an Azure region from This field is available when you |
|
User Id and Password |
Enter, in double quotation marks, your authentication
This field is available only when |
|
Warehouse |
Enter, in double quotation marks, the name of the This field is available only when |
| Schema |
Enter, within double quotation marks, the name of the This field is available only when |
|
Database |
Enter, in double quotation marks, the name of the This field is available only when |
|
Table |
Click the […] button and in the displayed wizard, select the Snowflake To load the data into a new table, select |
|
Schema and Edit Schema |
A schema is a row description. It defines the number of fields Built-In: You create and store the schema locally for this component Repository: You have already created the schema and stored it in the If the Snowflake data type to Click Edit
Note that if the input value of any non-nullable primitive This This |
| Table Action |
Select the action to be carried out to the table.
|
| Output Action |
Select the operation you want to perform to the incoming
|
| Storage | Select the type of storage to upload the incoming data to and to load data into the table from.
|
| Stage Folder | Specify the folder under the Snowflake stage to write incoming data to and to load data from. This field is available when you |
| Region | Specify the region where the S3 bucket locates.
This field is available when you select |
| Access Key and Secret Key |
Enter the authentication information required to connect to the Amazon S3 bucket to be used. To enter the password, click This field is available when you select |
| Bucket | Enter the name of the bucket (in double quotation marks) to be used for storing the incoming data and loading data from. This bucket must already exist. This field is available when you select |
| Folder | Enter the name of the folder (in double quotation marks) to be used for storing the incoming data and loading data from. This folder will be created if it does not exist at runtime. This property is |
| Server-Side Encryption | Select this check box to encrypt the files to be uploaded to the S3 bucket on the server side. This property is checked by default. This field is available when you select |
| Protocol | Select the protocol used to create Azure connection.
This field is available when you select |
| Account Name | Enter the Azure storage account name (in double quotation marks). This field is available when you select |
| Container | Enter the Azure container name (in double quotation marks).
This field is available when you select |
| SAS Token | Specify the SAS token to grant limited access to objects in your storage account. To enter the SAS token, click the This field is available when you select |
Advanced settings
| Additional JDBC Parameters |
Specify additional connection properties for the database connection you are This field is available only when you |
| Use Custom Snowflake Region |
Select this check box to specify a custom
Snowflake region. This option is available only when you select Use This Component from the Connection Component drop-down list in the Basic settings view.
For more information on Snowflake Region |
| Login Timeout |
Specify the timeout period (in minutes) |
|
Role |
Enter, in double quotation marks, the default access This role must already exist and has been granted to the |
| Allow Snowflake to convert columns and tables to uppercase |
Select this check box to convert lowercase in the defined If you deselect the check box, all identifiers are This property is not available when you select the For more information on the Snowflake Identifier Syntax, |
| Temporary Table Schema
|
Specify a schema for the temporary table.
The schema must exist. |
| Custom DB Type |
Select this check box to specify the DB type for each column in the schema. This property is available only when you |
| Delete Storage Files On Success |
Delete all the files in the storage folder once the data is loaded to the table successfully. This field is |
|
Use Custom Stage |
Select this check box to upload the data to the files generated in a folder under the stage. You need also to enter the path to the folder in the field provided. For example, to upload data to the files generated in myfolder1/myfolder2 under the stage, you need to type "@~/myfolder1/myfolder2" in the field. This field is available when you Once selected, the Stage Folder |
| Use Custom S3 Connection Configuration |
Select this check box if you wish to use your custom S3 configuration. Option: select the parameter from the list. Value: enter This field is available when you select |
| Copy Command Options | Set parameters for the COPY INTO command by selecting the following options from the drop-down list. The COPY INTO command is provided by Snowflake. It loads data to a Snowflake database table.
For information about the parameters of the COPY INTO command, see |
| Put Command Options |
Set parameters for the PUT command by selecting the following options from the drop-down list. The PUT command is provided by Snowflake. It uploads data to a Snowflake stage folder.
For information about the parameters of the PUT command, see the PUT command. This field is available when you |
| Put Command Error Retry |
Specify the maximum data loading This field is available when you |
| S3 Max Error Retry |
Specify the maximum data loading This field is available when you select |
| Azure Max Error Retry |
Specify the maximum data loading This field is available when you select |
| Non-empty Storage Folder Action |
Select any of the following options:
|
| Chunk Size (bytes) |
Specify the size for the files generated, which defaults to 52428800 bytes. With this option specified, This option can significantly |
| Number of file requests threads |
Specify the number of threads used for sending Put requests in parallel when writing the data in the files. |
|
tStatCatcher Statistics |
Select this check box to gather the Job processing metadata at the Job level |
Global Variables
|
NB_LINE |
The number of rows processed. This is an After variable and it returns an integer. |
|
NB_SUCCESS |
The number of rows successfully processed. This is an After variable and it returns an |
|
NB_REJECT |
The number of rows rejected. This is an After variable and it returns an integer. |
|
ERROR_MESSAGE |
The error message generated by the component when an error occurs. This is an After |
Usage
|
Usage rule |
This component is It can also send error messages to other components via a Row >
Rejects link. The provided information about an error could be:
|
Loading Data Using COPY Command
command, where Copy Command Options is customized in ON_ERROR form in
case any record is rejected.
The input data contains several records, one of which violates the length limitation.
|
1 2 3 4 |
#Name Harry veryveryveryLongName Jack |
Then, the input data is inserted into a Snowflake table and the record that violates the
length limitation is rejected.
Creating a Job for loading data using the COPY command
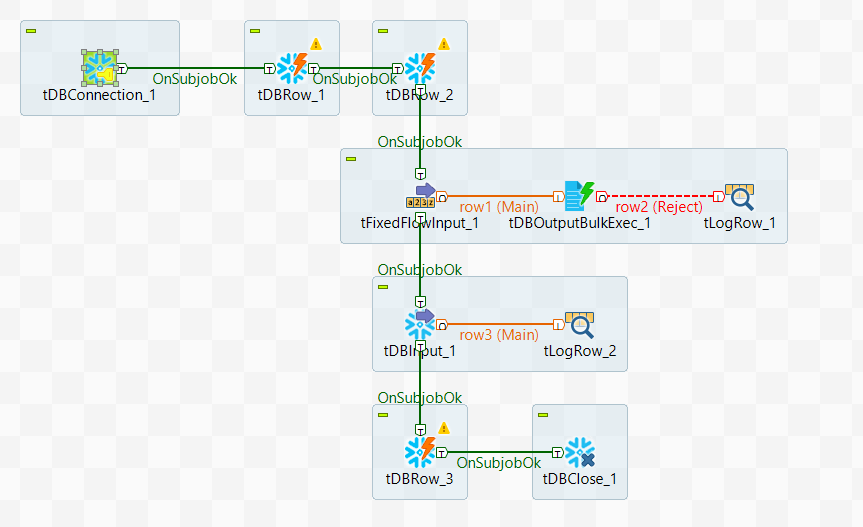
Create a Job to open a connection to access a Snowflake database, then create a
Snowflake table and several records and insert these records into the table using the COPY
command, and finally get and display the records on the console.

-
Create a new Job and add a tSnowflakeConnection component, a
tFixedFlowInput component, a
tSnowflakeOutputBulkExec component, a
tSnowflakeInput component, a
tSnowflakeClose component, two
tSnowflakeRow components and two
tLogRow components by typing their names in the design
workspace or dropping them from the Palette. -
Link the tFixedFlowInput component to the
tSnowflakeOutputBulkExec component using a
Row > Main connection. -
Do the same to link the tSnowflakeOutputBulkExec component
to the first tLogRow component and link the
tSnowflakeInput component to the second
tLogRow component. -
Link the tSnowflakeConnection component to the first
tSnowflakeRow component using a
Trigger > OnSubjobOk
connection. -
Do the same to link the first tSnowflakeRow component to the
second tSnowflakeRow component, the second
tSnowflakeRow component to the
tFixedFlowInput component, the
tFixedFlowInput component to the
tSnowflakeInput component, the
tSnowflakeInput component to the
tSnowflakeClose component.
Opening a connection to access a Snowflake database
connection to access a Snowflake database.
-
Double-click the tSnowflakeConnection component to open its
Basic settings view.
-
In the Account, User Id,
Password , Warehouse,
Schema and Database fields, specify
the authentication information required to access the Snowflake database. -
Select an AWS region available for the Snowflake database from the
Snowflake Region drop-down list. In this example, it is
AWS US West.
Creating a Snowflake table
table already exists, it will be dropped and then created. Next, configure the
tFixedFlowInput component to generate several records, one of
which violates the length limitation.
-
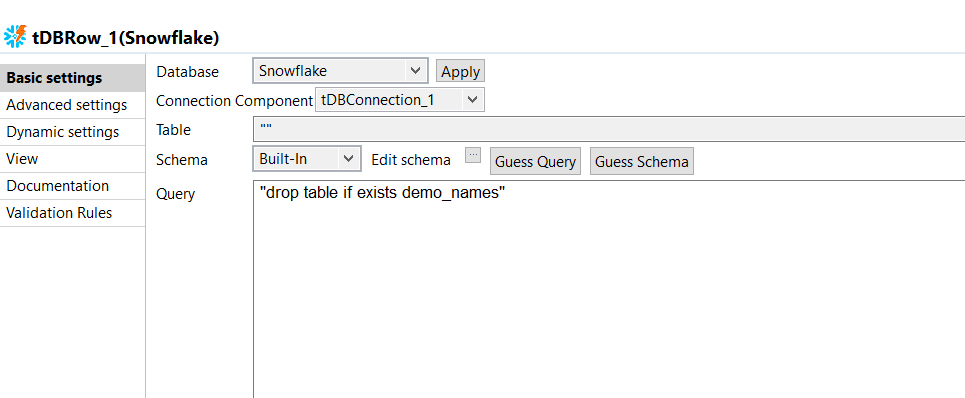
Double-click the tSnowflakeRow component to open its
Basic settings view.
-
Specify the connection details required to access Snowflake. In this example,
from the Connection Component drop-down list displayed,
select the connection component to reuse its connection details you have already
defined. -
In the Queue field, enter the query statement between
double quotation marks to drop the table if it already exists. In this example,
it is drop table if exists demo_names. -
Double-click the tSnowflakeRow component to open its
Basic settings view.
-
Specify the connection details required to access Snowflake. In this example,
from the Component List drop-down list displayed, select
the connection component to reuse its connection details you have already
defined. -
In the Queue field, enter the query statement between
double quotation marks to create a table. In this example, it is
create table demo_names (name varchar(10));. -
Double-click the tFixedFlowInput component to open its
Basic settings view.
-
Click the
 button next to Edit schema to
define the schema. In this example, the schema has only one column: Name. -
In the Mode area, select Use Inline
Content. Then add three records. In this example, they
are:1234HarryveryveryveryLongNameJack
Loading data to the Snowflake table
tSnowflakeOutputBulkExec component to insert data to the
Snowflake table.
-
Double-click the tSnowflakeOutputBulkExec component to
open its Basic settings view.
-
Specify the connection details required to access Snowflake. In this example,
from the Connection Component drop-down list displayed,
select the connection component to reuse its connection details you have already
defined. -
In the Table field, select the table you created in the
second tSnowflakeRow component in the previous step. In
this example, it is DEMO_NAMES. -
If needed, click the Sync columns button to make sure
the schema is properly retrieved from the preceding component. -
Select INSERT from the Output
Action drop-down list. -
Select Internal from the Storage
drop-down list and enter demo in the Stage
Folder field.
Using COPY command to load data
tSnowflakeOutputBulkExec component to use the COPY command to
load data, and then configure the first tLogRow component to
display data on the console.
-
Click Advanced settings to open the Advanced settings
view.
-
Select the Convert columns and table to uppercase check
box and the Delete Storage Files On Success check box to
convert the columns to uppercase and delete all files in the storage once the
Job runs successfully. -
Clear the Use Custom Stage Path check box. Otherwise,
the Stage Folder you specified in the Basic
settings makes no effect. -
Select Manual from the Copy Command
Options drop-down list and enter ON_ERROR='continue'
FILE_FORMAT=(type=csv field_delimiter=',' compression=gzip
field_optionally_enclosed_by='"') within double quotes. -
Select Default from the Put Command
Options drop-down list. -
Set Put Command Error Retry to
3. -
Clear the Stop on non-empty Storage Folder check box
. -
Double-click the first tLogRow component to open its
Basic settings view. -
In the Mode area, select Table to
display data.
Retrieving data from the Snowflake table
the Snowflake table, and then configure the second tLogRow
component to display data on the console.
-
Double-click the tSnowflakeInput component to open its
Basic settings view.
-
Specify the connection details required to access Snowflake. In this example,
from the Connection Component drop-down list displayed,
select the connection component to reuse its connection details you have already
defined. -
In the Table field, select the table you created in the
second tSnowflakeRow component in the previous step. In
this example, it is DEMO_NAMES. -
Click the
 button next to Edit schema to
open the schema dialog box and define the schema. In this example, the schema
has only one column: Name.
-
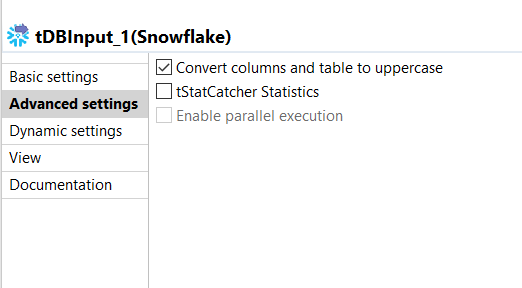
Click Advanced settings to open the Advanced settings
view.
-
Select the check box of Convert columns and table to
uppercase to convert the columns to uppercase. -
Double-click the second tLogRow component to open its
Basic settings view. -
In the Mode area, select Table to
display data.
Executing the Job
then F6 to execute the Job.

the console, and the one that violates the length limitation is rejected.
Related scenarios
For use cases in relation with tSnowflakeOutputBulkExec, see the
following scenario: