Configuring tMicrosoftCrmInput
-
Double-click tMicrosoftCrmInput to display
the component Basic settings view and define
its properties.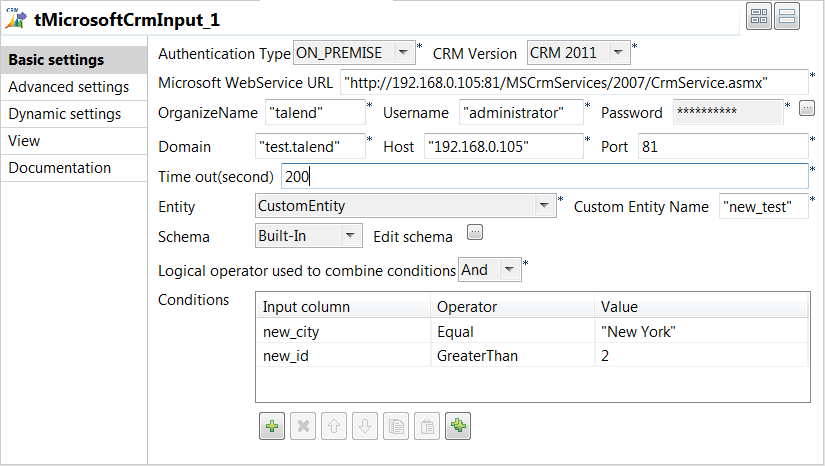
-
Set the Property Type to Repository if you have stored the input file
properties centrally in the Metadata node in
the Repository tree view. Otherwise, select
Built-In and fill the fields that follow
manually. In this example, property is set to Built-In. -
Enter the Microsoft Web Service URL as well as the user name and password in
the corresponding fields and enter the name that is given the right to access
the Microsoft CRM database in the OrganizeName
field. -
In the Domain field, enter the domain name of
the server on which Microsoft CRM is hosted, and then enter the host IP address
and the listening port number in the corresponding fields. -
In the Time out field, set the amount of time
(in seconds) after which the Job will time out. -
In the Entity list, select the one among
those offered you want to connect to. In this example,
CustomEntity is selected. -
The Schema is then automatically set
according to the entity selected. But you can modify it according to your needs.
In this example, you should set the schema manually since you want to access a
custom entity. Copy the seven-column schema from tMicrosoftCrmOutput and paste it in the schema dialog box in
tMicrosoftCrmInput.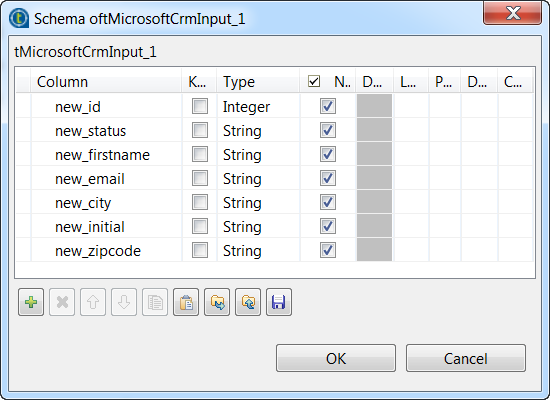
-
Click OK to close the dialog box. You will be
prompted to propagate changes. Click Yes in the
popup message. -
In the Basic settings view, select And or Or as the
logical operator you want to use to combine the conditions you set on the input
columns. In this example, we want to set two conditions on two different input
columns and we use And as the logical
operator. -
In the Condition area, click the plus button
to add as many lines as needed and then click in each line in the Input column list and select the column you want to
set condition on. In this example, we want to set conditions on two columns,
new_city and new_id. We want to
extract all customer rows whose city is equal to “New York” and whose id is
greater than 2. -
Click in each line in the Operator list and
select the operator to bind the input column with its value, in this example
Equal is selected for
new_city and Greater
Than for new_id. -
Click in each line in the Value list and set
the column value,New Yorkfor new_city and
2for new_id in this example. You can use
a fixed or a context value in this field.
Document get from Talend https://help.talend.com
Thank you for watching.
Subscribe
Login
0 Comments