Scenario: Writing data records in the stewardship console database
This scenario applies only to a subscription-based Talend Platform solution with MDM or Talend Data Fabric.
This scenario describes a five-component Job that generates data records in the form
of tasks and loads them into the stewardship console database.
These tasks will need later the intervention of an authorized data steward to merge,
compare and resolve the data records that are held in these tasks. For further
information, see
Talend Data Stewardship Console
User Guide.
In this scenario:
-
A tFixedFlowInput component generates input
data flow that has five columns: Source, Firstname,
Lastname, DOB (date of birth), and
PostalCode. This data has problems such as duplication,
first or last names spelled differently or wrongly, different information for
the same customer, etc. -
A tMatchGroup data quality component carries
out matching operations on data across the heterogeneous sources defined in the
input Source column. This component groups the output
columns by a blocking value to optimize the matching operation and compare only
the records that have the same blocking value, the Source
column in this scenario. For more information on grouping output columns and
using blocking values, see tMatchGroup. -
A tMap component filters the input flow into
unique data records and data records that have matching distances. -
The unique data records are displayed on the Run console via the tLogRow
component. All other data records that have a matching distance are sent to the
Talend Data Stewardship Console
database through the
tStewardshipTaskOutput component and are
displayed in the stewardship console. An authorized data steward can then
intervene to merge the data records with matching distances.

For detail information about related scenarios, see Scenario 1: Generating functional keys in the output flow and
Scenario 2: Comparing columns and grouping in the output flow duplicate records that have the same functional key.
-
Drop the following components from the Palette onto the design workspace: tFixedFlowInput, tMatchGroup,
tMap, tStewardshipTaskOutput and tLogRow. -
Connect the first three components together using the Main link.
-
Double-click tFixedFlowInput to display the
Basic settings view and define the
component properties as described in Scenario 1: Generating functional keys in the output flow.The tFixedFlowInput component generates an
input data flow that has five columns: Source, Firstname,
Lastname, DOB (date of birth), and
PostalCode. This data has problems such as duplication,
first or last names spelled differently or wrongly, different information for
the same customer, etc.

-
Double-click the tMatchGroup component to
display the Basic Settings view and define the
component properties.

-
Click Sync columns to retrieve the schema
from the preceding component. -
If required, click the Edit schema button to
view the input and output schema and do any modifications in the output
schema.
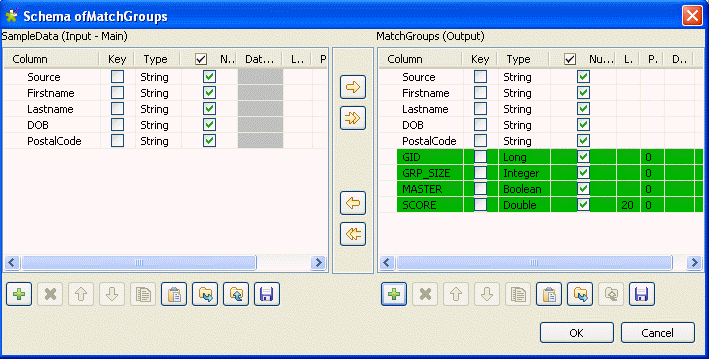
In the output schema of this component, there are four output standard columns
that are read-only. For more information, see tMatchGroup Standard properties.
-
In the Key definition table, click the
[+] button to add to the list the columns
on which you want to do the matching operation, FirstName
and LastName in this scenario. -
Click in the first and second cells of the Matching
type column and select from the list the method(s) to be used for
the matching operation, Jaro-Winkler in this
example. -
Click in the first and second cells of the Confidence
Weight column and set the numerical weights for each of the
columns used as key attributes. -
Click the [+] button below the Blocking Definition table to add a line in the table
then click in the line and select from the list the column you want to use as a
blocking value, Source in this example.Using a blocking value reduces the number of pairs of records that needs to
be examined. The input data is partitioned into exhaustive blocks based on the
data source. This will decrease the number of pairs to compare, as comparison is
restricted to record pairs within each block. -
Double-click the tMap component to open the
Map Editor.

The input area to the left is already filled with the input schema coming from the
previous component in the Job design.
-
Click the [+] button in the upper right
corner of the output area to add as many output tables as needed, two in this
example uniques and groups. The first
table will group the unique data records and the second will group all the
records that have matching distances to the master record in each group. -
Drop the input columns to fill in the first output schema. For further
information regarding data mapping, see
Talend Studio User
Guide.All the columns will be automatically filled in the Schema Editor in the below half of the Map
Editor. -
Click

in the upper right corner of the first output table to add
a condition to filter the data in the first output table:
row2.GRP_SIZE == 1. -
Drop the input columns to fill in the second output schema and add the
following filter: row2.GRP_SIZE > 1 ||
!row2.MASTER. -
In the Schema Editor of the second output
table, click the [+] button to add two extra
columns: weight and istarget. The
first to measure the matching distance and the second to decide if the record
will be a target record or a source record. -
Click Ok to close the Map Editor.
-
In the design workspace, right-click tMap and
select the uniques link and drop it on the tLogRow component. Do the same to connect tMap to tStewardshipTaskOutput with the groups
link. -
Double-click the tStewardshipTaskOutput
component to display its Basic settings view
and define the component properties.

-
In the Schema list, select Built-In and click the […] button next to Edit
schema to open a dialog box.

The data is collected from the columns defined in the groups
output table in the tMap component.
-
Click OK to close the dialog box and proceed
to the next step. -
In the Url field, enter the URL for
connecting to the stewardship console database. -
In the Username and Password fields, enter your login and password to connect to the
MDM server. -
In the Task name field, enter a functional
name for the task you want to list in
Talend Data Stewardship Console
. -
From the Type list, select the type of the
tasks you want to write in the stewardship console: Resolution or Data. In this
example, only resolution tasks are to be written.For further information on task type, see
Talend Data Stewardship Console
User Guide. -
In the Created by field, enter between
inverted commas the name of the task creator, Administrator
in this example. The task creator corresponds to the users of
Talend MDM Web UI
. For further information, see
Talend MDM Web UI
User Guide. -
In the Owner field, enter between inverted
commas the name of the task owner, the user to whom the task is assigned,
Administrator in this example.
Task can be assigned to a specific user either from the Basic settings view of the tStewardshipTaskOutput component, or directly from the stewardship
console by an administrator. For further information, see tStewardshipTaskOutput.
-
In the Star field, enter between inverted
commas the number of stars, 0 through 5, you want to assign to the task in the
stewardship console to highlight importance. -
In the Tags field, enter between inverted
commas the name of the tag category associated with the tasks you want to read,
not used in this example.For further information, see
Talend Data Stewardship Console
User Guide. -
From the Looping column list, select a column
in the input schema on which to base the loop, GID in this
Example. -
From the Source/Target selector list, select
the column that will decide if the record will be a target record or a source
record. -
From the Source list, select a source column
in the input schema. -
From the Score list, select the matching
score column in the input schema. -
From the Weights list, select the column that
defines the matching distance for the input columns. -
In the Extra info table, click the

button to add one or several rows that you can use to add
extra information to one or several record in the created task.
You can click the

button to add all your schema in one go without having to add
it row by row.

-
In the Title column, enter between inverted
commas the role of the person who adds the information. -
In the Info column, enter between inverted
commas the extra information you want to attach to the selected column. -
Click in the Scope column row and select from
the list the record to which you want to add the extra information,
PostalCode in this example.This will append a red mark to the PostalCode column
when we open the relevant task in
Talend Data Stewardship Console
When the data steward place the pointer on this mark, the attached information will
display. Such information may help the steward in resolving the data record.
-
In the Record Column table, click the
button to add the rows you want to show in each of the
tasks to create in
Talend Data Stewardship Console
. -
Click in each of the rows and select the column you want show in each of the
created tasks. In this example, each task must have four columns:
Firstname, Lastname,
PostalCode and DOB.
You can click the
button to add all your input schema in one go without having to
add it row by row.
-
Double-click the tLogRow component to display
its Basic settings view and define the
component properties. -
Save your Job and press F6 to execute
it.

The Run console displays the four columns from the
input flow.
The identifier for each group (task) is listed in the GID column
next to the corresponding record. The number of records in each of the tasks is listed
in the GRP_SIZE column and computed only on the master record. The
MASTER column indicates with “true” that the corresponding
record is a master record. The SCORE column lists the calculated
distance between the input record and the master record according to the Jargo-Winkler matching algorithm.
All other input records that have a matching distance are listed in
Talend Data Stewardship Console
waiting for a data steward to merge, compare and
resolve the data records.