tMatchGroup
Creates groups of similar data records in any source data including large volumes
of data by using one or several match rules.
tMatchGroup compares columns in both
standard input data flows and in M/R input data flows by using matching methods and
groups similar encountered duplicates together.
Several tMatchGroup components can be used sequentially to match data
against different blocking keys. This will refine the groups received by
each of the tMatchGroup components through
creating different data partitions that overlap previous data blocks and so
on.
In defining a group, the first processed record of each
group is the master record of the group. The other records are computed as
to their distances from the master records and then are distributed to the
due master record accordingly.
Depending on the Talend solution you
are using, this component can be used in one, some or all of the following Job
frameworks:
-
Standard: see tMatchGroup Standard properties.
The component in this framework is available when you have subscribed to one of
the Talend Platform products or Talend Data
Fabric. -
MapReduce: see tMatchGroup MapReduce properties.
The component in this framework is available when you have subscribed to any Talend Platform product with Big Data or Talend Data
Fabric.
tMatchGroup Standard properties
These properties are used to configure tMatchGroup running in the Standard Job framework.
The Standard
tMatchGroup component belongs to the Data Quality family.
The component in this framework is available when you have subscribed to one of
the Talend Platform products or Talend Data
Fabric.
Basic settings
|
Schema and Edit |
A schema is a row description, it defines the number of fields to be Click Sync columns to retrieve the The output schema of this component contains the following read-only – GID: provides a group identifier of the data
type String. Note:
All Jobs with tMatchGroup – GRP_SIZE: counts the number of records in the – MASTER: identifies, by Each input record will be compared to the master record, if they – SCORE: measures the distance between the input In case the tMatchGroup component is – GRP_QUALITY: provides the quality of – MERGE_INFO: this output column is available |
|
|
Built-in: You create and store the |
|
|
Repository: You have already created |
|
Matching Algorithm |
Select from the list the algorithm you want to use in the component: It is important to have the same type of the matching algorithm |
|
|
Click the import icon to import a match rule from the Studio It is important to import the same type of the rule selected in the For further information about how to import rules, see Importing match rules from the studio repository |
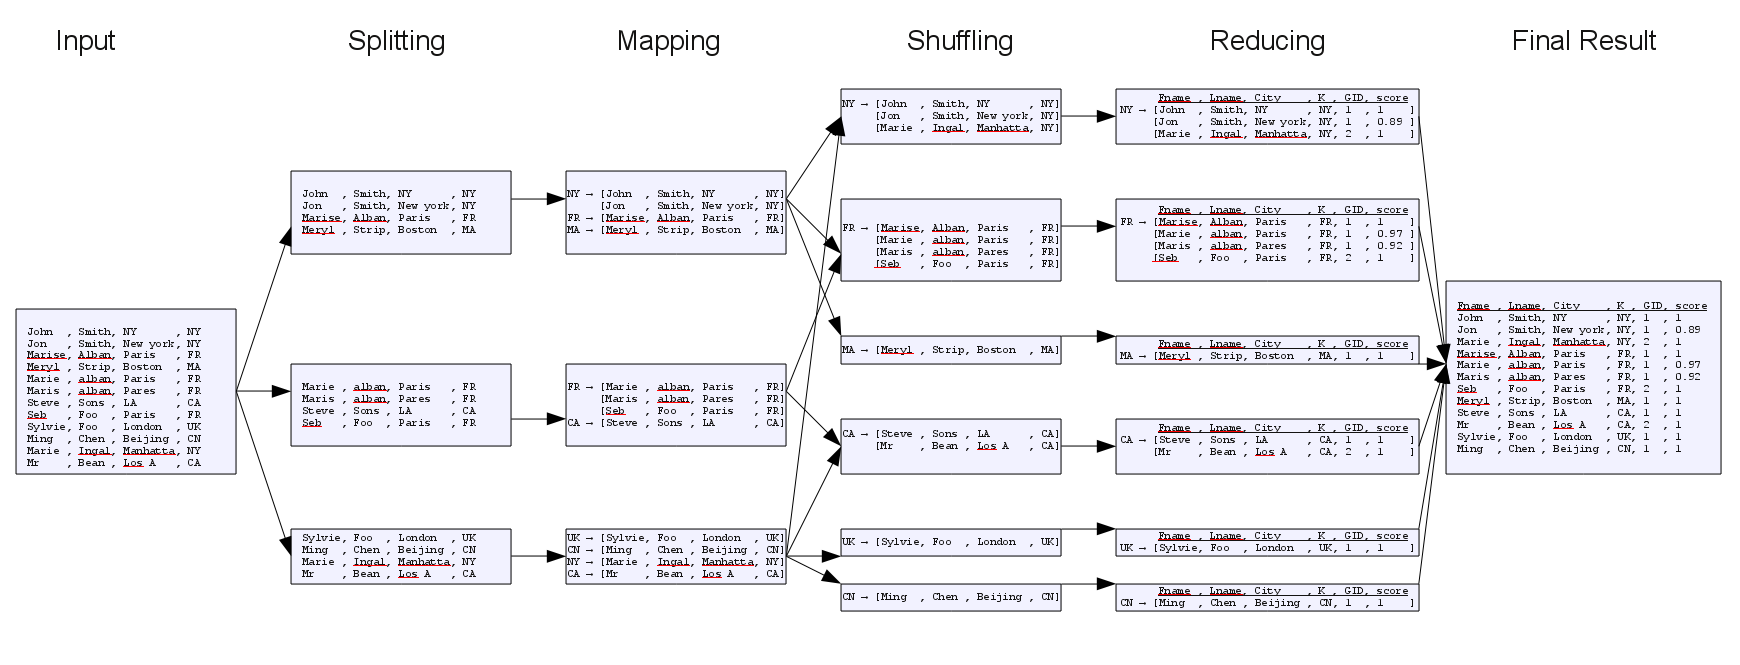
| Key Definition |
Input Key Attribute Select the column(s) from the input flow on which you want to apply a Note:
When you select a date column on which to apply an algorithm or a matching algorithm, For example, if you want to only compare the year in the date, in the component schema |
|
Matching Function Select a matching algorithm from the list:
Exact: matches each processed entry
Exact – ignore case: matches each
Soundex: matches processed entries
Levenshtein (edit distance):
Metaphone: Based on a phonetic
Double Metaphone: a new version of
Soundex FR: matches processed entries
Jaro: matches processed entries
Jaro-Winkler: a variant of Jaro, but
Fingerprint key: matches entries
after doing the following sequential process:
q-grams: matches processed entries by
Hamming: calculates the minimum
custom…: enables you to load an For further information about how to load an external Java library, For further information about how to create a custom matching For a related scenario about how to use a custom matching algorithm, |
|
|
Custom Matcher When you select Custom as the For example, to use a MyDistance.class class |
|
|
Threshold This column is displayed when you select to have T-Swoosh as the matching algorithm. Set a threshold between 0 and |
|
|
Tokenized measure Tokenization is the concept of splitting a string into words. Select
NO: no tokenization method is used
Same place: splits the two strings by
Same order: splits the two strings by This method should be used only with strings which has a few words,
Any order: splits the two strings by Using this method, “John Doe” and “Doe John” match. |
|
|
Weight Set a numerical weight for each attribute (column) of the key |
|
|
Handle Null To handle null values, select from the list the null operator you want
Null Match Null: a Null attribute
Null Match None: a Null attribute
Null Match All: a Null attribute For example, if we have two columns, name and If we have two records: “Doe”, “John” “Doe”, “” Depending on the operator you choose, these two records may or may not
Null Match Null: they do not
Null Match None: they do not Null Match All: they match. And for the records: “Doe”, “” “Doe”, “” Null Match Null: they match.
Null Match None: they do not Null Match All: they match. |
|
|
Match Threshold |
Enter the match probability. Two data records match when the You can enter a different match threshold for each match rule. |
|
Blocking Selection |
Input Column If required, select the column(s) from the input flow according to Blocking reduces the number of pairs of records that needs to be Using blocking column(s) is very useful when you are processing very |
Advanced settings
|
Store on disk |
Select the Store on disk check box if
Max buffer size: Type in the size of
Temporary data directory path: Set |
|
Multiple output |
Select the Separate output check box –Uniques: when the group score –Matches: when the group score –Suspects: when the group score
Confident match threshold: set a |
|
Multi-pass |
Select this check box to enable a tMatchGroup For an example Job, see Scenario 2: Matching customer data through multiple passes With multi-pass matching, all master records are generated but
Propagate original values: This |
|
Sort the output data by GID |
Select this check box to group the output data by the group |
|
Output distance details |
Select this check box to add an output column Note:
When you use two tMatchGroup |
|
Display detailed labels |
Select this check box to have in the output For example, if you try to match on first name and last name fields, |
|
Deactivate matching computation when opening the |
Select this check box to open the Configuration Wizard without running This enables you to have a better experience with the component. |
|
tStatCatcher Statistics |
Select this check box to collect log data at the component level. Note |
Global Variables
|
Global Variables |
ERROR_MESSAGE: the error message generated by the A Flow variable functions during the execution of a component while an After variable To fill up a field or expression with a variable, press Ctrl + For further information about variables, see |
Usage
|
Usage rule |
This component is an intermediary step. It requires an input flow as |
Configuration wizard
The configuration wizard enables you to create different production environments,
Configurations, and their match rules.
You can also use
the configuration wizard to import match rules created and tested in the studio and use them
in your match Jobs. For further information, see Importing match rules from the studio repository.
You can not open the configuration wizard unless you link the input component to the
tMatchGroup component.
To open the configuration wizard:
-
In the studio workspace, design your job and link the components together, for
example as below:
-
Double-click tMatchGroup; or right-click
it and from the contextual menu select Configuration
Wizard; or click Preview in the
basic settings view of
tMatchGroup.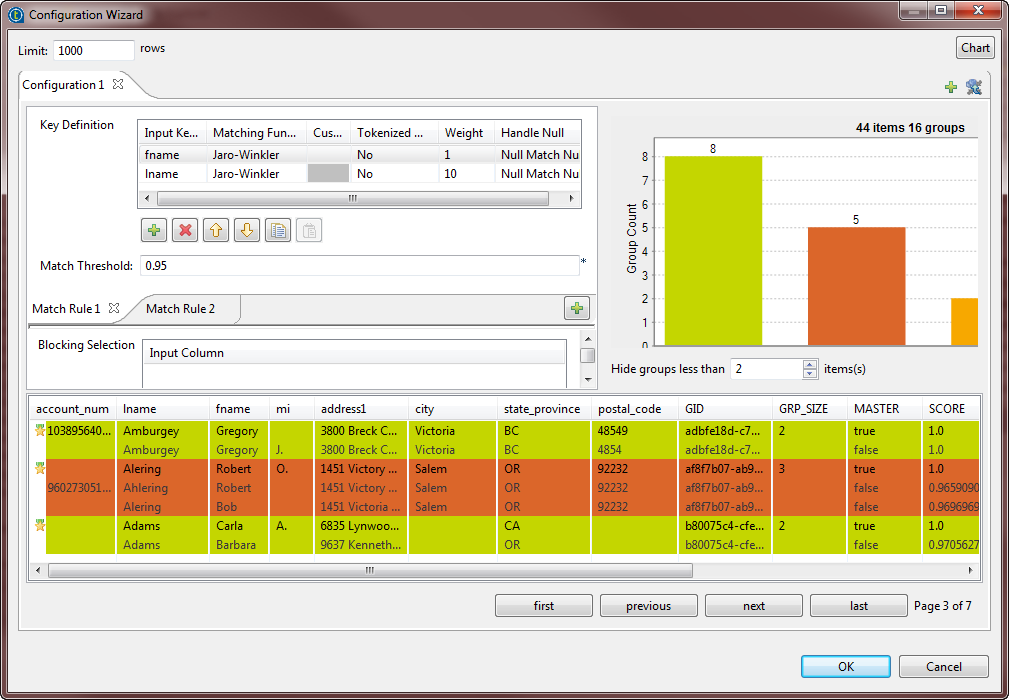
-
In the popup that opens, click Skip Computation
if you want to open the Configuration Wizard without running the match rules defined
in it.
-
the Configuration view, where you can set the
match rules and the blocking column(s). -
the matching chart, which presents the graphic matching result,
-
the matching table, which presents the details of the matching result.
The Limit field at the upper-left corner indicates the
maximum number of rows to be processed by the match rule(s) in the wizard. The by-default
maximum row number is 1000.
Configuration view
From this view, you can edit the configuration of the tMatchGroup component or define different configurations in which to execute
the Job.
You can use these different configurations for testing purposes for example, but
you can only save one configuration from the wizard, the open configuration.
In each configuration, you can define the parameters to generate match rules with the VSR
or the T-Swoosh algorithm. The settings of the Configuration view differ slightly depending if you select Simple VSR or T-Swoosh in the
basic settings of the tMatchGroup component.
You can define survivorship rules, blocking key(s) and multiple conditions using several
match rules. You can also set different match intervals for each rule. The match results on
multiple conditions will list data records that meet any of the defined rules. When a
configuration has multiple conditions, the Job conducts an OR match operation. It evaluates
data records against the first rule and the records that match are not evaluated against the
other rules.
-
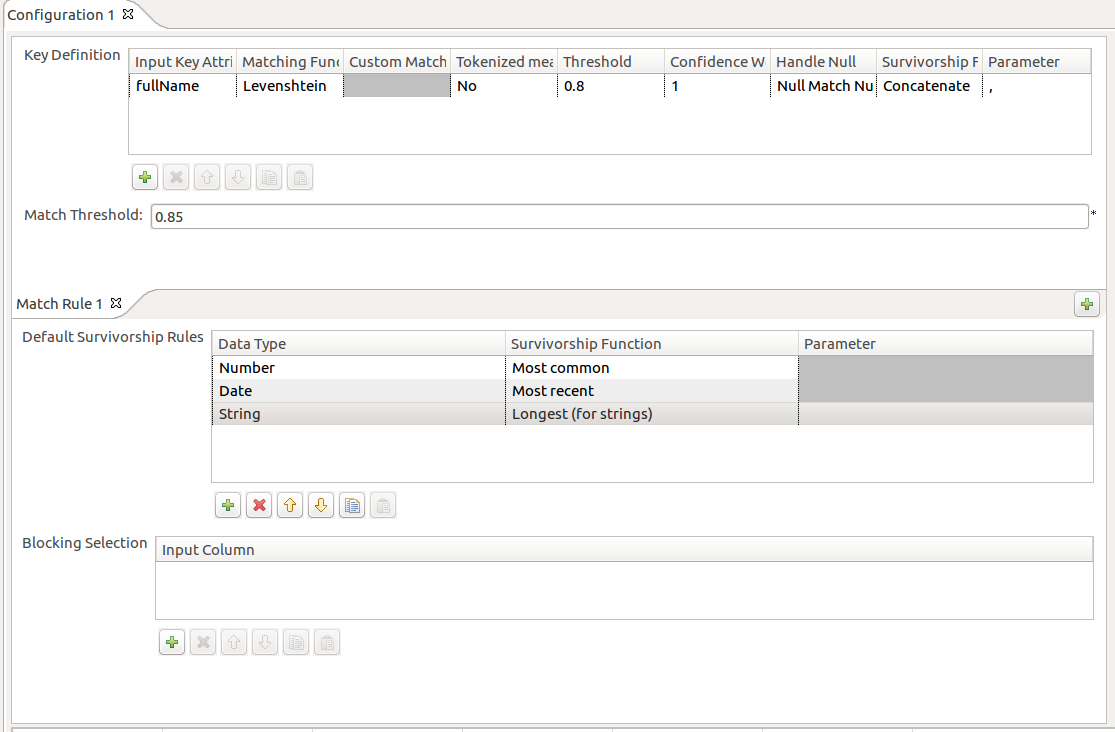
The Key definition parameters.
-
The Match Threshold field.
-
A blocking key in the Blocking Selection
table (available only for rules with the VSR algorithm).Defining a blocking key is not mandatory but advisable as it partitions data
in blocks to reduce the number of records that need to be examined. For further
information about the blocking key, see Importing match rules from the studio repository. -
The Default Survivorship Rules parameters
(available only for rules with the T-Swoosh algorithm).
-
In the basic settings of the tMatchGroup
component, select Simple VSR from the Matching Algorithm list.It is important to have the same type of the matching algorithm selected in the
basic settings of the component and defined in the configuration wizard. Otherwise
the Job runs with default values for the parameters which are not compatible between
the two algorithms. -
In the basic settings of the tMatchGroup
component, click Preview to open the configuration
wizard. -
Click the [+] button on the top right corner of
the Configuration view.This creates, in a new tab, an exact copy of the last configuration.
-
Edit or set the parameters for the new configuration in the Key definition and Blocking
Selection tables. -
If needed, define several match rules for the open configuration as
the following:-
Click the [+] button on the match rule bar to
create an exact copy of the last rule in a new tab. -
Set the parameters for the new rule in the Key
definition table and define its match interval. -
Follow the steps above to create as many match rules for a
configuration as needed. You can define a different match interval for
each rule.
When a configuration has multiple conditions, the Job conducts an OR
match operation. It evaluates data records against the first rule and the
records that match are not evaluated against the second rule and so
on. -
Click the [+] button on the match rule bar to
-
Click the Chart button at the top right corner of
the wizard to execute the Job in the open configuration.The matching results are displayed in the matching chart and table.Follow the steps above to create as many new configuration in the wizard as
needed. -
To execute the Job in a specific configuration, open the configuration in the
wizard and click the Chart button.The matching results are displayed in the matching chart and table. -
At the bottom right corner of the wizard, click either:
-
OK to save the open configuration.
You can save only one configuration in the wizard.
-
Cancel to close the wizard and keep the
configuration saved initially in the wizard.
-
For an example of a match rule with the T-Swoosh algorithm, see Scenario 3: Using survivorship functions to merge two records and create a master record.
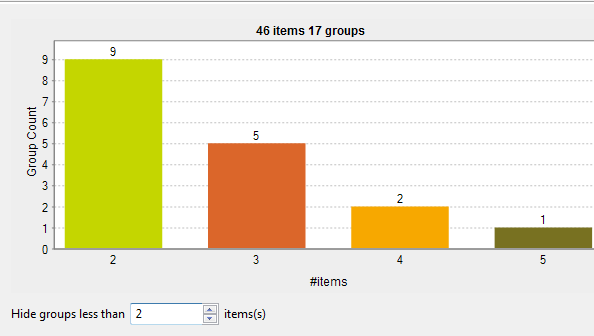
Matching chart
From the matching chart, you can have a global picture about the duplicates in the
analyzed data.
The Hide groups less than parameter, which is set to
2 by default, enables you to decide what groups to show in the result
chart. Usually you want to hide groups of small group size.
-
48 items are analyzed and classified into 18 groups according to a given match
rule and after excluding items that are unique, by setting the Hide groups less than parameter to 2. -
11 groups have 2 items each. In each group, the 2 items are duplicates of each
other. -
3 groups have 3 items each. In each group, these items are duplicates of one
another. -
3 groups have 4 items each. In each group, these items are duplicates of one
another. -
One single group has 5 duplicate items.
Matching table
From the matching table, you can read details about the different duplicates.
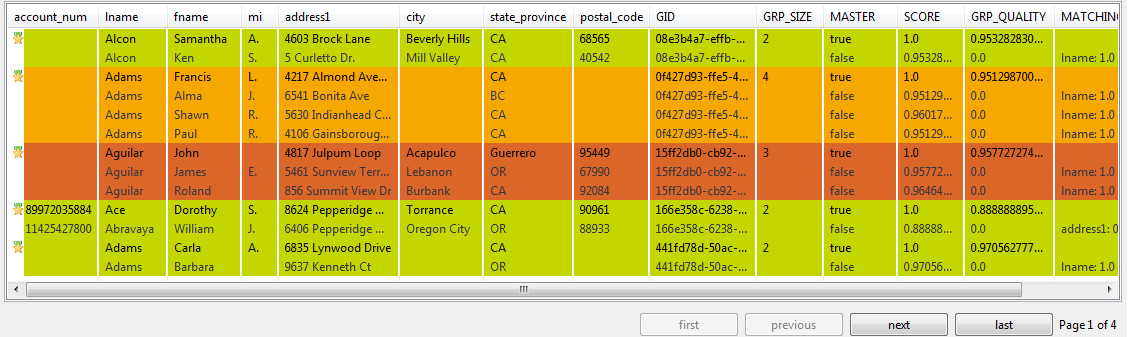
This table indicates the matching details of items in each group and colors the groups in
accordance with their color in the matching chart.
You can decide what groups to show in this table by setting the Hide
groups of less than parameter. This parameter enables you to hide groups of small
group size. It is set to 2 by default.
The buttons under the table helps you to navigate back and forth through pages.
Importing match rules from the studio repository
From the tMatchGroup configuration wizard, you can import
match keys from the match rules created and tested in the
Profiling
perspective
of
Talend Studio
. You can then use these imported matching keys in your match
Jobs.
The tMatchGroup component enables you to import from the
Studio repository match rules based on the VSR or the T-Swoosh algorithms.
The VSR algorithm takes a set of records as input and groups similar encountered
duplicates together according to defined match rules. It compares pairs of records and
assigns them to groups. The first processed record of each group is the master record of the
group. The VSR algorithm compares each record with the master of each group and uses the
computed distances, from master records, to decide to what group the record should go.
The T-Swoosh algorithm enables you to find duplicates and to define how
two similar records are merged to create a master record, using a survivorship function.
These new merged records are used to find new duplicates. The difference with the VSR
algorithm is that the master record is in general a new record that does not exist in
the list of input records.
-
From the configuration wizard, click the

icon on the top right corner.
The [Match Rule Selector] wizard opens listing
all match rules created in the studio and saved in the repository.
-
Select the match rule you want to import into the tMatchGroup component and use on your data.
A warning message displays in the wizard if the match rule you want to import is
defined on columns that do not exist in the input schema of tMatchGroup. You can define input columns later in the configuration
wizard.It is important to have the same type of the matching algorithm selected in the
basic settings of the component and imported from the configuration wizard.
Otherwise the Job runs with default values for the parameters which are not
compatible between the two algorithms. -
Select the Overwrite current Match Rule in the
analysis check box if you want to replace the rule in the
configuration wizard with the rule you import.If you leave the box unselected, the match keys will be imported in a new match
rule tab without overwriting the current match rule in the wizard. -
Click OK.
The matching key is imported from the match rule and listed as a new rule in the
configuration wizard.
-
Click in the Input Key Attribute and select from
the input data the column on which you want to apply the matching key. -
In the Match threshold field, enter the match
probability threshold. Two data records match when the computed match score is above
this value. -
In the Blocking Selection table, select the
column(s) from the input flow which you want to use as a blocking key.Defining a blocking key is not mandatory but advisable. Using a blocking key
partitions data in blocks and so reduces the number of records that need to be
examined, as comparisons are restricted to record pairs within each block. Using
blocking key(s) is very useful when you are processing big data set.The Blocking Selection table in the component is
different from the Generation of Blocking Key table
in the match rule editor in the
Profiling
perspective.The blocking column in tMatchGroup could come
from a tGenKey component (and would be called
T_GEN_KEY) or directly from the input schema (it could be a
ZIP column for instance). While the Generation of Blocking Key table in the match rule editor defines
the parameters necessary to generate a blocking key; this table is equivalent to the
tGenKey component. The Generation of Blocking Key table generates a blocking column
BLOCK_KEY used for blocking. -
Click the Chart button in the top right corner of
the wizard to execute the Job using the imported match rule and show the matching
results in the wizard.
Matching two records
and define how to merge similar records to create a master record.
Creating a master record is an iterative process: each new master record can be used to
find new duplicates.
You can choose between two different algorithms to create master records:
-
Simple VSR Matcher
-
T-Swoosh
The main difference between the two algorithms is that T-Swoosh creates, for each master
record, a new record that does not exist in the list of input records.
Matching measures
functions, such as Exact, Levenshtein and
Jaro-Winkler, or a custom matching algorithm you
created.
You can also compare two records on many attributes. For two records to match, the two
following conditions must hold:
-
When using the T-Swoosh algorithm, the score for each matching function in the
match rule must exceed the threshold, if any specified. By default, the
threshold is set to 1. This means exact match for most
matching functions, excepted for Exact – ignore case and
potentially any custom matching function. -
The global score, computed as a weighted score of the different matching
functions, must exceed the match threshold. The score is equal to
Σ(wi ×
si(r1,r2)) / Σwi where
wi is the confidence
weight of the matching function i and
si(r1,r2)
is the score of the matching function i over
records r1 and
r2.

In this example, the score for the Levenshtein metric on the
attribute country must exceed 0.7 and
the global score, with a confidence weight of 1 on each of
the two measures, must exceed 0.85.
This example shows the weighted average computation that yields the global score of
two similar records.
Match rules
Two records match if at least one of the match rules is satisfied. As soon as two records
match according to a given rule, the other rules are not checked.
Matching several records
Blocking
or many blocking keys to split the input dataset into smaller datasets called
blocks.
In each block, the blocking keys must have the same value. Then, each block is processed
independently.
Using blocking keys reduces the time needed by the Simple VSR Matcher and the T-Swoosh
algorithms to process data. For example, if 100,000 records are split into 100 blocks of
1,000 records each, the number of comparisons are reduced by a factor 100. This means
the algorithm runs around 100 times faster.
It is recommended to use the tGenKey component to generate
blocking keys and to visualize the statistics regarding the number of blocks. In a Job,
right-click the tGenKey component and select View Key
Profile in the contextual menu to visualize the distribution of the
number of blocks according to their size.
In this example, the average block size is around 40.
For the 13 blocks with 38 rows, there a 18,772 comparisons in these 13 blocks (13 × 382).
If records are compared with four columns, this means there will be 75,088 string
comparisons in these 13 blocks (18,772 × 4).
The Simple VSR Matcher algorithm
previous master records in the lookup table.
If a record does not match any of the previous master records, it is considered as a new
master record and added to the lookup table. This means that the first record of the
dataset is necessarily a master record.
When a record matches a master record, the Simple VSR Matcher algorithm does not further
attempt to match with other master records because all the master records in the lookup
table are not similar. So, once a record matches a master record, the chance of matching
another master record is low.
This means a record can only exist in one group of records and be linked to one master
record.
For example, take the following set of records as input:
|
id |
fullName |
|---|---|
|
1 |
John Doe |
|
2 |
Donna Lewis |
|
3 |
John B. Doe |
|
4 |
Louis Armstrong |
The algorithm processes the input records as follows:
- The algorithm takes record 1 and compares it with an empty set of records. Since
record 1 does not match any record, it is added to the lookup table. - The algorithm takes record 2 and compares it with record 1. Since it is not a match,
record 2 is added to the lookup table. -
The algorithm takes record 3 and compare it with record 1 and record 2. Record 3
matches record 1. So, record 3 is added to the group of record 1. -
The algorithm takes record 4 and compares it with record 1 and record 2 but not
with record 3, which is not a master record. Since it is not a match, record 4
is added to the lookup table.
The output will look like this:
|
id |
fullName |
Grp_ID |
Grp_Size |
Master |
Score |
GRP_QUALITY |
|---|---|---|---|---|---|---|
|
1 |
John Doe |
0 |
2 |
true |
1.0 |
0.72 |
|
3 |
John B. Doe |
0 |
0 |
false |
0.72 |
0 |
|
2 |
Donna Lewis |
1 |
1 |
true |
1.0 |
1.0 |
|
4 |
Louis Armstrong |
2 |
1 |
true |
1.0 |
1.0 |
The T-Swoosh algorithm
but it creates a master record instead of considering existing records to be master
records.
To create master records, you can design survivorship rules to decide which attribute
will survive.
There are two types of survivorship rules:
-
The rules related to matching keys: each attribute used as a matching key can
have a specific survivorship rule. -
The default rules: they are applied to all the attributes of the same data type
(Boolean, String, Date, Number).
If a column is a matching key, the rule related to matching keys specific to this column
is applied.
If the column is not a matching key, the default survivorship rule for this data type is
applied. If the default survivorship rule is not defined for the data type, the
Most common survivorship function is used.
Each time two records are merged to create a new master record, this new master record is
added to the queue of records to be examined. The two records that are merged are
removed from the lookup table.
For example, take the following set of records as input:
|
id |
fullName |
|---|---|
|
1 |
John Doe |
|
2 |
Donna Lewis |
|
3 |
John B. Doe |
|
4 |
Louis Armstrong |
The survivorship rule uses the Concatenate function with
, as a parameter to separate values.
At the beginning of the process, the queue contains all the input records and the lookup
is empty. To process the input records, the algorithm iterates until the queue is
empty:
-
The algorithm takes record 1 and compares it with an empty set of records. Since
record 1 does not match any record, it is added to the set of master records.
The queue contains now record 2, record 3 and record 4. The lookup contains
record 1. -
The algorithm takes record 2 and compares it with record 1. Since record 2 does
not match any record, it is added to the set of master records. The queue
contains now record 3 and record 4. The lookup contains record 1 and record
2. -
The algorithm takes record 3 and compares it with record 1. Record 3 matches
record 1. So, record 1 and record 3 are merged to create a new master record
called record 1,3. The queue contains now record 4 and record 1,3. The lookup
contains record 2. -
The algorithm takes record 4 and compares it with record 2. Since it is not a
match, record 4 is added to the set of master records. The queue contains now
record 1,3. The lookup table contains record 2 and record 4. -
The algorithm takes record 1,3 and compares it with record 2 and record 4. Record
1,3 matches record 4. So, record 1,3 and record 4 are merged to create a new
master record called record 1,3,4. Record 4 is removed from the lookup table.
Since record 1,3 was the result of a previous merge, it is removed from the
table. The queue now contains record 1,3,4. The lookup contains record 2. -
The algorithm takes record 1,3,4 and compares it with record 2. Since it is not a
match, record 1,3,4 is added to the set of master records. The queue is now
empty. The lookup contains records 1,3,4 and record 2.
The output will look like this:
|
id |
fullName |
GRP_ID |
GRP_SIZE |
MASTER |
SCORE |
GRP_QUALITY |
|---|---|---|---|---|---|---|
|
1,3,4 |
John Doe, John B. Doe, Johnnie B. Doe |
0 |
3 |
true |
1.0 |
0.72 |
|
1 |
John Doe |
0 |
0 |
false |
0.72 |
0 |
|
3 |
John B. Doe |
0 |
0 |
false |
0.72 |
0 |
|
4 |
Johnnie B. Doe |
0 |
0 |
true |
0.78 |
0 |
|
2 |
Donna Lewis |
1 |
1 |
true |
1.0 |
1.0 |
The differences between the Simple VSR Matcher and the T-Swoosh algorithms
When processing the input data using the Simple VSR Matcher algorithm, there
may be more iterations than the number of input records because a merged record may be
created on each iteration and added to the queue.
This is one of the main differences
between the Simple VSR Matcher and the T-Swoosh algorithms.
comparisons per iteration than the Simple VSR matcher algorithm:
-
When using the Simple VSR matcher algorithm, the record from the queue is
only compared with the value of the master record. -
When using the T-Swoosh algorithm, the record from the queue is compared with
the value of the master record and the value of each of the records used to
build this master record.You can find an example of how to survive master
records using the T-Swoosh algorithm in Talend Help Center (https://help.talend.com).In this example, the record “John Doe, John B. Doe” is compared with the
record “John B. Doe” on iteration 5. There is a match if at least one of the
three strings “John Doe, John B. Doe”, “John Doe” and “John B. Doe” matches
the string “Johnnie B. Doe”.
Multi-pass matching
You can design a Job with consecutive tMatchGroup components
to create data partitions based on different blocking keys.
For example, you want to find duplicates having either the same city or the same zip code
in a customer database. In this particular case, you can use two consecutive
tMatchGroup to process the data partitions:
-
One tMatchGroup in which the column “city” is defined as a
blocking key. -
One tMatchGroup in which the column “ZipCode” as a
blocking key.
What is multi-pass matching?
The idea behind multi-pass matching is to reuse the master records defined in the
previous pass as the input of the current tMatchGroup
component. Multi-pass matching is more effective if the blocking keys are almost not
correlated. For example, it is not relevant to define the column “country” as a
blocking key and the column “city” as another blocking key because all the
comparisons made with the blocking key “city” will also be done with blocking key
“country”.
When using multi-pass matching with the VSR algorithm, only master records of size 1
– records that did not match any record – are compared with master records of any
size. There are no comparisons between two master records that are derived from at
least two children each.
An example of multi-pass matching
In the following example, the dataset contains four records. It is assumed that the
first tMatchGroup component has a blocking key on the column
“ZipCode”, and the second tMatchGroup component has a
blocking key on the column “city”. The attribute “name” is used as a matching
key.
|
id |
name |
city |
ZipCode |
|---|---|---|---|
|
1 |
John Doe |
Nantes |
44000 |
|
2 |
John B. Doe |
Nantes |
|
|
3 |
Jon Doe |
Nantes |
44000 |
|
4 |
John Doe |
Nantes |
After the first pass, records 1 and 3 are grouped, and records 2 and 4 are grouped.
In these groups, record 1 and record 2 are master records.
In the second tMatchGroup, only the master records from the
first pass, record 1 and record 2, are compared. Since their group size is strictly
greater than 1, they are not compared.
The following results are returned:
|
id |
name |
city |
ZipCode |
GID |
GRP_SIZE |
MASTER |
SCORE |
GRP_QUALITY |
|---|---|---|---|---|---|---|---|---|
|
1 |
John Doe |
Nantes |
44000 |
0 |
2 |
true |
1.0 |
0.875 |
|
3 |
Jon Doe |
Nantes |
44000 |
0 |
0 |
false |
0.85 |
0 |
|
2 |
John B. Doe |
Nantes |
1 |
2 |
true |
1.0 |
0.72 |
|
|
4 |
John Doe |
Nantes |
1 |
0 |
false |
0.72 |
0 |
When running the T-Swoosh algorithm with the same parameters and the Most
common survivorship function, the following results are
returned:
|
id |
name |
city |
ZipCode |
GID |
GRP_SIZE |
MASTER |
SCORE |
GRP_QUALITY |
|---|---|---|---|---|---|---|---|---|
|
1 |
John Doe |
Nantes |
44000 |
0 |
4 |
true |
1.0 |
0.72 |
|
1 |
John Doe |
Nantes |
44000 |
0 |
0 |
true |
0.875 |
0 |
|
3 |
Jon Doe |
Nantes |
44000 |
0 |
0 |
false |
0.875 |
0 |
|
2 |
John B. Doe |
Nantes |
0 |
0 |
true |
0.72 |
0 |
|
|
4 |
John Doe |
Nantes |
1 |
0 |
false |
0.72 |
0 |
Scenario 1: Grouping output data in separate flows according to the minimal distance
computed in each record
This scenario applies only to a subscription-based Talend Platform solution or Talend Data Fabric.
Jaro-Winkler matching method on the
lname and fname column and the q-grams matching method on the address1
column. It then groups the output records in three output flows:
-
Uniques: lists the records which group
score (minimal distance computed in the record) is equal to
1. -
Matches: lists the records which group
score (minimal distance computed in the record) is higher than the threshold
you define in the Confidence threshold
field. -
Suspects: lists the records which group
score (minimal distance computed in the record) is below the threshold you
define in the Confidence threshold
field.
For another scenario that groups the output records in one single output flow, see
Scenario 2: Comparing columns and grouping in the output flow duplicate records that have the same functional key.
Setting up the Job
- Drop the following components from the Palette onto the design workspace: tFileInputExcel, tMatchGroup and three tLogRows.
-
Connect tFileInputExcel to tMatchGroup using the Main
link. -
Connect tMatchGroup to the three
tLogRow components using the Unique rows, Confident
groups and Uncertain groups
links.Warning:To be able to set three different output flows for the processed
records, you must first select the Separate
output check box in the Advanced
settings view of the tMatchGroup component. For further information, see the
section about configuring the tMatchGroup component.
Configuring the input component
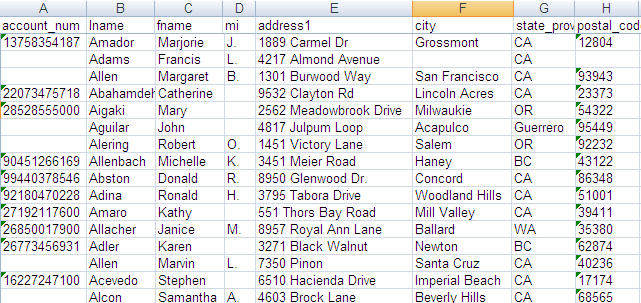
The main input file contains eight columns: account_num,
lname, fname,
mi, address1,
city, state_province and
postal_code. The data in this input file has problems
such as duplication, names spelled differently or wrongly, different information
for the same customer.
You can create the input file used in this scenario if you execute the
c0 and c1 Jobs included in the
data quality demo project, TDQEEDEMOJAVA, you can import from the login window
of your
Talend Studio
. For
further information, see the
Talend Studio User
Guide.
-
In the Basic settings view of tFileInputExcel, fill in the File Name field by browsing to the input file
and set other properties in case they are not stored in the Repository.
-
Create the schema through the Edit Schema
button, if the schema is not already stored in the Repository. Remember to set the data type in the Type column.
Configuring the tMatchGroup component
-
Double-click tMatchGroup to display the
Basic settings view and define the
component properties. -
From the Matching Algorithm list, select
Simple VSR.In this scenario, the match rule is based on the VSR algorithm. -
Click Sync columns to retrieve the schema
from the preceding component. -
Click the Edit schema button to view the
input and output schema and do any modifications in the output schema, if
necessary.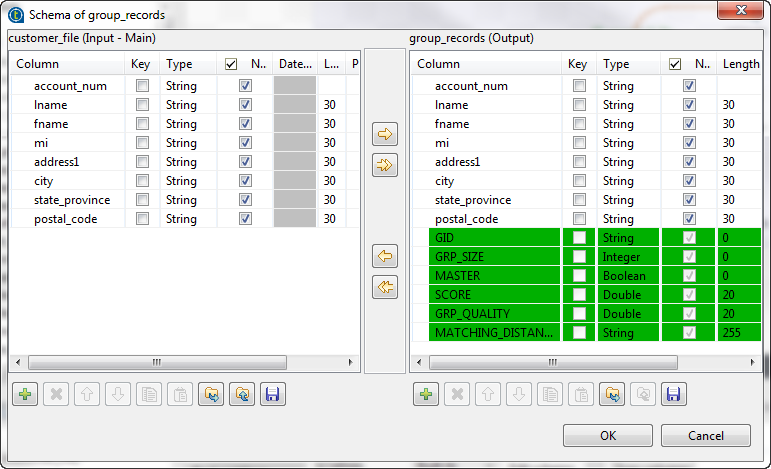 In the output schema of this component there are few output standard columns
that are read-only. For more information, see tMatchGroup Standard properties. - Click OK to close the dialog box.
-
Click Preview to open the configuration
wizard and define the component configuration and the match rule(s).
You can use the configuration wizard to import match rules created and tested
in the studio and stored in the repository, and use them in your match Jobs. For
further information, see Importing match rules from the studio repository.It is important to import or define the same type of the rule selected in the
basic settings of the component, otherwise the Job runs with default values for
the parameters which are not compatible between the two algorithms. -
Define the first match rule as the following:
-
In the Key definition table, click
the [+] button to add to the list the
column(s) on which you want to do the matching operation,
lname and fname.Note:When you select a date column on which to apply an algorithm or a matching algorithm,
you can decide what to compare in the date format.For example, if you want to only compare the year in the date, in the component schema
set the type of the date column to Date and then enter
“yyyy” in the Date
Pattern field. The component then converts the date format to a string
according to the pattern defined in the schema before starting a string
comparison. -
Click in the Matching Function column
and select from the list Jaro-Winkler
as the method to be used for the matching operation.If you select custom as a matching
type, you must set in the Custom Matcher
column the path pointing to the custom class (external
matching algorithm) you need to use. This path is defined by yourself in
the library file (.jar file). -
From the Tokenized measure list,
select not to use a tokenized distance for the selected
algorithms. -
Click in the cell of the Weight
column to set the numerical weights for the two columns used as key
attributes. -
Click in the cell of the Handle Null
column and select the null operator you want to use to handle null
attributes in the columns. In this example, select Null Match None in order to have matching results where
null values have minimal effect. -
Set the match probability in the Match
Interval field.
-
-
Follow the same procedure in the above step to define the second match rule.
Set the address1 column as an input attribute and select
Jaro as the matching type. Select Null Match None as the null operator. And finally set
the match probability which can be different from the one set for the first
rule. -
Set the Hide groups of less than parameter in
order to decide what groups to show in the result chart and matching table. This
parameter enables you to hide groups of small group size. -
Click the Advanced settings tab and set the
advanced parameters for the tMatchGroup
component as the following: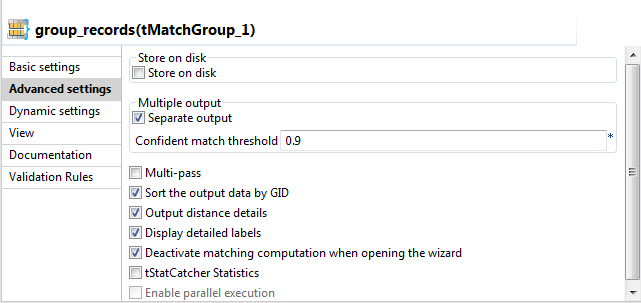
-
Select the Separate output check box.
The component will have three separate output flows: Unique rows, Confident
groups and Uncertain
groups.If this check box is not selected, the tMatchGroup component will have only one output flow
where it groups all output data. For an example scenario, see Scenario 2: Comparing columns and grouping in the output flow duplicate records that have the same functional key. -
Select the Sort the output data by
GID check box to sort the output data by their group
identifier. -
Select the Output distance details
and Display detailed labels check
boxes.The component will output the MATCHING_DISTANCES
column. This column provides the distance between the input and the
master columns giving also the names of the columns against which the
records are matched. -
Select the Deactivate matching computation when
opening the wizard check box if you do not want to run
the match rules the next time you open the wizard.
-
-
Click the Chart button in the wizard to
execute the Job in the defined configuration and have the matching results
directly in the wizard.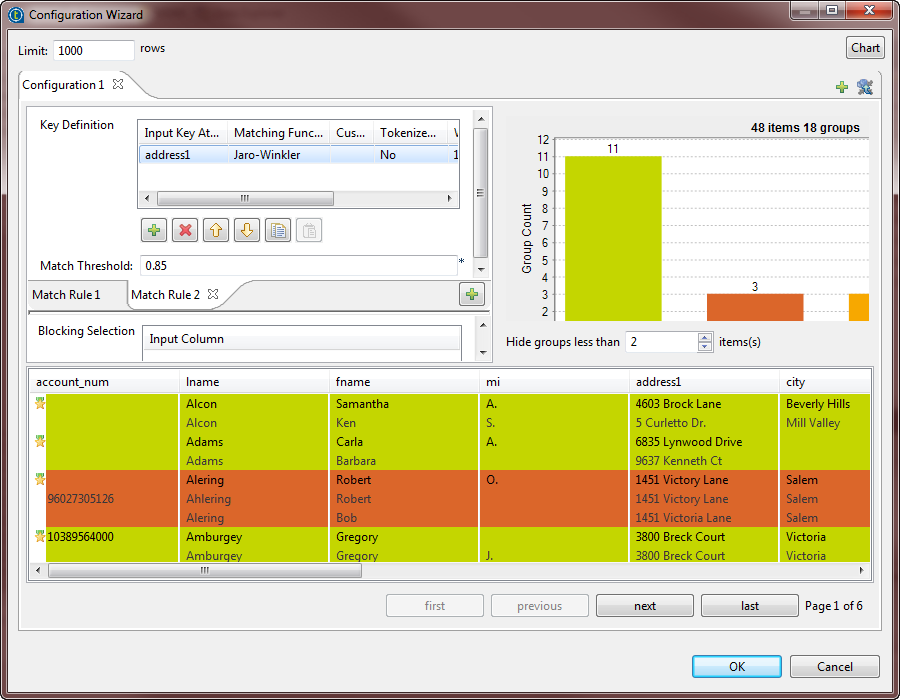 The matching chart gives a global picture about the duplicates in the analyzed
data. The matching table indicates the details of items in each group and colors
the groups in accordance with their color in the matching chart.The Job conducts an OR match operation on the records. It evaluates the
records against the first rule and the records that match are not evaluated
against the second rule. The MATCHING_DISTANCES
column allows you to understand which rule has been used on what records. In
the yellow data group for example, the Amole Sarah record
is matched according to the second rule that uses address1
as a key attribute, whereas the other records in the group are matched according
to the first rule which uses the lname and
fname as key attributes.You can set the Hide groups of less than
parameter in order to decide what groups to show in the matching chart and
table
Finalizing the Job and executing it
-
Double-click each of the tLogRow
components to display the Basic
settings view and define the component properties. -
Save your Job and press F6 to execute
it.You can see that records are grouped together in three different groups.
Each record is listed in one of the three groups according to the value of
the group score which is the minimal distance computed in the group.The identifier for each group, which is of String
data type, is listed in the GID column next to the
corresponding record. This identifier will be of the data type
Long for Jobs that are migrated from older
releases. To have the group identifier as String, you
must replace the tMatchGroup component in
the imported Job with tMatchGroup from the
studio Palette.The number of records in each of the three output blocks is listed in the
GRP_SIZE column and computed only on the master
record. The MASTER column indicates with true or false
if the corresponding record is a master record or not a master record. The
SCORE column lists the calculated distance between
the input record and the master record according to the Jaro-Winkler and Jaro matching algorithms.The Job evaluates the records against the first rule and the records that
match are not evaluated against the second rule.All records which group score is between the match interval,
0.95 or 0.85 depending on the
applied rule, and the confidence threshold defined in the advanced settings
of tMatchGroupare listed in the Suspects output flow.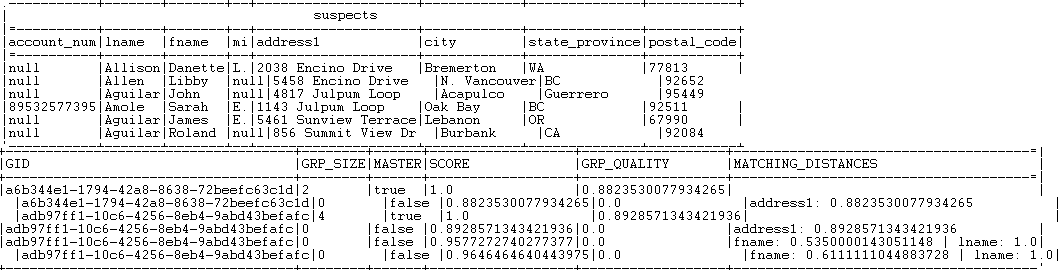 All records which group score is above one of the match probabilities are
listed in the Matches output flow. All records that have a group size equal to 1 is listed in the Uniques output flow.
For another scenario that groups the output records in one single output flow
based on a generated functional key, see Scenario 2: Comparing columns and grouping in the output flow duplicate records that have the same functional key.
Scenario 2: Matching customer data through multiple passes
This scenario applies only to a subscription-based Talend Platform solution or Talend Data Fabric.
The Job in this scenario, groups similar customer records by running through two
subsequent matching passes (tMatchGroup components) and
outputs the calculated matches in groups. Each pass provides its matches to the pass
that follows in order for the latter to add more matches identified with new rules and
blocking keys.

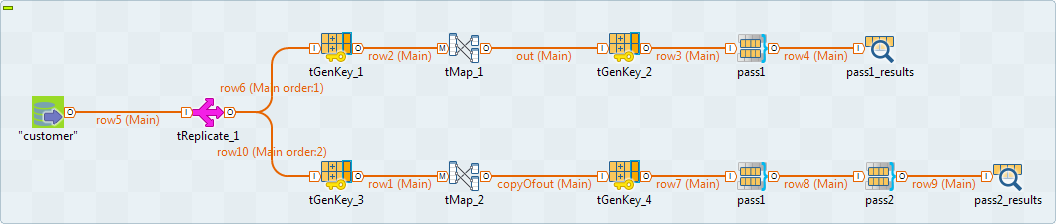
In this Job:
-
The tMysqlInput component connects to the
customer records to be processed. -
Each of the tGenKey components defines a way
to partition data records. The first key partitions data to many groups and the
second key creates fewer groups that overlaps the previous blocks depending on
the blocking key definition. -
The tMap component renames the key generated
by the second tGenKey component. -
The first tMatchGroup processes the
partitions defined by the first tGenKey, and
the second tMatchGroup processes those defined
by the second tGenKey.Warning:The two tMatchGroup components must
have the same schema. -
The tLogRow component presents the matching
results after the two passes.
Setting up the Job
In this scenario, the main input schema is already stored in the Repository. For more information about storing schema
metadata in the repository, see the
Talend Studio User
Guide.
-
In the Repository tree view, expand
Metadata – DB
Connections where you have stored the main input schema and
drop the database table onto the design workspace. The input table used in
this scenario is called customer.A dialog box is displayed with a list of components. - Select the relevant database component, tMysqlInput in this example, and then click OK.
-
Drop two tGenKey components, two
tMatchGroup components, a tMap and a tLogRow components from Palette onto the design workspace. -
Link the input component to the tGenKey
and tMap components using Main links. -
In the two tMatchGroup components, select the
Output distance details check boxes in the
Advanced settings view of both components
before linking them together.This will provide the MATCHING_DISTANCES column in the
output schema of each tMatchGroup.If the two tMatchGroup components are already
linked to each other, you must select the Output distance
details check box in the second component in the Job flow first
otherwise you may have an issue. -
Link the two tMatchGroup components and
the tLogRow component using Main links. -
If needed, give the components specific labels to reflect their usage in
the Job.For further information about how to label a component, see
Talend Studio
User Guide.
Configuring input data and key generation
Connecting to the input data
-
Double-click tMysqlInput to open its
Component view. The property fields for tMysqlInput are
automatically filled in. If you do not define your input schema locally in
the repository, fill in the details manually after selecting Built-in in the Schema and Property Type
lists.The input table used in this scenario is called
customer. -
Modify the query in the Query box to
select only the columns you want to match:
account_name, lname,
fname, mi,
address1, city,
state_province and
postal_code.
Configuring the key generation for the first pass
-
Double-click the first tGenKey to open
the Component view.
-
Click
and import blocking keys from match rules created and
tested in the
Profiling
perspective
of
Talend Studio
and use them in your Job. Otherwise,
define the blocking key parameters as described in the below steps. -
Under the Algorithm table, click the
[+] button to add two rows in the
table. -
In the column column, click the newly added row and
select from the list the column you want to process using an algorithm. In this
example, select lname. -
Do the same on the second row to select
postal_code. -
In the pre-algorithm column, click the newly
added row and select from the list the pre-algorithm you want to apply to the
corresponding column.In this example, select remove diacritical marks and
convert to upper case to remove any diacritical mark and converts
the fields of the lname column to upper
case.This conversion does not change your raw data. -
In the algorithm column, click the newly
added row and select from the list the algorithm you want to apply to the
corresponding column. In this example, select N first
characters of each word.If you select the Show help check box, you
can display instructions on how to set algorithms/options parameters. -
Do the same for the second row on the algorithm column to select first N
characters of the string. -
Click in the Value column next to the
algorithm column and enter the value for
the selected algorithm, when needed.In this scenario, enter 1 for both rows. The first letter
of each field in the corresponding columns will be used to generate the
key.Make sure to set a value for the algorithm which need one, otherwise you may
have a compilation error when you run the Job.
Configuring the key generation for the second pass
-
Double-click the second tGenKey to open
the Component view.
-
In the Algorithm table, define the column
you want to use to partition data, account_num in this
component. Select the first N characters of the
string algorithm and set the value to 1
in the Value column.Each of the two tGenKey components will
generate a read_only T_GEN_KEY column in
the output schema. You must rename one of theT_GEN_KEY columns to stop them from overwriting each
other. -
Double-click the tMap component to open
its editor.
-
In the Schema editor, copy the columns
from the first table onto the second table and rename T_GEN_KEY to T_GEN_KEY1, for example. -
In the top part of the editor, drop all columns from the input table to
the output table. -
Click Ok to save data transformation and
close the editor. -
In the tGenKey basic settings, click the

button to verify that the two generated keys are named
differently in the output schema.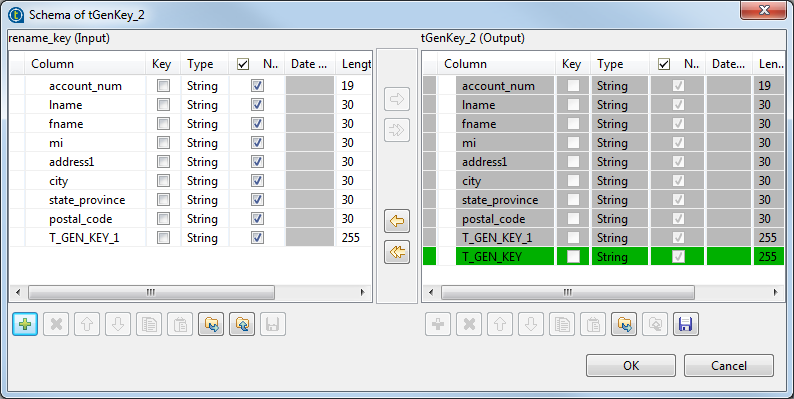
Configuring the two matching passes
Configuring the first pass
-
In the basic settings of the tMatchGroup
labelled pass1, select Simple VSR from the Matching
Algorithm list.In this scenario, the match rule is based on the VSR algorithm. -
Click the Preview button to display the
Configuration Wizard.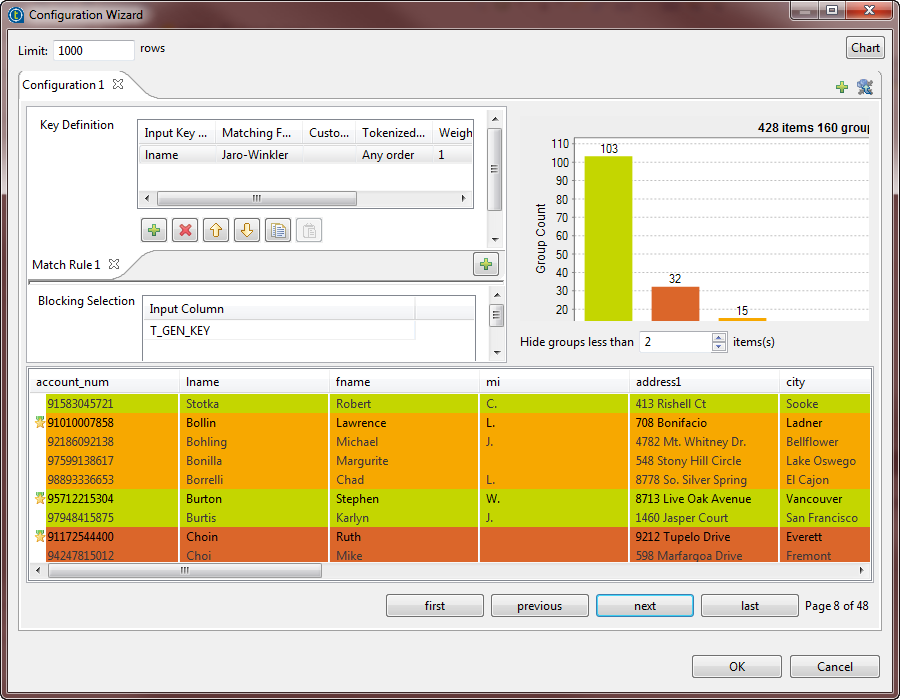
-
Click
and import matching keys from the match rules created and
tested in the
Profiling
perspective of
Talend Studio
and use them in your Job. Otherwise, define
the matching key parameters as described in the below steps.It is important to import or define the same type of the rule selected in the
basic settings of the component, otherwise the Job runs with default values for
the parameters which are not compatible between the two algorithms. -
In the Key definition table, click the
[+] button to add the column(s) on which
you want to do the matching operation, lname
in this scenario.Note:When you select a date column on which to apply an algorithm or a matching algorithm,
you can decide what to compare in the date format.For example, if you want to only compare the year in the date, in the component schema
set the type of the date column to Date and then enter
“yyyy” in the Date
Pattern field. The component then converts the date format to a string
according to the pattern defined in the schema before starting a string
comparison. - Select the Jaro-Winkler algorithm in the Matching Function column.
-
From the Tokenized measure list, select
Any order. -
Set Weight to 1 and in
the Handle Null column, select the null
operator you want to use to handle null attributes in the column, Null Match Null in this scenario. -
Click the [+] button below the Blocking Selection table to add one row in the table
then click in the line and select from the list the column you want to use as a
blocking value, T_GEN_KEY in this example.Using a blocking value reduces the number of pairs of records that needs to be
examined. The input data is partitioned into exhaustive blocks based on the
functional key. This will decrease the number of pairs to compare, as comparison
is restricted to record pairs within each block. -
If required, click Edit schema to open the
schema editor and see the schema retrieved from the previous component in the
Job.
-
Click the Advanced settings tab and select
the Sort the output data by GID check box to
arrange the output data by their group IDs. -
Select the Deactivate matching computation when opening
the wizard check box if you do not want to run the match rules
the next time you open the wizard.
Configuring the second pass
-
In the basic settings of the tMatchGroup
labelled pass2, select Simple VSR from the Matching
Algorithm list.In this scenario, the match rule is based on the VSR algorithm. -
Click the Preview button to display the
Configuration Wizard.If this component does not have the same schema of the preceding component, a
warning icon appears. If so, click the Sync
columns button to retrieve the schema from the preceding one and
once done, the warning icon disappears. -
In the Key Definition table, click
the [+] button to add the column(s) on
which you want to do the matching operation, lname in this scenario.Note:When you select a date column on which to apply an algorithm or a matching algorithm,
you can decide what to compare in the date format.For example, if you want to only compare the year in the date, in the component schema
set the type of the date column to Date and then enter
“yyyy” in the Date
Pattern field. The component then converts the date format to a string
according to the pattern defined in the schema before starting a string
comparison. - Select the Jaro-Winkler algorithm in the Matching Function column.
-
Set Weight to 1 and in
the Handle Null column, select the null
operator you want to use to handle null attributes in the column, Null Match Null in this scenario. -
Click the [+] button below the Blocking Selection table to add one row in the table
then click in the line and select from the list the column you want to use as a
blocking value, T_GEN_KEY1 in this example.
-
Click the Advanced settings tab and select
the Multi-pass check box. This option enables
tMatchGroup to receive data sets from the
tMatchGroup that precedes it in the Job.
-
In the Advanced settings view, select the
Sort the output data by GID check box to
arrange the output data by their group IDs. -
Select the Deactivate matching computation when opening
the wizard check box if you do not want to run the match rules
the next time you open the wizard.
Executing the Job and showing the results on the console
them with the groups created after the second pass, you must modify the Job as
the following:
-
-
Use a tReplicate component to
replicate the input flow you want to process as shown in the above
figure. Use a copy/paste operation to create the two parts of the
Job. -
Keep only the first pass,tMatchGroup component, in the upper part of the Job
and show the match results in a tLogRow component. -
Use two passes in the lower part of the Job and show the final
match results in a tLogRow
component.
-
Double-click each of the tLogRow
components to open the Component view and
in the Mode area, select the Table (print values in cells of a table)
option. -
Save your Job and press F6 to execute
it.The results after the first pass read as follows: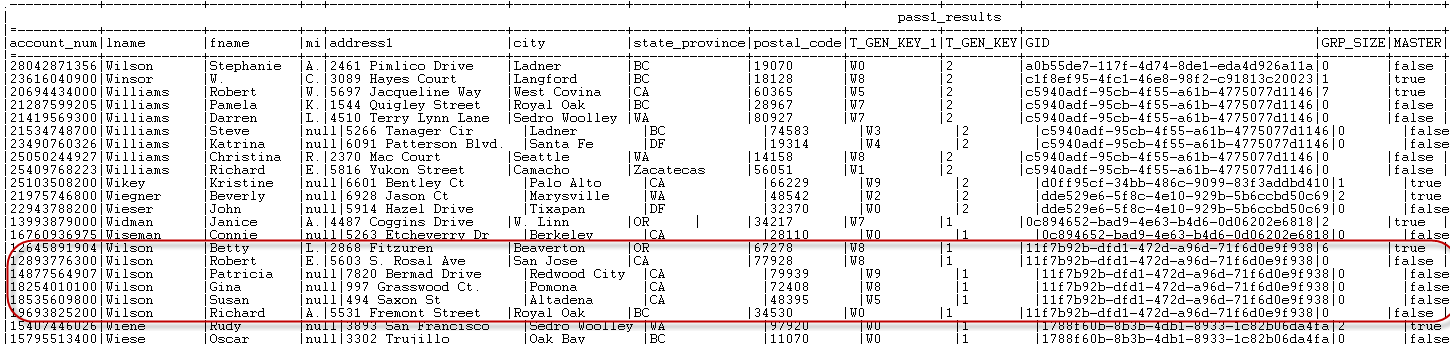 The results after the second pass read as follows:
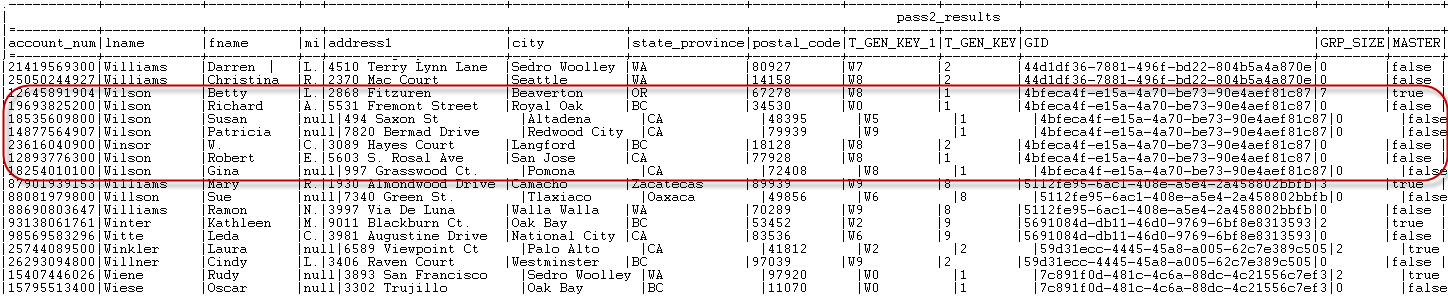 When you compare, for example, the customer name Wilson from the results of the two passes, you will find
that more customers using the last name Wilson are grouped together after the second pass.
Scenario 3: Using survivorship functions to merge two records and create a master
record
This scenario applies only to a subscription-based Talend Platform solution or Talend Data Fabric.
This scenario describes a basic Job that uses the T-Swoosh algorithm to find duplicates in
customer names. It compares values in the first_name column using
matching and survivorship methods, groups similar records together and creates single
representations of entities in each group by merging two similar records according to a
survivorship rule.
These master records are new records that do not exist in the input data.

You can use several matching passes with the T-Swoosh algorithm in a Job. Each pass
provides the survived masters for each group and the original records to the second pass.
However, intermediate master records are removed from the output flow. Only final master and
original records are kept at the end.
In this Job:
-
The tFileInputDelimited component provides the
customer records to be processed. -
The tMatchGroup component processes data using
matching and survivorship methods. -
The tLogRow component presents the matching and
survivorship results.
Setting up the Job
In this scenario, the main input schema is already stored in the Repository. For more information about storing schema metadata in the
repository, see the
Talend Studio User Guide.
-
In the Repository tree view, expand Metadata – File
delimited where you have stored the main input schema and drop
the file connection onto the design workspace. The file connection used in this
scenario is called Customer_File.A dialog box is displayed with a list of components. -
Select tFileInputDelimited and click
OK. - Drop a tMatchGroup and a tLogRow from the Palette onto the design workspace.
-
Link the components together using the Main
links.
Configuring the input component
The main input file contains the columns: id,
first_name and age. The data in this input
file has problems such as duplication, names spelled differently or wrongly, different
information for the same customer.
-
Double-click tFileInputDelimited to open its
Component view. The property fields are automatically filled in. If you do not define your
input schema locally in the repository, fill in the details manually after
selecting Built-in in the Schema and Property Type
lists. -
Create the schema through the Edit Schema
button, if the schema is not already stored in the Repository. Remember to set the data type in the Type column.
Creating the match rule with a matching key and a survivorship function
Setting the schema and selecting the matching algorithm
-
Double-click tMatchGroup to display the
Basic settings view and define the
component properties. -
From the Matching Algorithm list, select
T-Swoosh.In this scenario, the match rule is based on the T-Swoosh algorithm. -
Click Sync columns to retrieve the schema
from the preceding component. -
Click the Edit schema button to view the
input and output schema and do any modifications in the output schema, if
necessary. In the output schema of this component there are few output standard columns
that are read-only. For more information, see tMatchGroup Standard properties. -
In the Advanced settings view, leave the
parameters selected by default.
Defining the match rule
-
In the tMatchGroup basic settings, click
Preview to open the configuration wizard
and define the matching key and the survivorship function.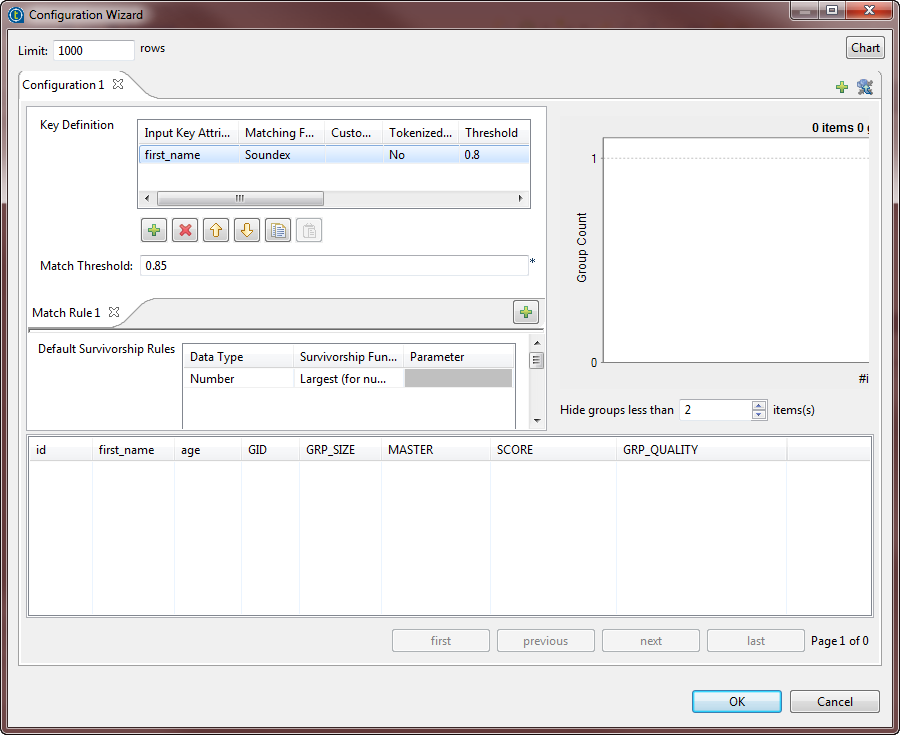 You can use the configuration wizard to import match rules created and tested
in the studio and stored in the repository, and use them in your match Jobs. For
further information, see Importing match rules from the studio repository.It is important to have the same type of the matching algorithm selected in
the basic settings of the component and defined in the configuration wizard.
Otherwise the Job runs with default values for the parameters which are not
compatible between the two algorithms. -
Define the match rule as the following:
-
In the Key definition table, click
the [+] button to add a line in the
table. Click in the Input Key Attribute
column and select the column on which you want to do the matching
operation, first_name in this scenario. -
Click in the Matching Function column
and select Soundex from the list. This
method matches processed entries according to a standard English
phonetic algorithm which indexes strings by sound, as pronounced in
English. -
From the Tokenized measure list,
select not to use a tokenized distance for the selected
algorithm. -
Set the Threshold to 0.8 and the Confidence Weight to 1.
-
Select Null Match None in the
Handle Null column in order to have
matching results where null values have minimal effect. -
Select Most common in the Matching Function column. This method
validates the most frequent name value in each group of
duplicates.
-
-
Define the survivorship rule as the following:
-
In the Default Survivorship Rules
table, click the [+] button to add a
line in the table. Click in the Data
Type column and select Number. -
Click in the Survivorship Function
column and select Largest (for numbers)
from the list. This method validates the largest numerical value in each
group.
-
-
Set the Hide groups of less than parameter in
order to decide what groups to show in the result chart and matching table. This
parameter enables you to hide groups of small group size. -
Click the Chart button in the wizard to
execute the Job in the defined configuration and have the results directly in
the wizard. The matching chart gives a global picture about the duplicates in the analyzed
data. The matching table indicates the details of the items in each group,
colors the groups in accordance with their color in the matching chart and
indicates with true the records which are
master records. The master record in each group is the result of merging two
similar records according to the phonetic algorithm and survivorship rule. The
master record is a new record that does not exist in the input data. - Click OK to close the wizard.
Finalizing the Job and executing it
-
Double-click the tLogRow component to display
its Basic settings view and define the
component properties. -
Save your Job and press F6 to execute
it.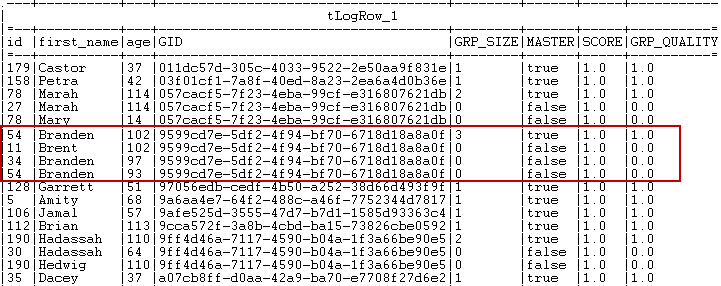 Similar records are grouped together. The number of records in each group is
listed in the GRP_SIZE column and computed only on the
master record. The MASTER column indicates with true or false if
the corresponding record is a master record or not a master record. The master
record is created by merging the record which best matches the phonetic
algorithms with the record which has the largest age value. The
SCORE column lists the calculated similarity between
the input record and the master record according to the Soundex matching algorithm.The identifier for each group, which is of String data
type, is listed in the GID column next to the corresponding
record. This identifier will be of the data type Long for
Jobs that are migrated from older releases. To have the group identifier as
String, you must replace the tMatchGroup component in the imported Job with tMatchGroup from the studio Palette.
tMatchGroup MapReduce properties
These properties are used to configure tMatchGroup running in the MapReduce Job framework.
The MapReduce
tMatchGroup component belongs to the Data Quality family.
The component in this framework is available when you have subscribed to any Talend Platform product with Big Data or Talend Data
Fabric.
Basic settings
|
Schema and Edit |
A schema is a row description, it defines the number of fields to be Click Sync columns to retrieve the The output schema of this component contains the following read-only
GID: provides a group identifier of the data type
String. Note:
All Jobs with tMatchGroup
GRP_SIZE: counts the number of records in the
MASTER: identifies, by Each input record will be compared to the master record, if they
SCORE: measures the distance between the input In case the tMatchGroup component is
GRP_QUALITY: provides the quality of similarities |
|
|
Built-in: You create and store the |
|
|
Repository: You have already created |
|
Matching Algorithm |
Select from the list the algorithm you want to use in the component: If you converted a standard Job using tMatchGroup with the T-Swoosh algorithm to a Map/Reduce Job, select Simple VSR from the list and save the |
| Key Definition |
Input Key Attribute Select the column(s) from the input flow on which you want to apply a Note:
When you select a date column on which to apply an algorithm or a matching algorithm, For example, if you want to only compare the year in the date, in the component schema |
|
Matching Function Select a matching algorithm from the list:
Exact: matches each processed entry
Exact – ignore case: matches each
Soundex: matches processed entries
Levenshtein (edit distance):
Metaphone: Based on a phonetic
Double Metaphone: a new version of
Soundex FR: matches processed entries
Jaro: matches processed entries
Jaro-Winkler: a variant of Jaro, but
Fingerprint key: matches entries
after doing the following sequential process:
q-grams: matches processed entries by
Hamming: calculates the minimum
custom…: enables you to load an For further information about how to load an external Java library, For further information about how to create a custom matching For a related scenario about how to use a custom matching algorithm, |
|
|
Custom Matcher When you select Custom as the For example, to use a MyDistance.class class |
|
|
Weight Set a numerical weight for each attribute (column) of the key |
|
|
Handle Null To handle null values, select from the list the null operator you want
Null Match Null: a Null attribute
Null Match None: a Null attribute
Null Match All: a Null attribute For example, if we have two columns, name and If we have two records: “Doe”, “John” “Doe”, “” Depending on the operator you choose, these two records may or may not
Null Match Null: they do not
Null Match None: they do not Null Match All: they match. And for the records: “Doe”, “” “Doe”, “” Null Match Null: they match.
Null Match None: they do not Null Match All: they match. |
|
|
Match Threshold |
Enter the match probability. Two data records match when the You can enter a different match threshold for each match rule. |
|
Blocking Selection |
Input Column If required, select the column(s) from the input flow according to Blocking reduces the number of pairs of records that needs to be Using blocking column(s) is very useful when you are processing very |
Advanced settings
|
Store on disk |
Select the Store on disk check box if
Max buffer size: Type in the size of
Temporary data directory path: Set |
|
Multiple output |
Select the Separate output check box –Uniques: when the group score –Matches: when the group score –Suspects: when the group score
Confident match threshold: set a |
|
Multi-pass |
Select this check box to enable a tMatchGroup For an example Job, see Scenario 2: Matching customer data through multiple passes |
|
Sort the output data by GID |
Select this check box to group the output data by the group |
|
Output distance details |
Select this check box to add an output column Note:
When you use two tMatchGroup |
|
Display detailed labels |
Select this check box to have in the output For example, if you try to match on first name and last name fields, |
|
tStatCatcher Statistics |
Select this check box to collect log data at the component level. Note |
Global Variables
|
Global Variables |
ERROR_MESSAGE: the error message generated by the A Flow variable functions during the execution of a component while an After variable To fill up a field or expression with a variable, press Ctrl + For further information about variables, see |
Usage
|
Usage rule |
In a You need to use the Hadoop Configuration tab in the For further information about a For a scenario demonstrating a Map/Reduce Job using this component, Note that in this documentation, unless otherwise |
Working principle
This component implements the MapReduce model, based on the blocking keys defined in
the Blocking definition table of the Basic settings view.
This implementation proceeds as follows:
-
Splits the input rows in groups of a given size.
-
Implements a Map Class that creates a map between each key and a list of
records. -
Shuffles the records to group those with the same key together.
-
Applies, on each key, the algorithm defined in the Key
definition table of the Basic
settings view.Then accordingly, this component reads the records, compares them with the
master records, groups the similar ones, and classes each of the rest as a
master record. -
Outputs the groups of similar records with their group IDs, group sizes,
matching distances and scores.
Configuration wizard in Map/Reduce Jobs
The match results on multiple conditions will list data
records that meet any of the defined rules.
You can not open
the configuration wizard unless you link an input component to the tMatchGroup component.
configuration wizard in tMatchGroup, you can:
-
define multiple conditions using several match rules to group
data, -
set different match intervals for each rule,
-
import match rules created and tested in the studio and stored in
the repository, and use them in your match Jobs. You can only import rules
configured with the VSR algorithm. For further information, see Importing match rules from the studio repository. -
select a blocking key to partition data.
-
Click the [+] button on the match rule
bar. -
Set the parameters for the new rule in the Key
definition table and define its match interval. -
Repeat the above steps to create as many match rules as needed. You can define
a different match interval for each rule.When you define multiple rules, the Job conducts an OR match operation. It
evaluates data records against the first rule and the records that match are not
evaluated against the second rule. -
In the Blocking Selection table, select the
column(s) from the input flow which you want to use as a blocking key.Defining a blocking key is not mandatory but is very useful when you are
processing big data sets. A blocking key partitions data in blocks and so
reduces the number of records that need to be examined. This key can come from a
tGenKey component (and would be called
T_GEN_KEY) or directly from the input schema. -
At the bottom right corner of the wizard, click either:
-
OK to save the current
configuration. -
Cancel to close the wizard and keep
the configuration saved initially in the wizard.
-
Scenario: Matching data through multiple passes using Map/Reduce components
This scenario applies only to a subscription-based Talend Platform solution with Big data or Talend Data Fabric.
Note that
Talend
Map/Reduce components are available only to users
who subscribed to Big Data.
This scenario shows how to create a
Talend
Map/Reduce Job to match data by
using Map/Reduce components. It generates Map/Reduce code and runs right in
Hadoop.

The Job in this scenario, groups similar customer records by running through two
subsequent matching passes (tMatchGroup components) and
outputs the calculated matches in groups. Each pass provides its matches to the pass
that follows in order for the latter to add more matches identified with new rules and
blocking keys.
This Job is a duplication of the Standard data
integration Job described in Scenario 2: Matching customer data through multiple passes where standard components are replaced with Map/Reduce components.
You can use
Talend Studio
to automatically
convert the standard Job in the previous section to a Map/Reduce Job. This way, you do
not need to redefine the settings of the components in the Job.
Before starting to replicate this scenario, ensure that you have appropriate rights
and permissions to access the Hadoop distribution to be used.
Converting the Job
-
In the Repository tree view of the
Integration
perspective of
Talend Studio
,
right-click the Job you have created in the earlier scenario to open its
contextual menu and select Edit
properties.Then the [Edit properties] dialog box is
displayed. Note that the Job must be closed before you are able to make any
changes in this dialog box.This dialog box looks like the image below:
 Note that you can change the Job name as well as the other descriptive
information about the Job from this dialog box. -
From the Job Type list, select Big Data Batch. Then a Map/Reduce Job using the same
name appears under the Big Data Batch sub-node
of the Job Design node.
Setting up the Job
-
Double-click the new Map/Reduce Job to open it in the workspace.
The Map/Reduce component Palette is opened.

-
Delete tMysqlInput in this scenario as it is
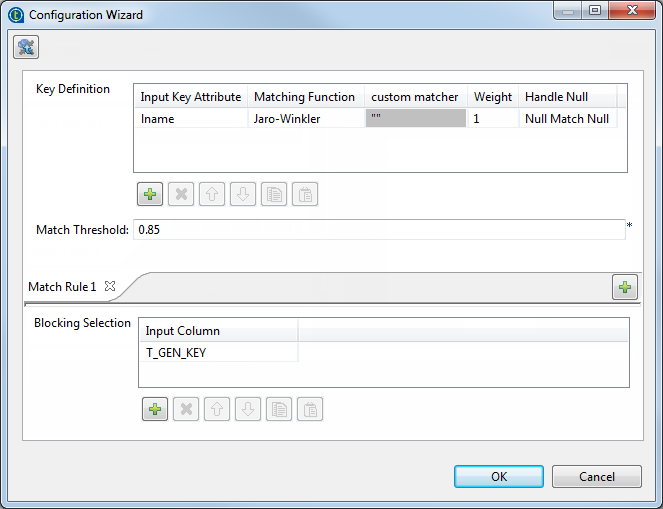
not a Map/Reduce component and use tRowGenerator in its place. Link it to tGenKey with a Row > Main
link. -
Double-click tRowGenerator to open its
editor.
- Define the schema you want to use to write data in Hadoop.
-
Click OK to validate your schema and close
the editor. -
Leave the settings of the other components as you defined initially in the
standard version of the Job.
Setting up Hadoop connection
-
Click Run to open its view and then click the
Hadoop Configuration tab to display its
view for configuring the Hadoop connection for this Job. -
From the Property type list,
select Built-in. If you have created the
connection to be used in Repository, then
select Repository and thus the Studio will
reuse that set of connection information for this Job. -
In the Version area, select the
Hadoop distribution to be used and its version.If you cannot find from the list the distribution corresponding to yours,
select Custom so as to connect to a
Hadoop distribution not officially supported in the Studio. For a
step-by-step example about how to use this Custom option, see Connecting to a custom Hadoop distribution.If you use Google Cloud Dataproc, see Defining the Dataproc connection parameters for MapReduce Jobs.
Along with the evolution of Hadoop, please note the following changes:-
If you use Hortonworks Data
Platform V2.2, the configuration files of your
cluster might be using environment variables such as ${hdp.version}. If this is your situation,
you need to set the mapreduce.application.framework.path property in the
Hadoop properties table
with the path value explicitly pointing to the MapReduce
framework archive of your cluster. For
example:1mapreduce.application.framework.path=/hdp/apps/2.2.0.0-2041/mapreduce/mapreduce.tar.gz#mr-framework -
If you use Hortonworks Data
Platform V2.0.0, the type of the operating
system for running the distribution and a
Talend
Job must be the same, such as Windows or Linux.
Otherwise, you have to use
Talend
Jobserver to execute the Job in the same type of
operating system in which the Hortonworks Data Platform V2.0.0 distribution
you are using is run.
-
-
In the Name node field, enter the location of
the master node, the NameNode, of the distribution to be used. For example,
hdfs://tal-qa113.talend.lan:8020.-
If you are using a MapR distribution, you can simply leave maprfs:/// as it is in this field; then the MapR
client will take care of the rest on the fly for creating the connection. The
MapR client must be properly installed. For further information about how to set
up a MapR client, see the following link in MapR’s documentation: http://doc.mapr.com/display/MapR/Setting+Up+the+Client -
If you are using WebHDFS, the location should be
webhdfs://masternode:portnumber; if this WebHDFS is secured
with SSL, the scheme should be swebhdfs and you need to use
a tLibraryLoad in the Job to load the library required by
the secured WebHDFS.
-
-
In the Resource Manager field,
enter the location of the ResourceManager of your distribution. For example,
tal-qa114.talend.lan:8050.-
Then you can continue to set the following parameters depending on the
configuration of the Hadoop cluster to be used (if you leave the check
box of a parameter clear, then at runtime, the configuration about this
parameter in the Hadoop cluster to be used will be ignored):-
Select the Set resourcemanager
scheduler address check box and enter the Scheduler address in
the field that appears. -
Select the Set jobhistory
address check box and enter the location of the JobHistory
server of the Hadoop cluster to be used. This allows the metrics information of
the current Job to be stored in that JobHistory server. -
Select the Set staging
directory check box and enter this directory defined in your
Hadoop cluster for temporary files created by running programs. Typically, this
directory can be found under the yarn.app.mapreduce.am.staging-dir property in the configuration files
such as yarn-site.xml or mapred-site.xml of your distribution. -
Select the Use datanode
hostname check box to allow the Job to access datanodes via
their hostnames. This actually sets the dfs.client.use.datanode.hostname property to true. When connecting to a S3N filesystem, you must select this check
box.
-
-
-
If you are accessing the Hadoop cluster running
with Kerberos security, select this check box, then, enter the Kerberos
principal name for the NameNode in the field displayed. This enables you to use
your user name to authenticate against the credentials stored in Kerberos.
-
If this cluster is a MapR cluster of the version 4.0.1 or later, you can set the MapR
ticket authentication configuration in addition or as an alternative by following the
explanation in Connecting to a security-enabled MapR.Keep in mind that this configuration generates a new MapR security ticket for the username
defined in the Job in each execution. If you need to reuse an existing ticket issued for the
same username, leave both the Force MapR ticket
authentication check box and the Use Kerberos
authentication check box clear, and then MapR should be able to automatically
find that ticket on the fly.
In addition, since this component performs Map/Reduce computations, you
also need to authenticate the related services such as the Job history server and
the Resource manager or Jobtracker depending on your distribution in the
corresponding field. These principals can be found in the configuration files of
your distribution. For example, in a CDH4 distribution, the Resource manager
principal is set in the yarn-site.xml file and the Job history
principal in the mapred-site.xml file.If you need to use a Kerberos keytab file to log in, select Use a keytab to authenticate. A keytab file contains
pairs of Kerberos principals and encrypted keys. You need to enter the principal to
be used in the Principal field and the access
path to the keytab file itself in the Keytab
field. This keytab file must be stored in the machine in which your Job actually
runs, for example, on a Talend
Jobserver.Note that the user that executes a keytab-enabled Job is not necessarily
the one a principal designates but must have the right to read the keytab file being
used. For example, the user name you are using to execute a Job is user1 and the principal to be used is guest; in this
situation, ensure that user1 has the right to read the keytab
file to be used. -
-
In the User name field, enter the login user
name for your distribution. If you leave it empty, the user name of the machine
hosting the Studio will be used. -
In the Temp folder field, enter the path in
HDFS to the folder where you store the temporary files generated during
Map/Reduce computations. -
Leave the default value of the Path separator in
server as it is, unless you have changed the separator used by your
Hadoop distribution’s host machine for its PATH variable or in other words, that
separator is not a colon (:). In that situation, you must change this value to the
one you are using in that host.
-
Leave the Clear temporary folder check box
selected, unless you want to keep those temporary files. -
Leave the Compress intermediate map output to reduce
network traffic check box selected, so as to spend shorter time
to transfer the mapper task partitions to the multiple reducers.However, if the data transfer in the Job is negligible, it is recommended to
clear this check box to deactivate the compression step, because this
compression consumes extra CPU resources. -
If you need to use custom Hadoop properties, complete the Hadoop properties table with the property or
properties to be customized. Then at runtime, these changes will override the
corresponding default properties used by the Studio for its Hadoop
engine.For further information about the properties required by Hadoop, see Apache’s
Hadoop documentation on http://hadoop.apache.org, or
the documentation of the Hadoop distribution you need to use. -
If the HDFS transparent encryption has been enabled in your cluster, select
the Setup HDFS encryption configurations check
box and in the HDFS encryption key provider field
that is displayed, enter the location of the KMS proxy.
For further information about the HDFS transparent encryption and its KMS proxy, see Transparent Encryption in HDFS.
-
If the Hadoop distribution to be used is Hortonworks Data Platform V1.2 or Hortonworks
Data Platform V1.3, you need to set proper memory allocations for the map and reduce
computations to be performed by the Hadoop system.
In that situation, you need to enter the values you need in the Mapred
job map memory mb and the Mapred job reduce memory
mb fields, respectively. By default, the values are both 1000 which are normally appropriate for running the
computations.If the distribution is YARN, then the memory parameters to be set become Map (in Mb), Reduce (in Mb) and
ApplicationMaster (in Mb), accordingly. These fields
allow you to dynamically allocate memory to the map and the reduce computations and the
ApplicationMaster of YARN.For further information about the Resource Manager, its scheduler and the
ApplicationMaster, see YARN’s documentation such as http://hortonworks.com/blog/apache-hadoop-yarn-concepts-and-applications/.For further information about how to determine YARN and MapReduce memory configuration
settings, see the documentation of the distribution you are using, such as the following
link provided by Hortonworks: http://docs.hortonworks.com/HDPDocuments/HDP2/HDP-2.0.6.0/bk_installing_manually_book/content/rpm-chap1-11.html. -
If you are using Cloudera V5.5+, you can select the Use Cloudera Navigator check box to enable the Cloudera Navigator of your
distribution to trace your Job lineage to the component level, including the schema
changes between components.
With this option activated, you need to set the following parameters:
-
Username and Password: this is the credentials you use to connect to your Cloudera
Navigator. -
Cloudera Navigator URL : enter the location
of the Cloudera Navigator to be connected to. -
Cloudera Navigator Metadata URL: enter the
location of the Navigator Metadata. -
Activate the autocommit option: select this
check box to make Cloudera Navigator generate the lineage of the current Job at the end
of the execution of this Job.Since this option actually forces Cloudera Navigator to generate lineages of
all its available entities such as HDFS files and directories, Hive queries or Pig
scripts, it is not recommended for the production environment because it will slow the
Job. -
Kill the job if Cloudera Navigator fails: select this check
box to stop the execution of the Job when the connection to your Cloudera Navigator fails.Otherwise, leave it clear to allow your Job to continue to run.
-
Disable SSL validation: select this check box to
make your Job to connect to Cloudera Navigator without the SSL validation
process.This feature is meant to facilitate the test of your Job but is not
recommended to be used in a production cluster.
-
-
If you are using Hortonworks Data Platform V2.4.0 onwards and you have
installed Atlas in your cluster, you can select the Use
Atlas check box to enable Job lineage to the component level, including the
schema changes between components.
With this option activated, you need to set the following parameters:
-
Atlas URL : enter the location of the Atlas
to be connected to. It is often http://name_of_your_atlas_node:port -
Die on error: select this check box to stop the Job
execution when Atlas-related issues occur, such as connection issues to Atlas.Otherwise, leave it clear to allow your Job to continue to run.
In the Username field and the Password field, enter the authentication information for access
to Atlas. -
Executing the Job
it.
provides its matches to the pass that follows and more matches are
identified with the rule and blocking key of the second pass.
second pass.