tMatchModel
Generates the matching model that is used by the tMatchPredict component to automatically predict the labels for the suspect
pairs and groups records which match the label(s) set in the component
properties.
For further information about the
tMatchPairing and tMatchPredict
components, see the tMatchPairing and
tMatchPredict documentation on Talend Help Center (https://help.talend.com).
tMatchModel reads the sample of the
suspect pairs outputted by tMatchPairing after you
label each second element in a pair, analyzes the data using the Random Forest algorithm
and generates a matching model.
You can use the sample suspect records labeled in a Grouping campaign defined on the
Talend Data Stewardship
server with tMatchModel.
For further information about Grouping campaigns, see
documentation on Talend Help Center (https://help.talend.com).
Spark 1.6+ and 2.0:
-
Spark 1.6: CDH5.7, CDH5.8, HDP2.4.0, HDP2.5.0, MapR5.2.0,
EMR4.5.0, EMR4.6.0. -
Spark 2.0: EMR5.0.0.
tMatchModel properties for Apache Spark Batch
These properties are used to configure tMatchModel running in the Spark Batch Job framework.
The Spark Batch
tMatchModel component belongs to the Data Quality family.
The component in this framework is available when you have subscribed to any Talend Platform product with Big Data or Talend Data
Fabric.
Basic settings
|
Define a storage configuration |
Select the configuration component to be used to provide the configuration If you leave this check box clear, the target file system is the local The configuration component to be used must be present in the same Job. For |
|
Schema and Edit |
A schema is a row description. It defines the number of fields (columns) to Click Sync columns to retrieve the schema from Click Edit schema to make changes to the schema.
|
|
|
Built-In: You create and store the |
|
|
Repository: You have already created |
|
Matching key |
Select the columns on which you want to base the match |
|
Matching label column |
Select the column from the input flow which holds the If you select the Integration with Data |
|
Matching model location |
Select the Save the model on If you want to store the model in a specific file system, The button for browsing does not work with the Spark Local mode; if you are using the Spark Yarn or the Spark Standalone mode, |
|
Integration with Data Stewardship |
Select this check box to set the connection parameters to the If you select this check box, tMatchModel uses the |
|
Data Stewardship Configuration |
|
Advanced settings
|
Max token number for phonetic |
Set the maximum number of the tokens to be used in the When the number of tokens exceeds what has been defined |
|
Random Forest hyper-parameters |
Number of trees range: Enter a Increasing this range can improve the accuracy by
Maximum tree-depth range: Enter a Generally speaking, a deeper decision tree is more expressive and thus potentially more |
|
Cross-validation parameters |
Number of folds: Enter a numeric
Evaluation metric type: Select a |
|
Random Forest parameters |
Subsampling rate: Enter the
Subset Strategy: Select the Each strategy takes a different number of features into
|
|
Max Bins |
Enter the numeric value to indicate the maximum number of bins used for splitting The continuous features are automatically transformed to ordered discrete features. |
|
Min Info gain |
Enter the minimum number of information gain to be expected from a parent node to its The default value of the minimum number of information gain is 0.0, meaning that no further information is obtained by splitting a given node. For further information about how the information gain is calculated, see Impurity and Information gain from the Spark documentation. |
|
Min instance per Node |
Enter the minimum number of training instances a node should have to make it valid for The default value is 1, which means when a node has |
|
Impurity |
Select the measure used to select the best split from
For further information about how each of the measures is calculated, see Impurity measures from the Spark documentation. |
|
Set a random seed |
Enter the random seed number to be used for bootstrapping and choosing feature |
|
Data Stewardship Configuration |
This field only appears if you selected the Integration with
Batch Size: Specify the number of records to be Do not change the default value unless you are facing performance issues. |
Usage
|
Usage rule |
This component is used as an intermediate step. This component, along with the Spark Batch component Palette it belongs to, appears only |
|
Spark Batch Connection |
You need to use the Spark Configuration tab in
the Run view to define the connection to a given Spark cluster for the whole Job. In addition, since the Job expects its dependent jar files for execution, you must specify the directory in the file system to which these jar files are transferred so that Spark can access these files:
This connection is effective on a per-Job basis. |
Scenario 1: Generating a matching model from a Grouping campaign
This scenario applies only to a subscription-based Talend Platform solution with Big data or Talend Data Fabric.
tMatchModel reads the sample of suspect pairs computed on a list
of duplicate childhood education centers and labeled by data stewards in Talend Data Stewardship.
It generates several matching models, searches the best combination of the learning
parameters and keeps the best matching model which comes out as the result of cross
validation.
- You have generated the suspect data pairs by using the
tMatchPairing component and labeled them in Talend Data Stewardship. For
further information, see Scenario 1: Computing suspect pairs and writing a sample in Talend Data Stewardship.For further information about handling
grouping tasks, see the documentation on Talend Help Center (https://help.talend.com).
Setting up the Job
-
Drop the tMatchModel component from the
Palette onto the design workspace. -
Check that you have defined the connection to the Spark cluster
in the Run > Spark
Configuration view as described in Selecting the Spark mode.
Generating the matching model
-
Double-click tMatchModel to display the
Basic settings view and define the component
properties.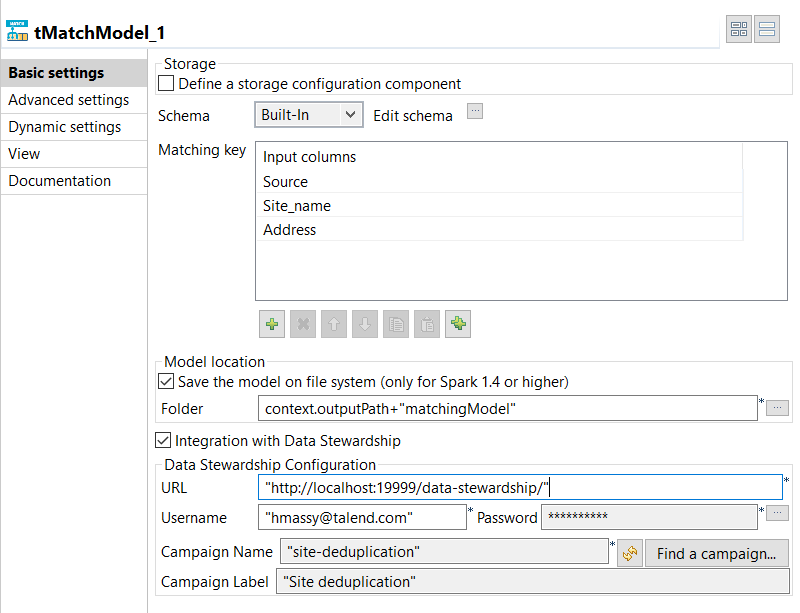
-
In the Matching Key table, click the
[+] button to add rows in the table and select the
columns on which you want to base the match computation.The Original_Id column is ignored in the computation
of the matching model. -
Select the Save the model on file system check box and
in the Folder field, set the path to the local folder
where you want to generate the matching model file. -
Select the Integration with Data Stewardship check box
and set the connection parameters to the Talend Data Stewardship
server.-
In the URL field, enter the address of
the server suffixed with /data-stewardship/, for example http://localhost:19999/data-stewardship/.
-
Enter your login information to the server in the
Username and Password
fields.To enter your password, click the […] button next to the Password field, enter your password between double
quotes in the dialog box that opens and click OK. -
Click Find a campaign to open a dialog
box which lists the campaigns defined on the server and for which you are the owner or
you have the access rights.
-
Select the campaign from which to read the grouping tasks,
Site deduplication in this example, and click
OK.
-
-
Click Advanced settings and set the below
parameters:-
Set the maximum number of the tokens to be used in the phonetic
comparison in the corresponding field. -
In the Random Forest hyper parameters tuning
field, enter the ranges for the decision trees you want to build and
their depth.These parameters are important for the accuracy of the
model. - Leave the other by-default parameters unchanged.
-
Set the maximum number of the tokens to be used in the phonetic
-
Press F6 to execute the
Job and generate the matching model in the output folder.
You can now use this model with the tMatchPredict component to
label all the duplicates computed by tMatchPairing.
For further information, see the online publication about
labeling suspect pairs on Talend Help Center (https://help.talend.com).
Scenario 2: Generating a matching model
This scenario applies only to a subscription-based Talend Platform solution with Big data or Talend Data Fabric.
The tMatchModel component reads the
suspect sample pairs generated by the tMatchPairing component and manually labeled by you.
For further information, see the
tMatchPairing documentation on Talend Help Center (https://help.talend.com).
The tMatchModel component generates several matching models,
searches the best combination of the learning parameters automatically and keeps the
best matching model which comes out as the result of cross validation.
The use case described here uses the following components:
-
A tFileInputDelimited component reads the
source file, which contains the suspect data pairs generated by tMatchPairing. -
A tMatchModel component
generates the features from the suspect records, implements the Random Forest
algorithm and creates a classification model.
Setting up the Job
-
You have generated the suspect data pairs by using the
tMatchPairing component. -
You added a label next to the second record in each suspect pair to say
whether it is a duplicate record or not or whether it is a possible
duplicate as well:1234480060609;DFSS_AgencySiteLies_2012.csv;Catholic Charities of the Archdiocese of Chicago St. Joseph;4800 S. Paulina; st. joseph_1;;480060609;purple_binder_early_childhood.csv;Catholic Charities Chicago - St. Joseph;4800 S Paulina Street; st. joseph_1;0.8058642705131237;YES425760624;chapin_dfss_providers_2011_070212.csv;CHICAGO PUBLIC SCHOOLS GOLDBLATT, NATHAN R.;4257 W ADAMS; r._20;;422560653;chapin_dfss_providers_2011_070212.csv;CHICAGO PUBLIC SCHOOLS ROBINSON, JACKIE R.;4225 S LAKE PARK AVE; r._20;0.8219437219200757;NOThe labels used in this example are YES or
NO, but you can use any label you like and more
than two.
You can find an example of how to compute suspect pairs and
suspect sample from source data on Talend Help Center (https://help.talend.com).
-
Drop the following components from the Palette onto the design workspace:
tFileInputDelimited and tMatchModel. - Connect the components together using the Row > Main link.
-
Check that you have defined the connection to the Spark cluster in the Run > Spark Configuration view. For more information about selecting the Spark mode, see
the documentation on Talend Help Center (https://help.talend.com).

Configuring the input component
-
Double-click tFileInputDelimited to open
its Basic settings view in the Component tab.The input data to be used with
tMatchModel is the suspect data pairs generated
by tMatchPairing. For an example of how to compute
suspect pairs and suspect sample from source data, see the documentation in
Talend Help Center (https://help.talend.com). -
Click the […] button next to Edit
schema to open a dialog box and add columns to the input schema:
Original_Id, Source,
Site_name and Address,
PAIR_ID, SCORE and
LABEL.The input schema is the same used with the sample of suspect pairs generated
by the tMatchPairing component. The column LABEL
column holds the label you manually set on every second record in a
pair.For readability purposes, you can ignore the columns PAIR_ID and SCORE.
-
Click OK in the dialog box and accept to propagate the
changes when prompted. -
In the Folder/File field, set the path to the input
file. -
Set the row and field separators in the corresponding fields and the header and
footer, if any.In this example, the number of row in the Header field
is set to 1.
Generating the matching model
-
Double-click tMatchModel to display the
Basic settings view and define the component
properties.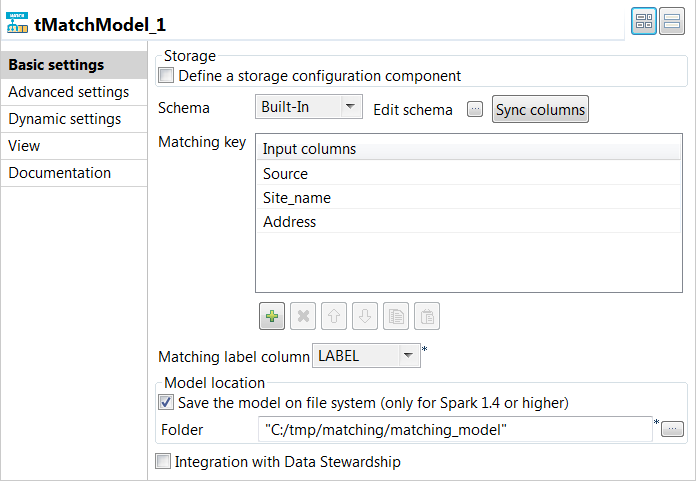
-
In the Matching Key table, click the
[+] button to add rows in the table and select the
columns on which you want to base the match computation.The Original_Id column is ignored in the computation
of the matching model. -
From the matching label
column list, select the column which holds the labels you added
on the suspect records. -
Select the Save the model on file system check box and
in the Folder field, set the path to the local folder
where you want to generate the matching model file. -
Click Advanced settings and set the below
parameters:-
Set the maximum number of the tokens to be used in the phonetic
comparison in the corresponding field. -
In the Random Forest hyper parameters tuning
field, enter the ranges for the decision trees you want to build and
their depth.These parameters are important for the accuracy of the
model. - Leave the other by-default parameters unchanged.
-
Set the maximum number of the tokens to be used in the phonetic
-
Press F6 to execute the
Job and generate the matching model in the output folder.
You can now use this model with the tMatchPredict component to
label all the duplicates computed by tMatchPairing.
For further information, see the online publication about
labeling suspect pairs on Talend Help Center (https://help.talend.com).